Collections in Building BI
This feature allows you to easily organize and publish BBI Dashboards for all users or specific roles.
To make a BBI Dashboard visible to users beyond the collaborators, it must be added to a collection and then published.
Creating a BBI Collection
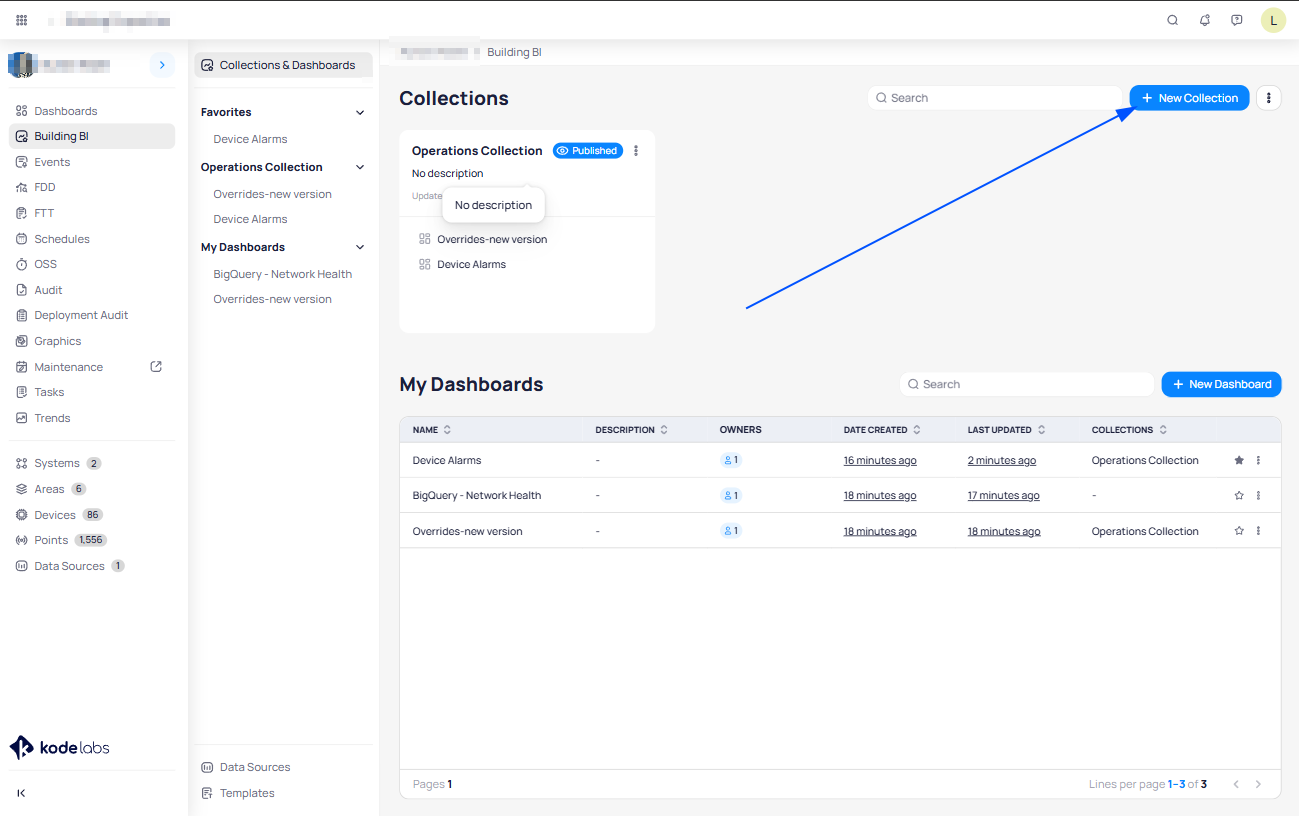
Creating a BBI collection is super easy. Just go to the upper right corner and click “New Collection” button:
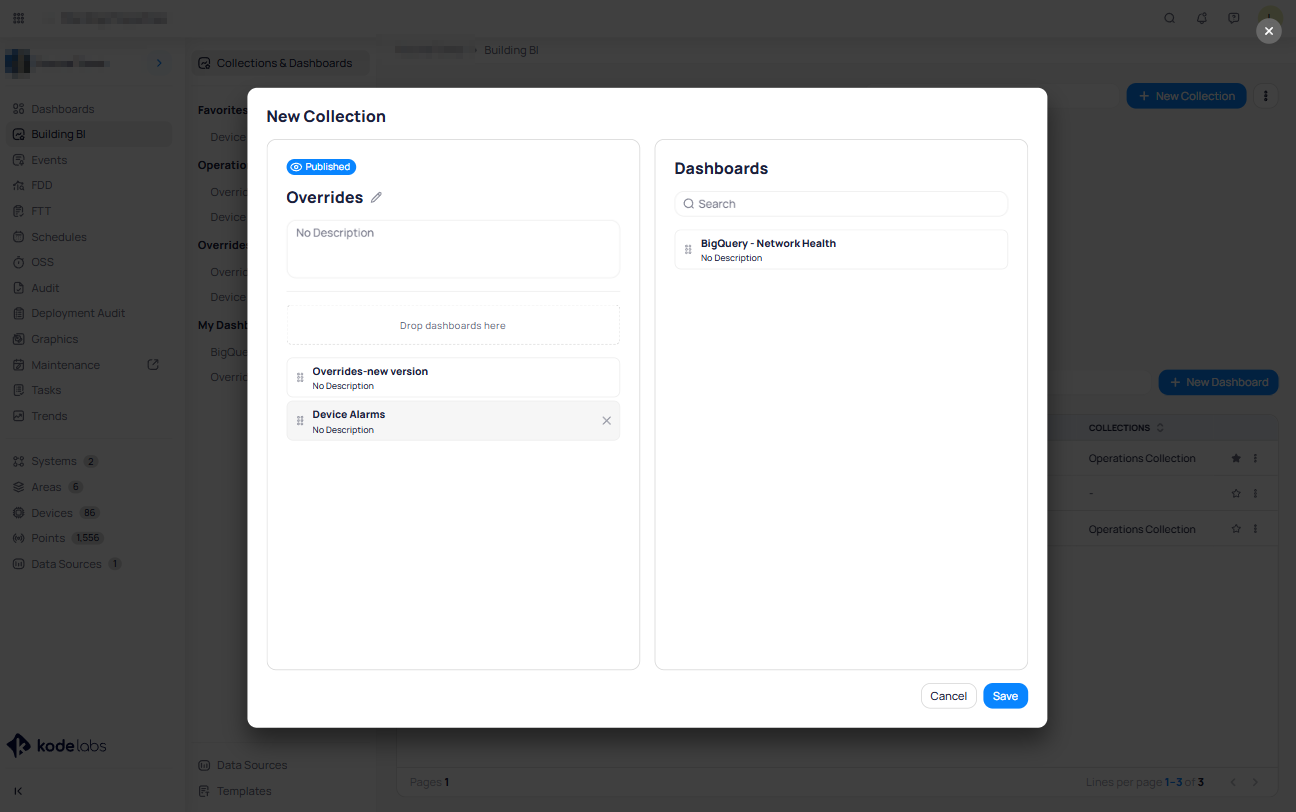
After you clicked the button a new window will appear:
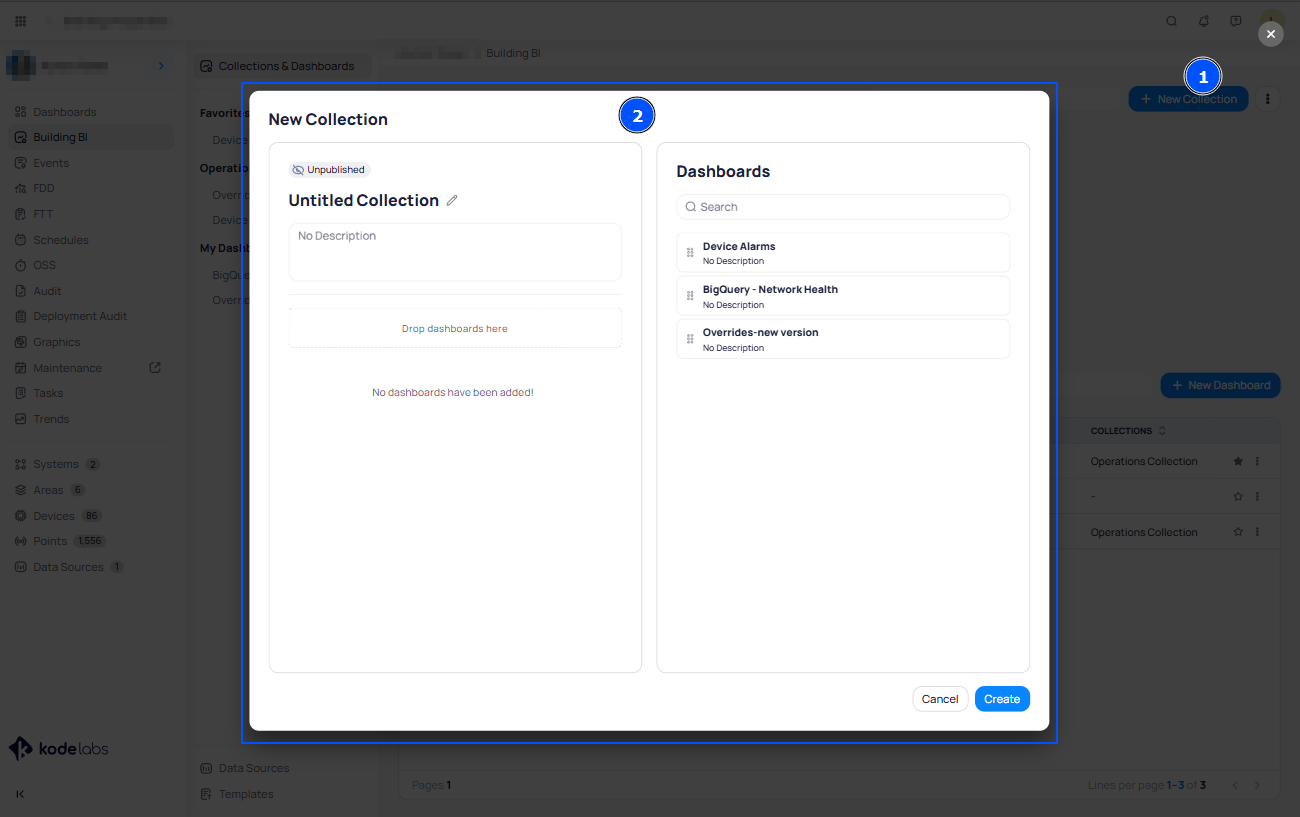
In this window you need to put a name of the collection by clicking on the pencil icon, then deleting the default title and typing a one of your choice or matching the name according to the BBI Dashboards type that will be added in it.
On the right side you will have all BBI Dashboards that are available to be put in the collection. Simply drag and drop them in the left side section where it says “Drop Dashboards here”.
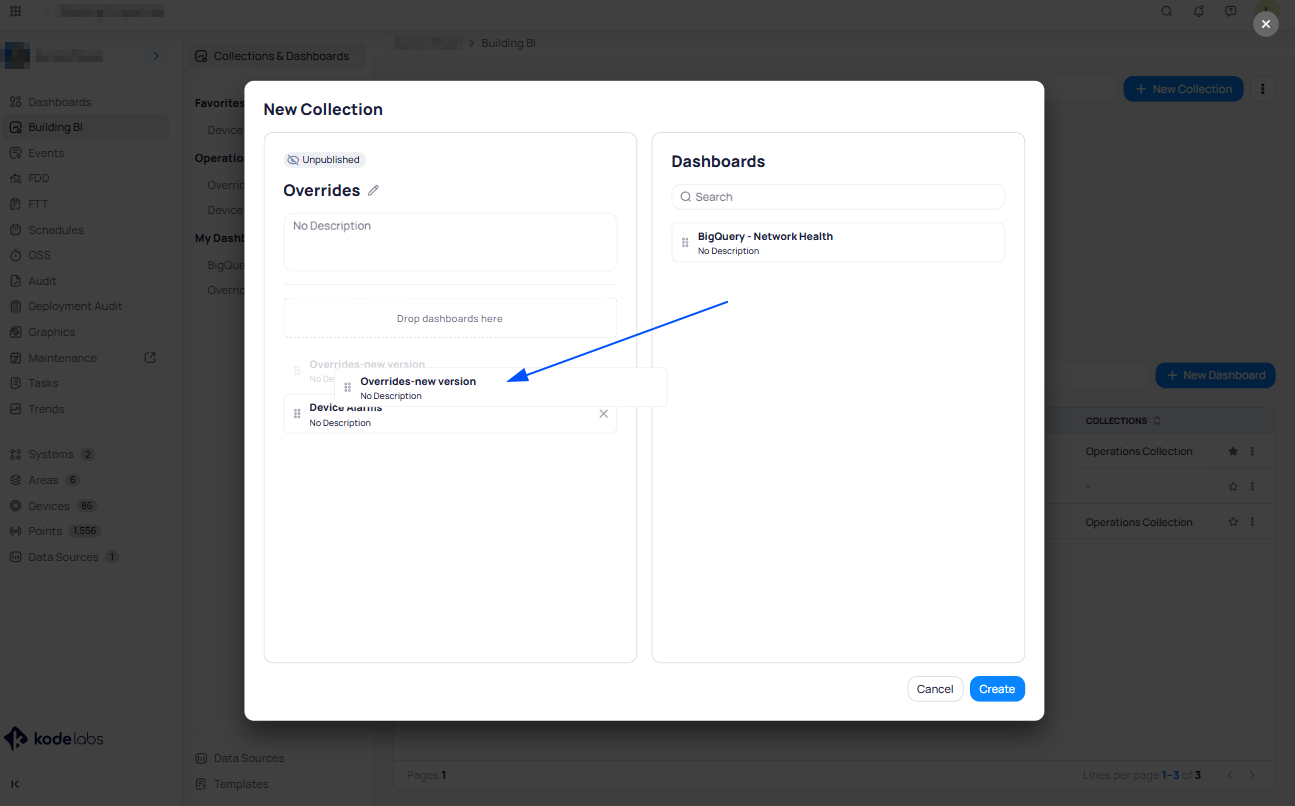
After the list will be populated you can arrange them according to your preference by holding them clicked and moving them:
After you complete the steps you just hit the “Create” button.
When a collection is created it will stay “Unpublished”, this means that this collection is not viewable to other users or roles.
Publishing the collection
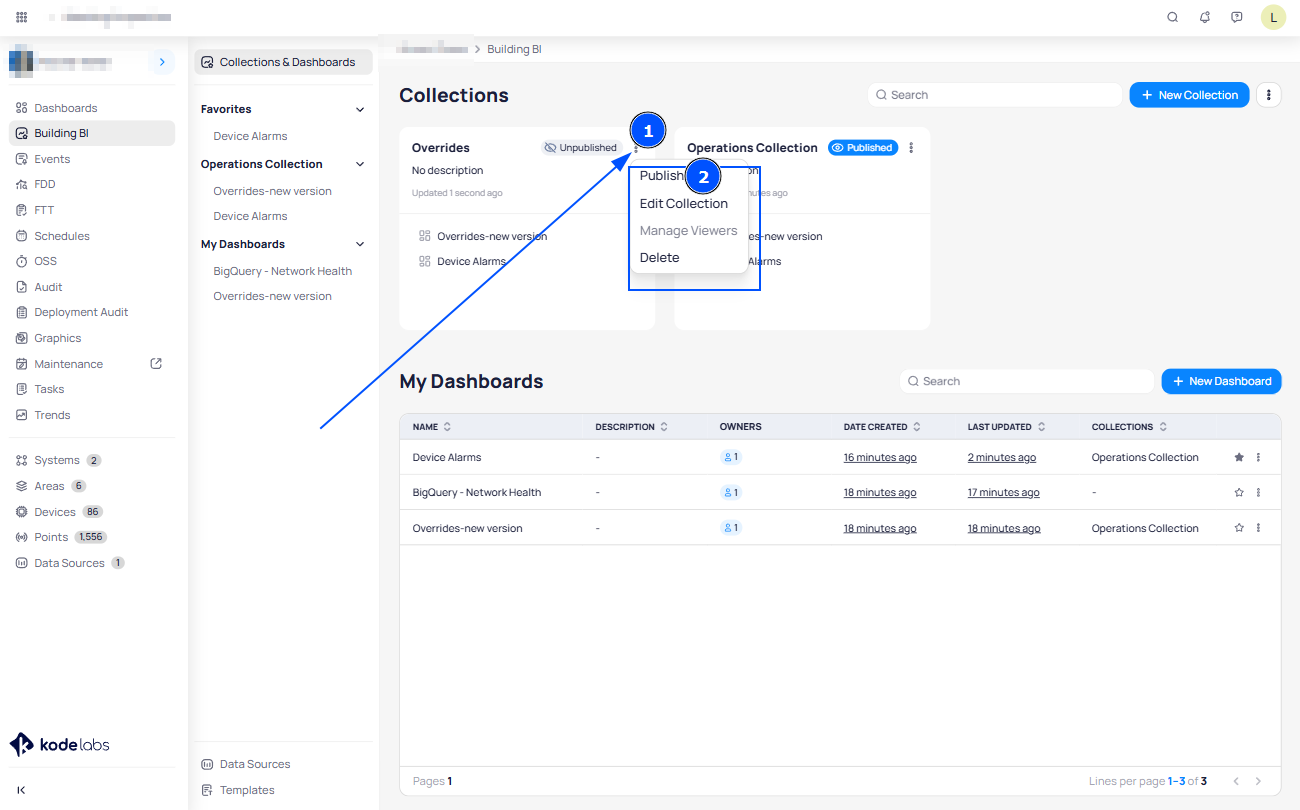
In order to publish it simply click on the three dots of the specific collection and go to the “Publish” option:
When you click on publish option a dialog will appear asking if you want to publish to all or you want to publish to a specific role/s.
If we want to publish to a specific role after clicking the button a new pop up windows will appear where you can click on “Add Role” button:
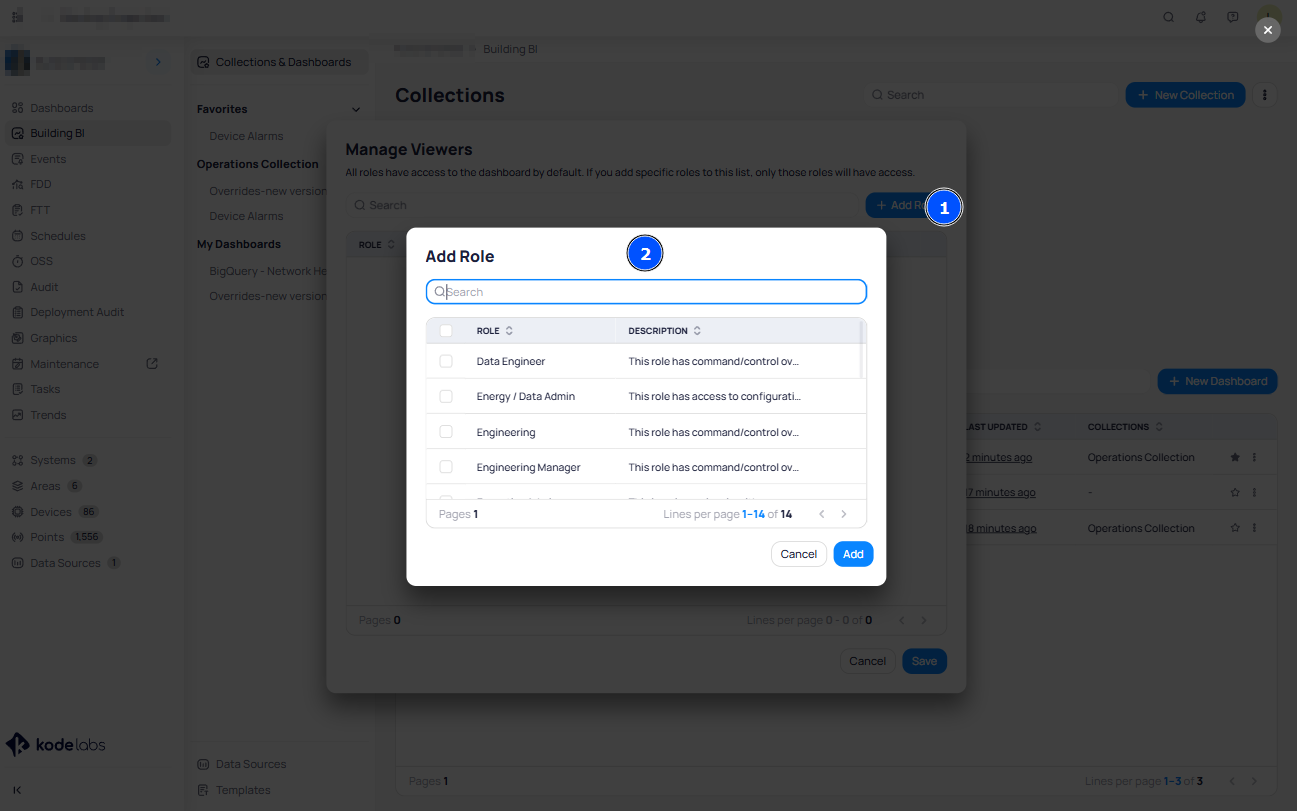
Here you can choose the roles that you want and click Add to go to the list page back:
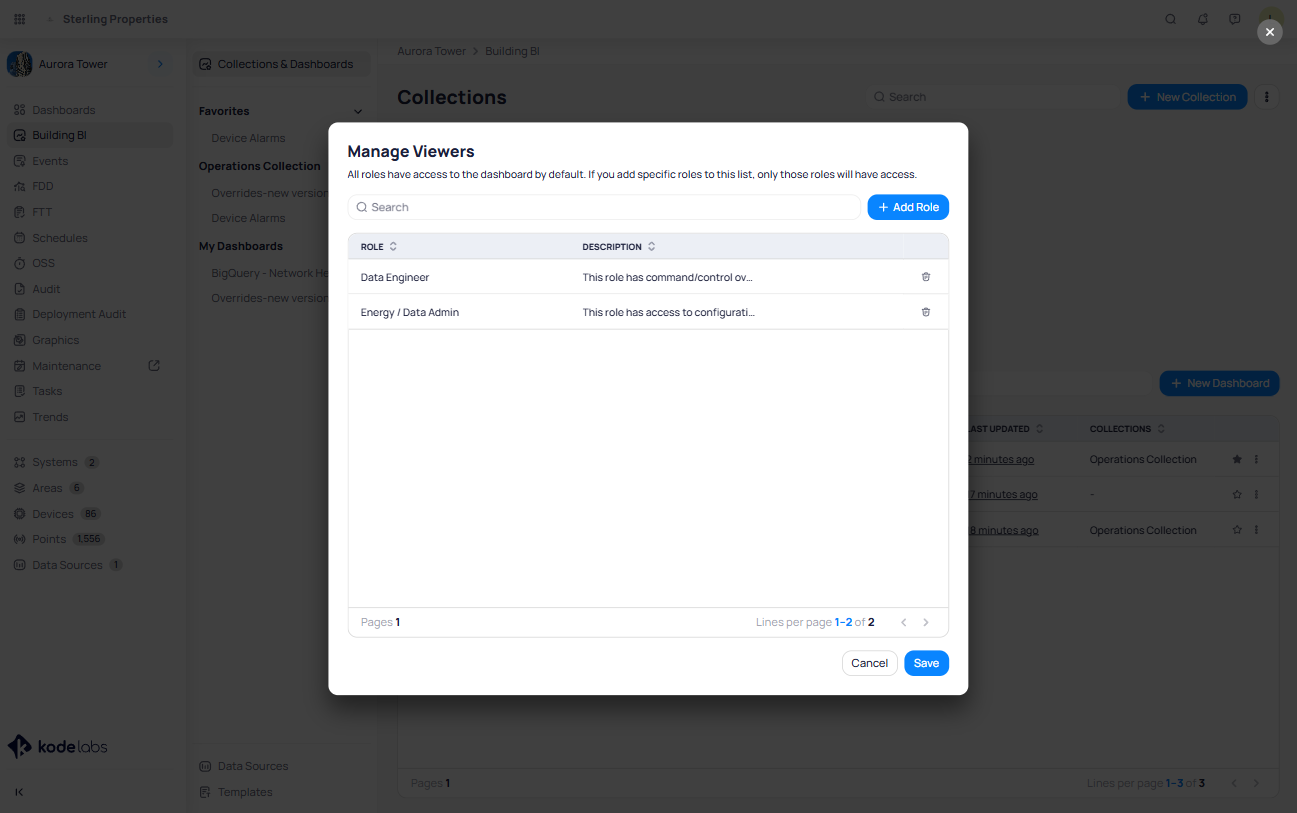
On this view we can see the roles that we just selected or if we published this collection earlier we can manage the roles here if we want to remove or add a role.
Hit the save button for the changes to take effect.
A collection can be only published to a role/s and not to a specific user!
Note: If you want to unpublish the collection simply select the unpublish option from the three dots menu of the collection!
Editing Collection
If you want to edit the saved collection just select the Edit Collection option from the three dots menu of the desired collection. The view and the logic of the working in this dialog is the same as we firstly created a dashboard where we can remove a dashboard from the collection or change the name of the collection:
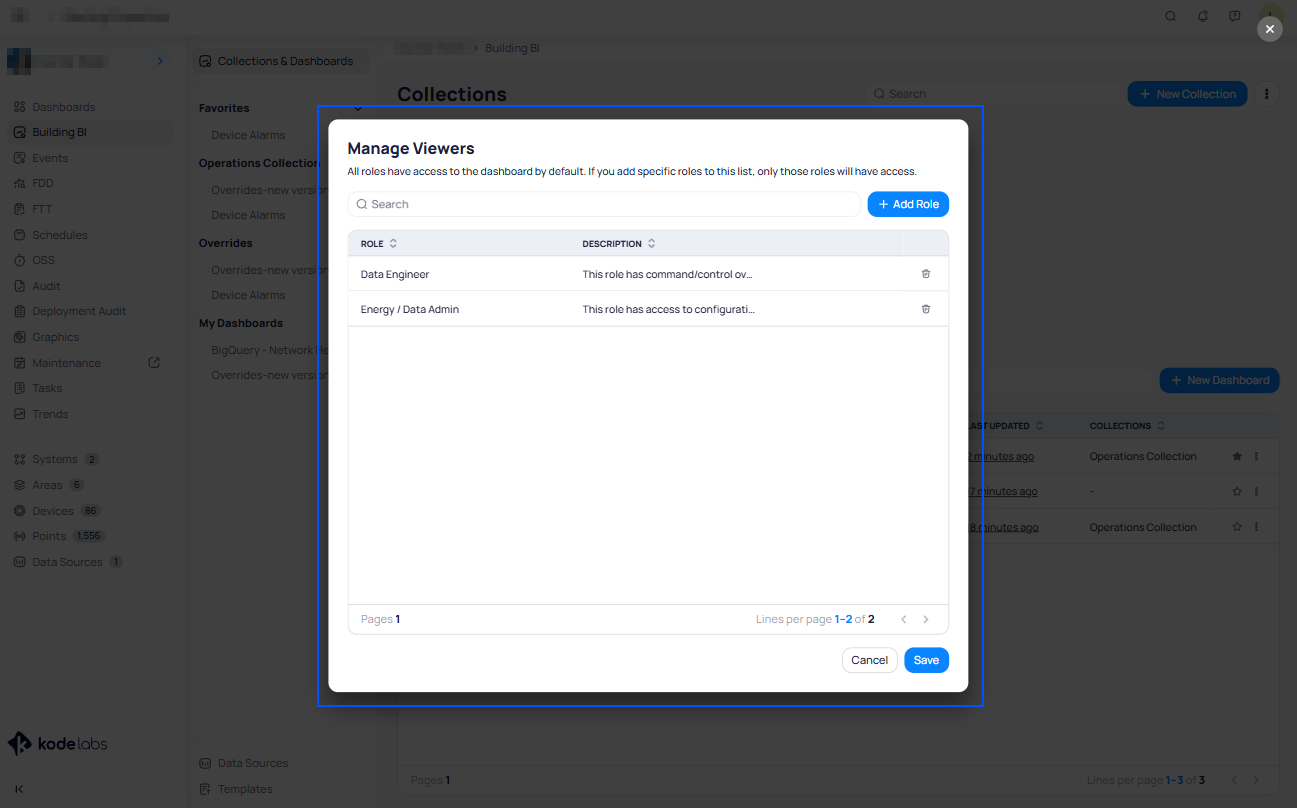
Manage Viewers
If you select the Manage viewers option here you will see a window where you can delete or add a role that this collection is published/visible to:
Deleting a collection
You can delete a collection simply by clicking the delete option from the collections three dotted menu and confirming on the dialog.
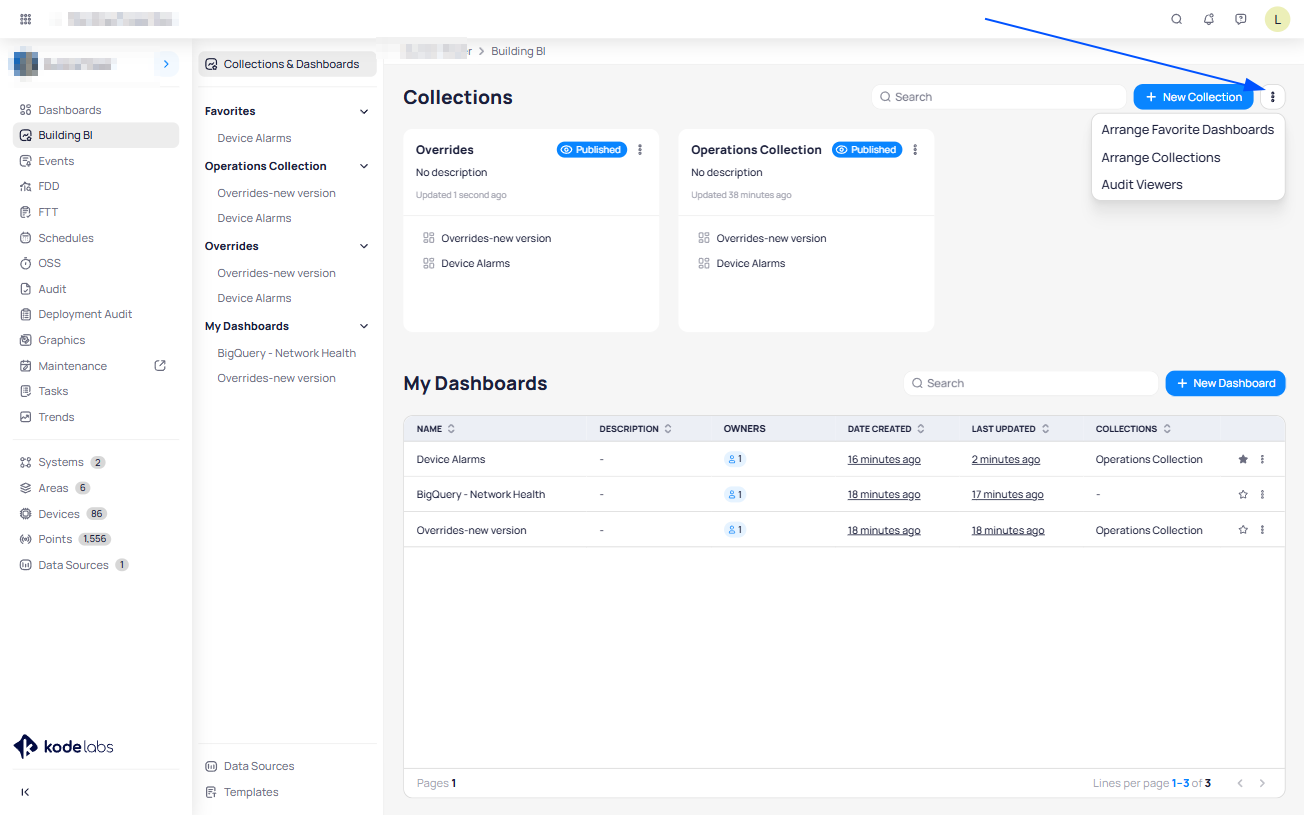
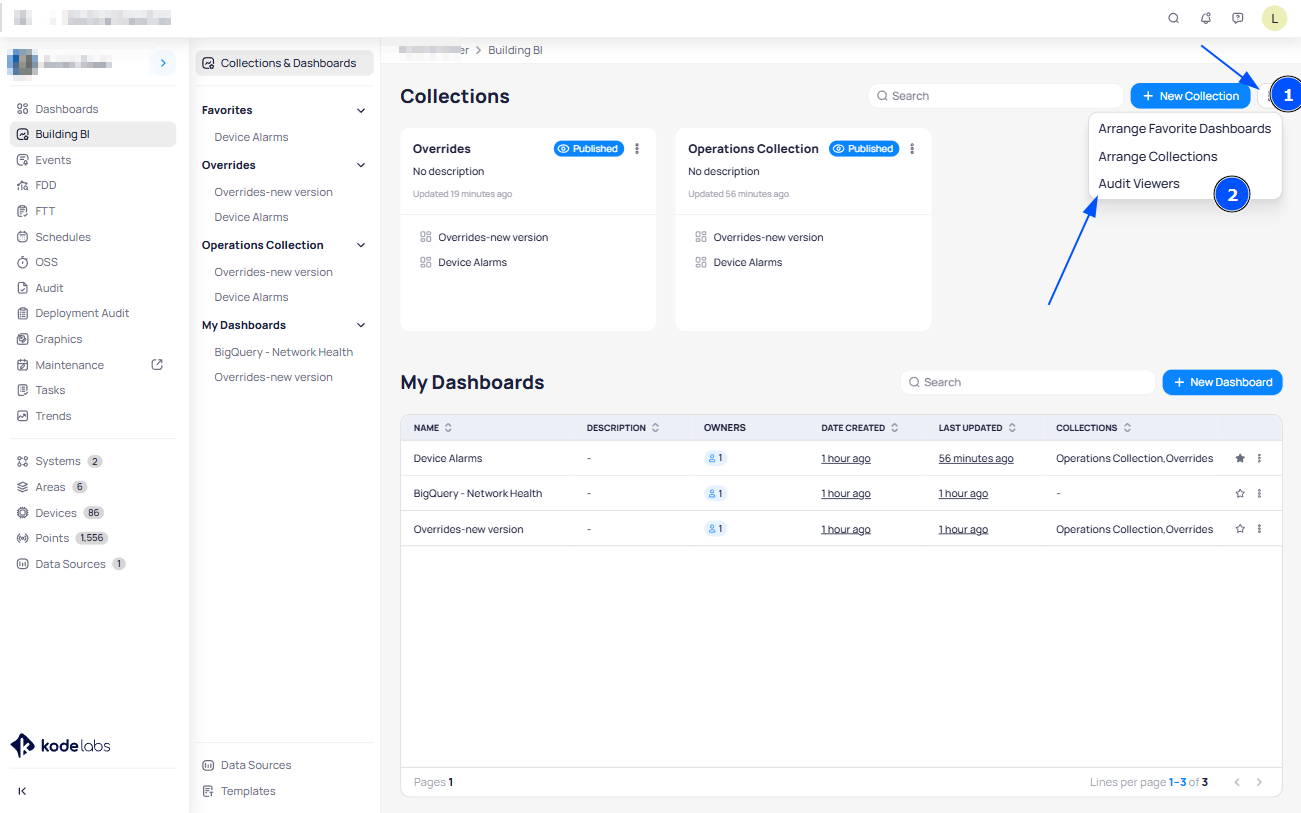
Organizing favorite dashboards and collections
Favorite dashboards and collections can be arranged in a specific order by simply going on the three dotted menu on the right side on top of the page:
Clicking on the Arrange Collections or Favorites dashboards will bring to you a window where you can move the dashboards or collection to your desired order. The arrangement you make here will be reflected in the left side pane of the BBI Module:
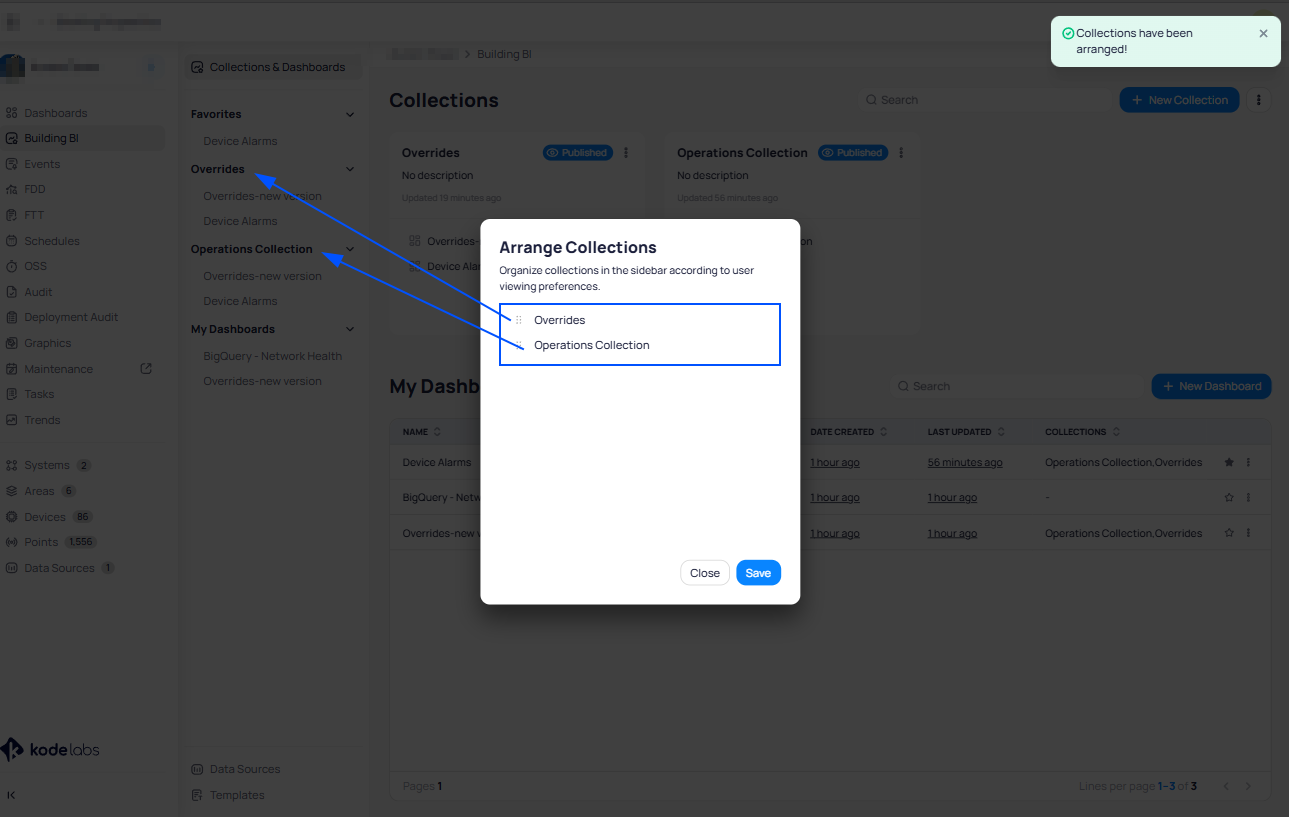
The left pane on the BBI Module will list the favorites dashboards collections and dashboards in a tree list view.
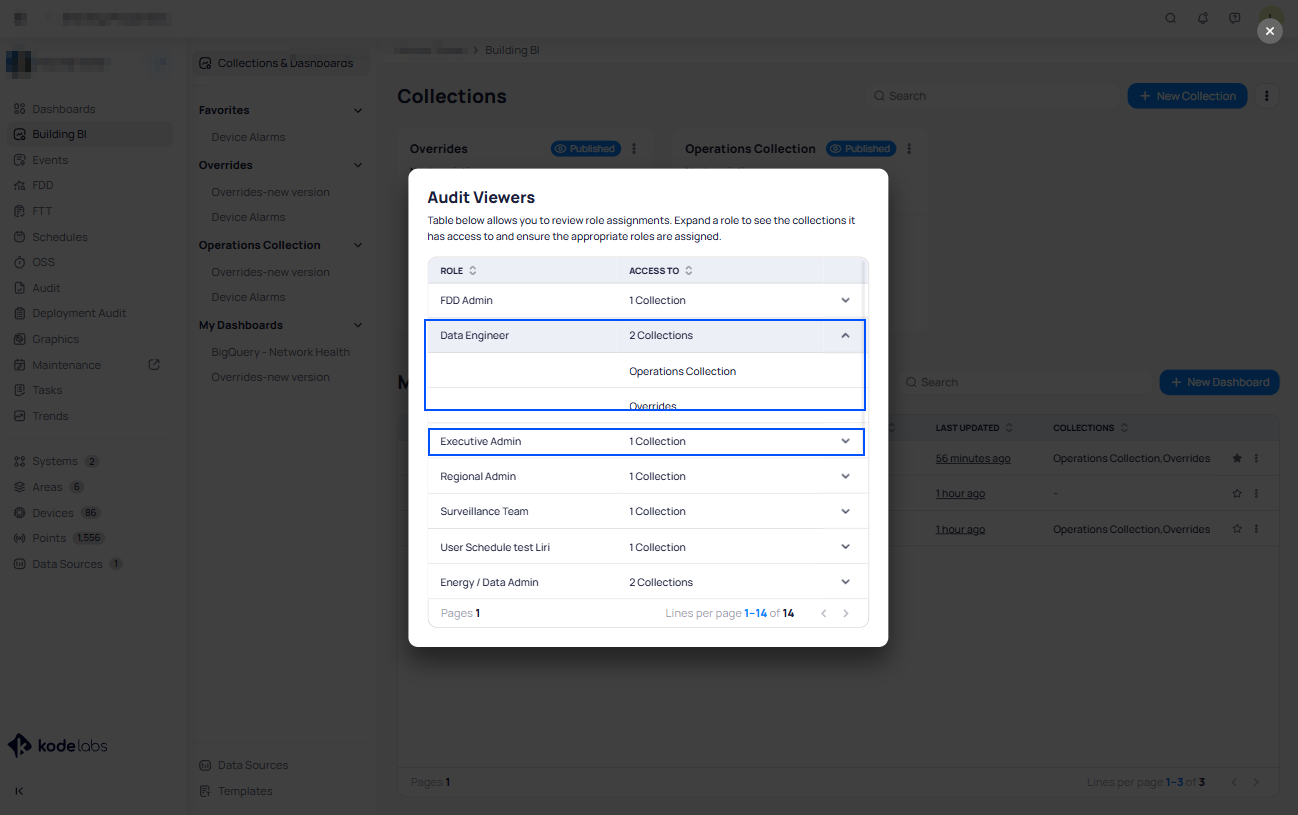
We can also audit viewers by selecting the Audit Viewers option on the three doted menu on top right side of the page:
You will see a new window after you click on that option listing all the roles showing the number of the collections that the role has access to. The collections names can be viewed by clicking on the drop arrow to expand the list:
Navigation widget
The “Navigation” widget helps you to seamlessly jump to another defined page within the current dashboard and even better now this widget can be configured to redirect you to the other desired BBI Dashboard.
This widget it's pretty easy to set up.
Navigate to another page within current dashboard
To add this widget and setup it simply go to edit mode in your desired BBI dashboard.
When you are in editing mode on the right side of the screen go and find the “Navigation widget”:
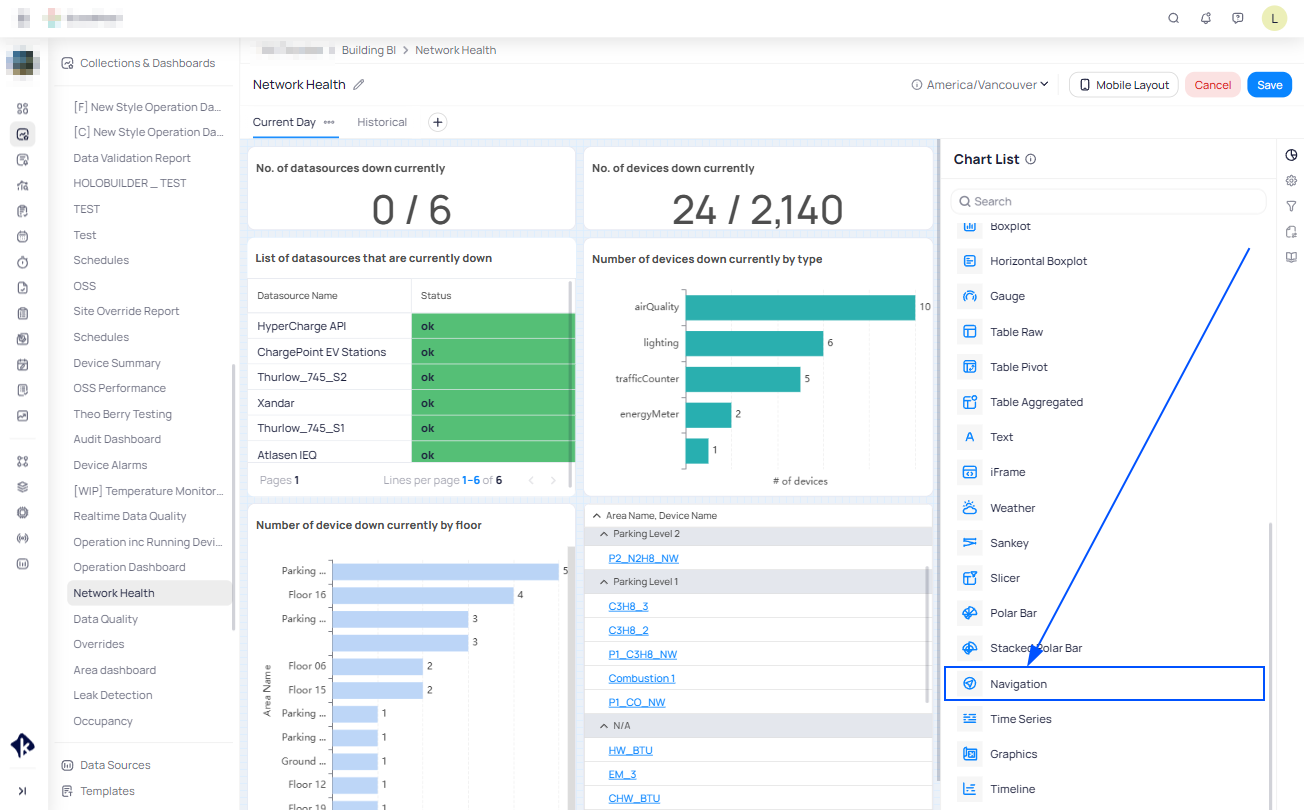
Drag and drop it to the desired place in your BBI Dashboard’s page. After you place it click on it and set the option under “Navigate to” to “Page” and on the “Select page” option select the page of your choice:

After you finish the option configuring hit “Save” and your navigation button will be ready to be used to navigate to the desired page within your current BBI Dashboard.

Navigate to another BBI Dashboard
In order to set this “Navigation” widget to redirect you to another BBI dashboard simply go to edit mode within your selected BBI dashboard find the “Navigation” widget and drag and drop it to the desired place in your BBI dashboard.
After you place it to your desired place in the dashboard set the “Navigate to” option to “Dashboard” and on the “Select Dashboard” choose the dashboard where this widget should redirect when it will be clicked:
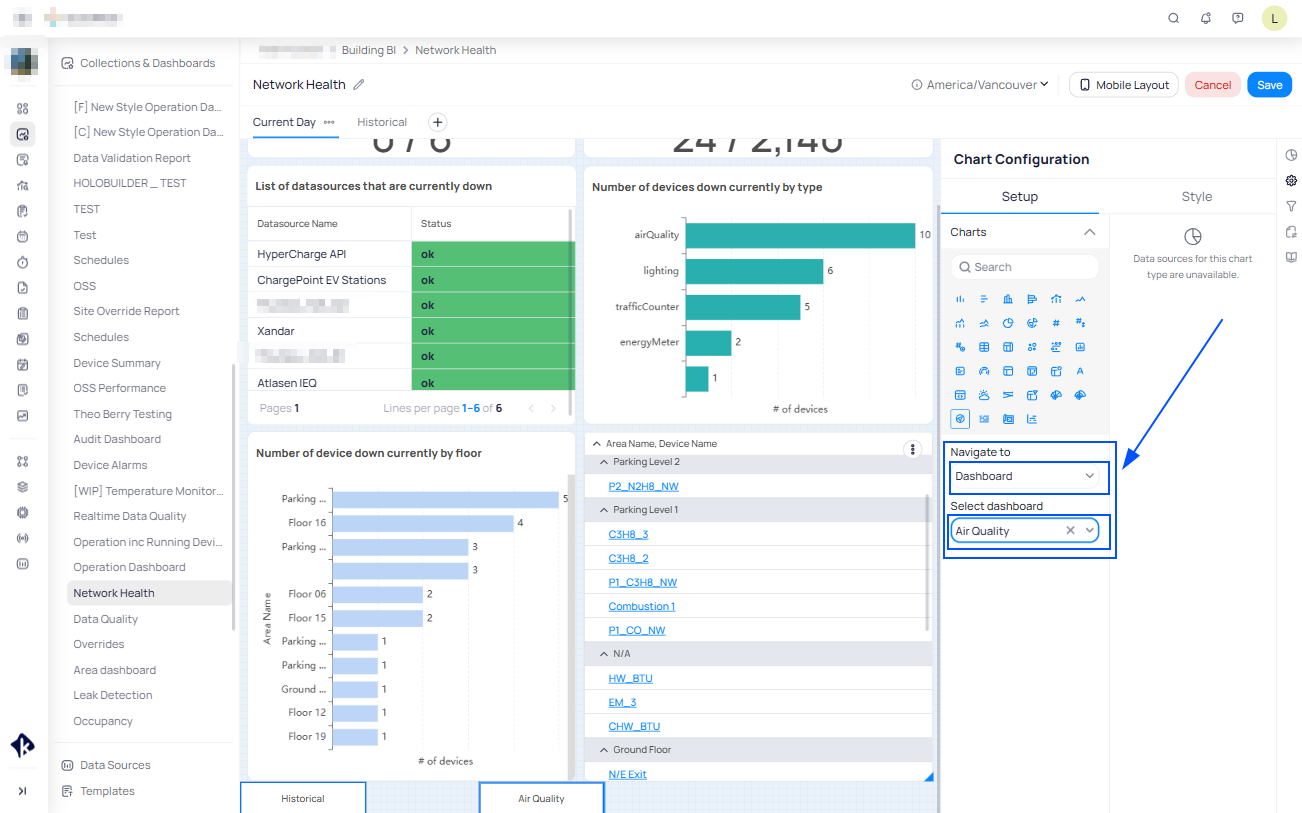
Hit the “Save” button and your widget will be ready to redirect the user to the configured dashboard when it will be clicked.

Related Articles
Building BI - Navigation
The Building BI tool is a feature within our platform that allows you to view data on a dashboard and in a chart form. This data can provide valuable insights into the performance of your building management solution, helping you make informed ...Building BI - Deployment Manager
Overview The Deployment Manager is a feature within Building BI that enables you manage and deploy dashboards across multiple buildings. Note: Only users with the Sync / Bulk Deploy permission can: Access the Deployment Manager. Deploy dashboards to ...Building BI - Settings
Building BI - Settings The Settings option in Building BI allows you to view and manage: Shared Links Scheduled Reports Shared Links: In this section, you can view all links generated for specific dashboards in Building BI, including details such as ...Building BI - Data Sources
Building BI - Data Sources In order for Building BI to calculate and display data, it needs a Data Source. This is where all metrics, calculations, and columns originate from. Because of this, the Data Source section exists to define what data ...PDF Exports & Scheduled PDF reports in Building BI
With PDF Export and Scheduled PDF Reports in the Building BI module, you can easily share insights and automate reporting. PDF Export allows you to generate high-quality PDFs of your dashboards in just a few clicks—perfect for quick sharing and ...