Preventive Maintenance
Overview
Preventive maintenance are routine procedures that help reduce equipment failure and unplanned downtime.
Preventive maintenance refers to any routine maintenance performed at regularly scheduled intervals, inspections, servicing, and repairs of equipment to prevent potential problems and ensure optimal performance. This tool provides insights into maintenance activities across properties, enabling efficient tracking, management, and optimization of preventive maintenance tasks.
Benefits of Preventive Maintenance
Increased equipment lifespan: Extend the life of your building systems and components with regular maintenance.
Improved efficiency: Well-maintain your equipment to operate more efficiently, reducing energy consumption and operational costs.
Reduced downtime: Identify and fix issues before they cause system failures, minimizing downtime and disruptions.
Enhanced safety: Operate all systems safely and reduce the risk of accidents or malfunctions.
Cost savings: By preventing major breakdowns, PM reduces the need for expensive emergency repairs and replacements.
Reactive vs. Preventive Maintenance
Reactive maintenance - This is when you fix something only after it breaks down. A technician finds the problem and
repairs it to get it working again.
Preventive maintenance - This involves regularly scheduled check-ups and maintenance to keep things running smoothly.
By taking care of equipment before it breaks, you can avoid expensive repairs and unexpected downtime.
Navigate through Preventive Maintenance module
To access Preventive Maintenance module, follow these steps:
Open KODE OS.
There are two ways you can navigate to the Maintenance module:
Click on the apps menu at the top left of the page and select "Maintenance".
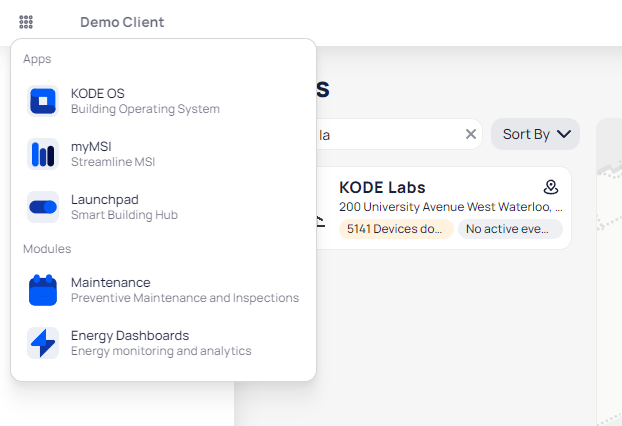
Select a site and click on "Maintenance" on the main left navigation bar. This will redirect you to the Preventive Maintenance of the selected site.
Automatic Device Setup in Preventive Maintenance
One of the key features of the Preventive Maintenance module is its seamless integration with KODE OS. There is
no need for manual setup of devices within the module. All devices discovered in KODE OS are automatically made
available for Preventive Maintenance. This ensures that your maintenance tasks are always up to date with the latest
devices, minimizing setup time and ensuring comprehensive coverage of your building systems.
Simply navigate to the Preventive Maintenance module, and you'll see all the relevant devices already listed, ready for
you to start scheduling and managing maintenance tasks.
Preventive Maintenance Settings
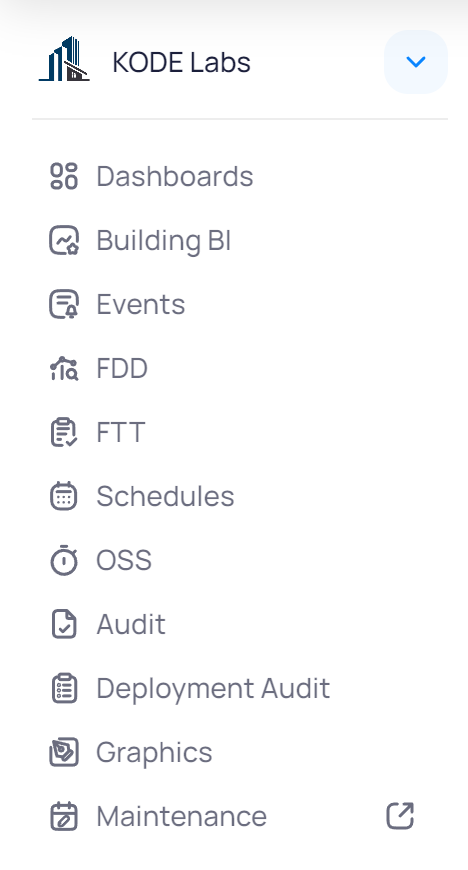
Once you are on the Preventive Maintenance module, on the main left navigation bar you will see 2 options: Sites and Settings.
If you click on Settings from the left sidebar you will see 2 categories of tasks:
Maintenance Tasks - the repairing or servicing tasks that restore equipment to optimal condition.
Inspection Tasks - an assessment of equipment conditions and performance without actually performing any servicing or corrective action.
Based on the maintenance inspection, you can schedule future maintenance work or adjust the existing schedule for the inspected equipment.

Maintenance Tasks
Click "Maintenance Tasks" on the left sidebar to see the list of all tasks. From there, you can choose a task to check the details or add a new one.
To add new maintenance tasks follow these steps:
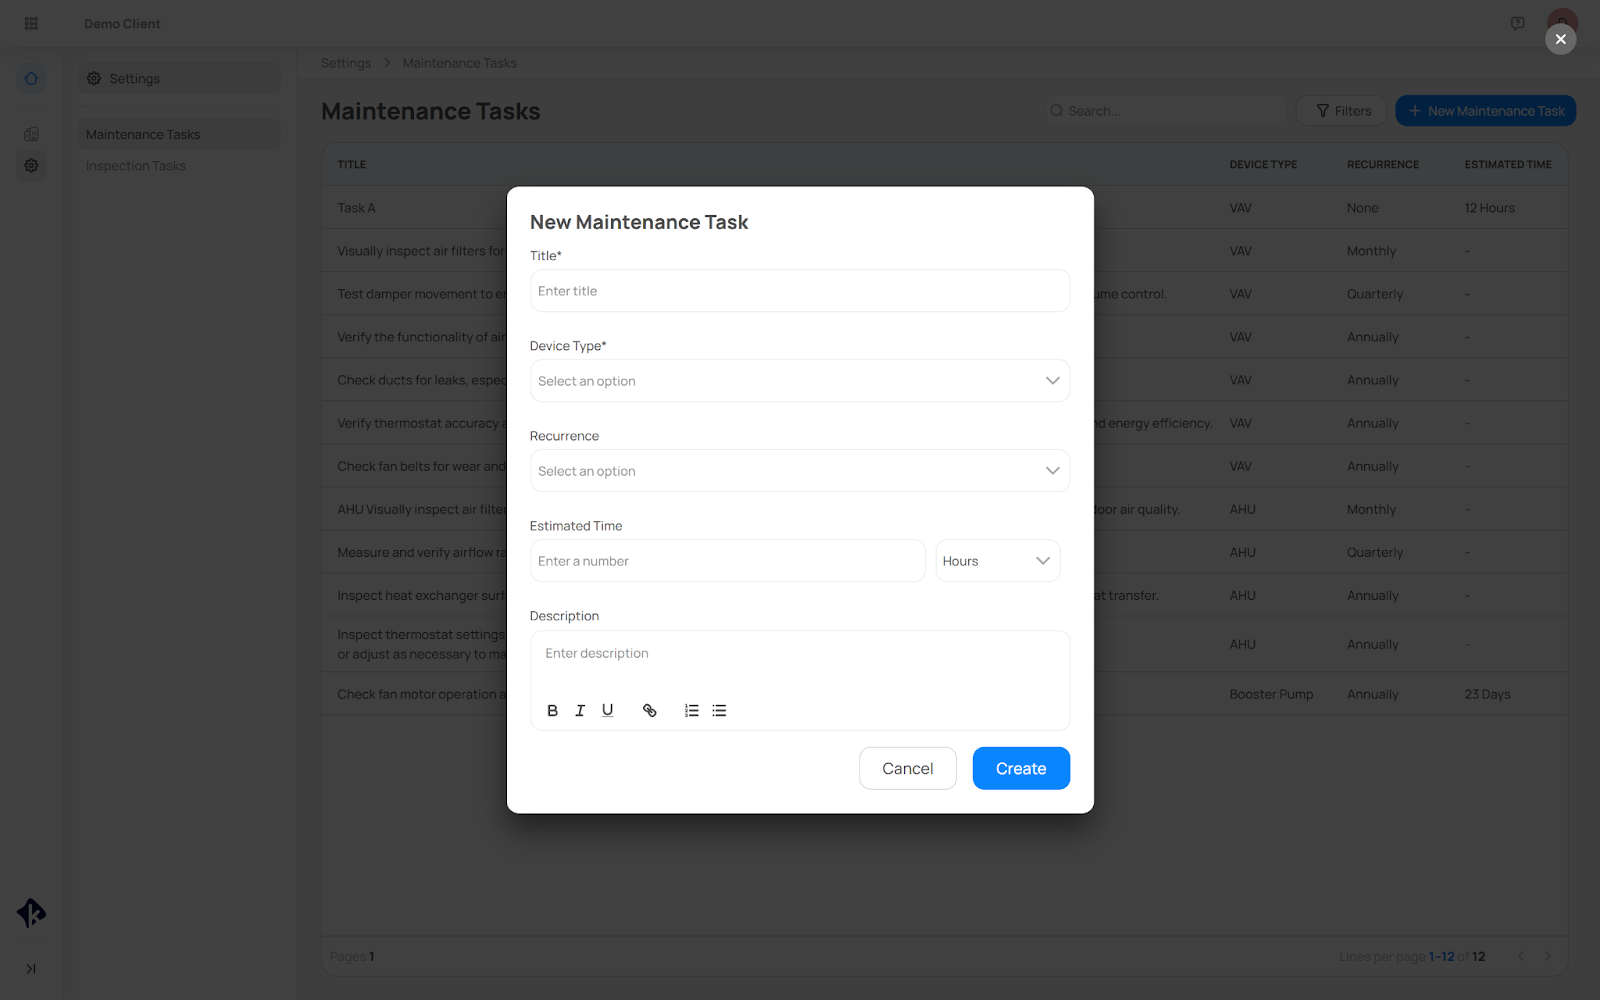
On the top-right corner, click on the “New Maintenance Task” button.
On the pop-up window that opens up, specify:
Task title,
Device type,
Recurrence,
Estimated time,
Add description.
Click on the “Create” button.
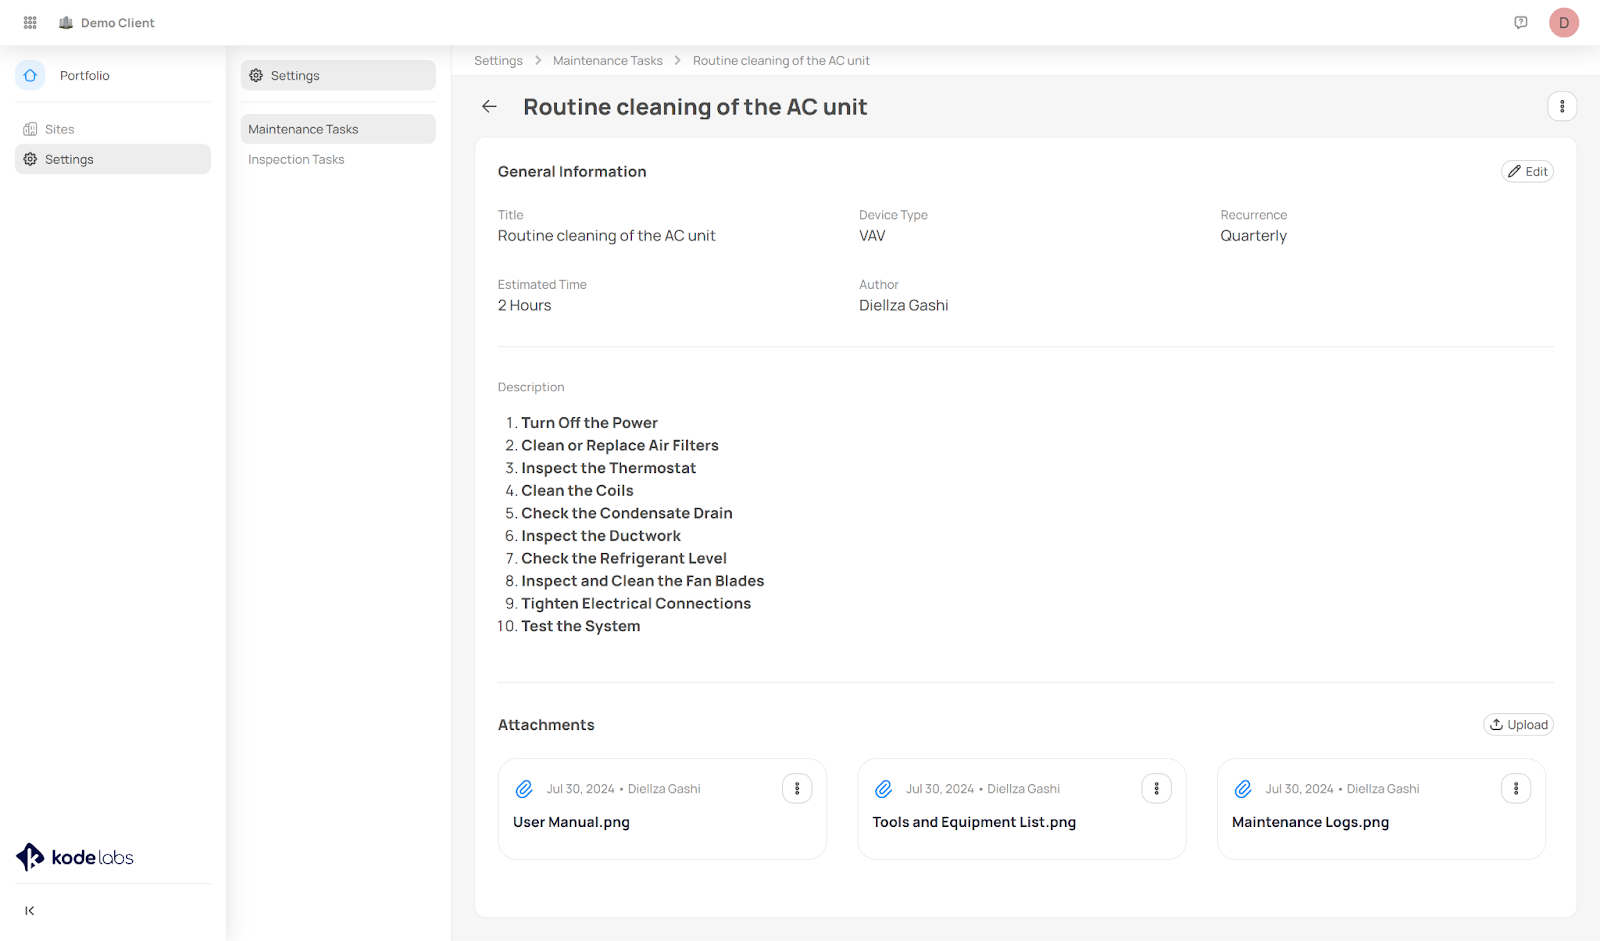
After you create the task, you'll be redirected to its details page. There, you can update the task and attach any guidelines or instructions for performing the equipment maintenance. Attachments can be documents, videos, etc., to help the engineers in the field understand what they need to do to perform the task.
Inspection Tasks
Click "Inspection Tasks" on the left sidebar to see the list of all tasks. From there, you can choose a task to check the details or add a new one.
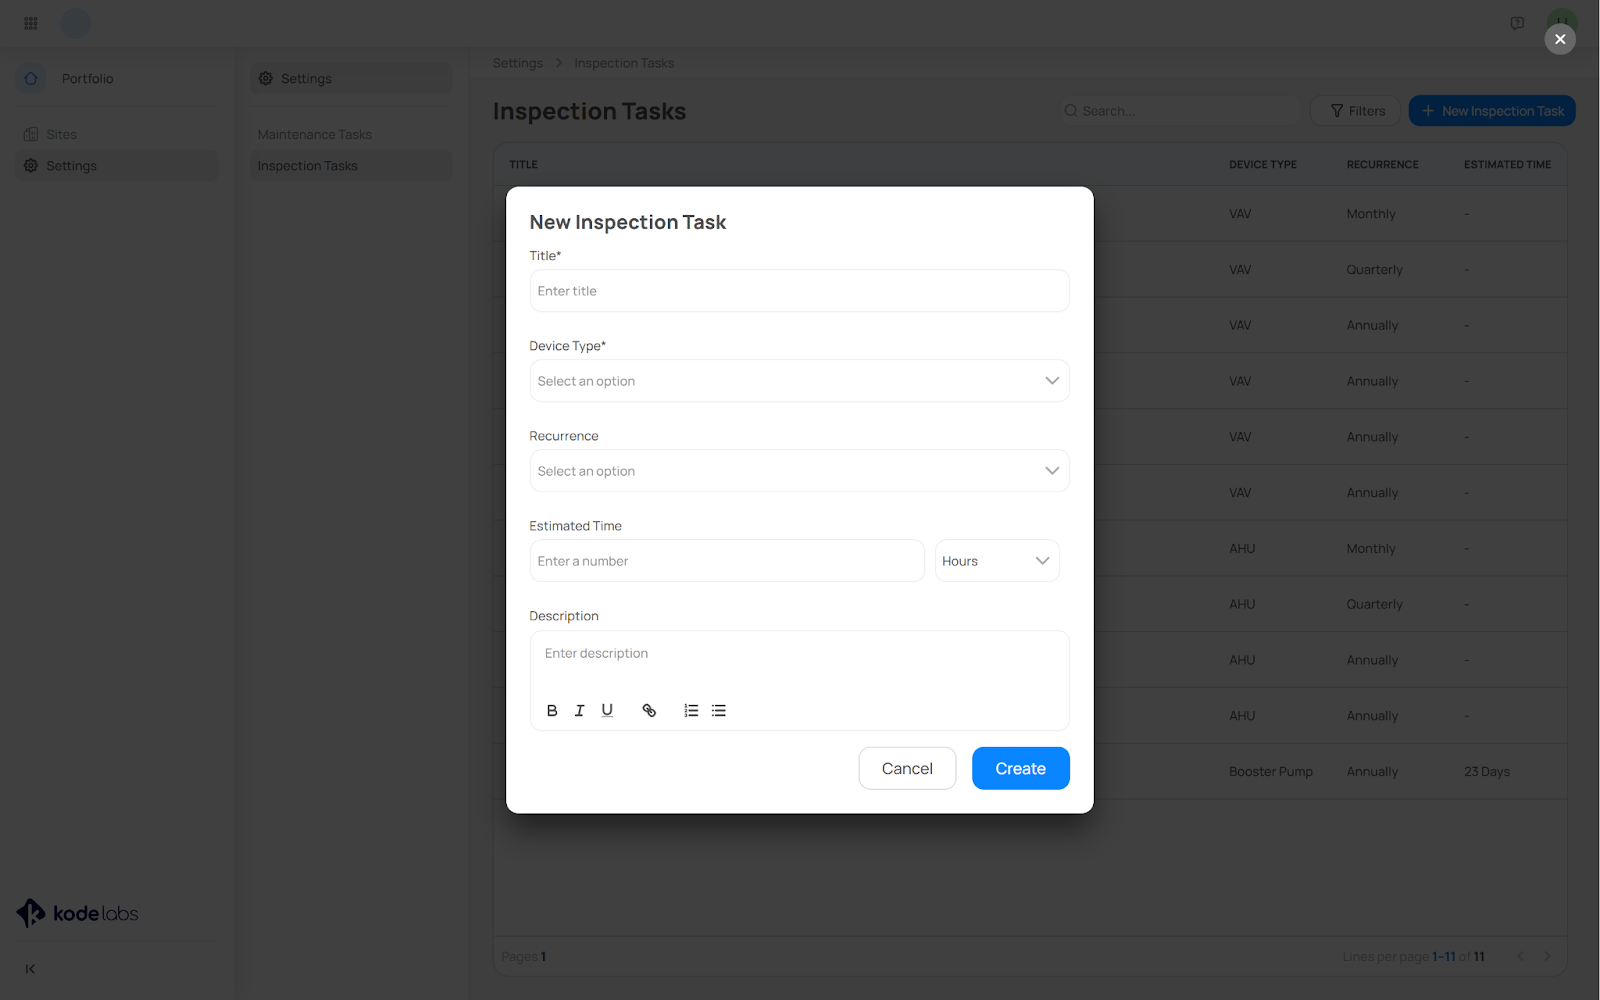
To add new inspection tasks follow these steps:
On the top-right corner, click on the “New Inspection Task” button.
On the pop-up window that opens up, specify:
Task title,
Device type,
Recurrence,
Estimated time,
Add description.
Click on the “Create” button.
After you create the task, you'll be redirected to its details page. There, you can update the task and attach any guidelines or instructions for performing the equipment inspection. Attachments can be documents, videos, etc., to help the engineers in the field understand what they need to do to perform the task.
Click on “Sites” from the main left sidebar and select the site of your choice.
Once you select a site you will see the side menu of task categories from where you can choose:
Dashboard
Preventive Maintenance
Tasks
Schedules
Schedule Log
Inspections
Tasks
Schedules
Schedule Log
Devices
Preventive Maintenance Dashboard
The Preventive Maintenance Dashboard module is designed to provide an overview of maintenance and inspections activities. It features a variety of visualized charts and tools to help you monitor, manage, and analyze tasks.
Here’s a breakdown of the dashboard components:
Timeframe Filter - At the top right of the page, you will find the date filter that allows you to filter the dashboard data based on a selected timeframe (e.g., daily, weekly, monthly, quarterly, yearly).
Select the desired date range to update all charts and tables with relevant data for that period.
Completed Tasks - Displays the number of all tasks completed out of the total assigned.
Simple numeric display, e.g., "Completed Tasks: 50 out of 100."
Overdue Tasks - Shows the number of tasks that are past their due date out of the total assigned.
Simple numeric display, e.g., "Overdue Tasks: 10 out of 100."
Work Orders - Indicates the total number of work orders generated.
Simple numeric display, e.g., "Work Orders: 200."
Tasks by Status - Provides a breakdown of tasks based on their current status (e.g., open, on hold, completed).
Donut chart that visually represents the proportion of tasks in each status category.
Tasks by Assignee - Shows the number of tasks assigned to each team member.
Bar chart that displays tasks per assignee, making it easy to see workload distribution.
Task List - A detailed table listing all tasks with relevant information.
Task Number
Task Template
Device
Status
Assignee
Task Calendar Heatmap - A heatmap chart that visualizes the frequency of tasks performed on each day of the week throughout the selected year.
Calendar heatmap showing months and highlighting days with higher task frequencies.
Usage Tips
Use the ‘Date Filter’, at the top right of the page, to narrow down the data to specific periods and gain more targeted insights.
Regularly check the ‘Overdue Tasks’ section to ensure timely completion and avoid maintenance backlogs.
Use the ‘Tasks by Assignee’ chart to balance workloads among team members effectively.
Analyze the ‘Task Calendar Heatmap’ to identify trends and peak periods for maintenance activities, aiding in better planning.

Preventive Maintenance
The preventive maintenance module is divided into three main sections:
Tasks
Schedules
Schedule Logs
Preventive Maintenance Tasks
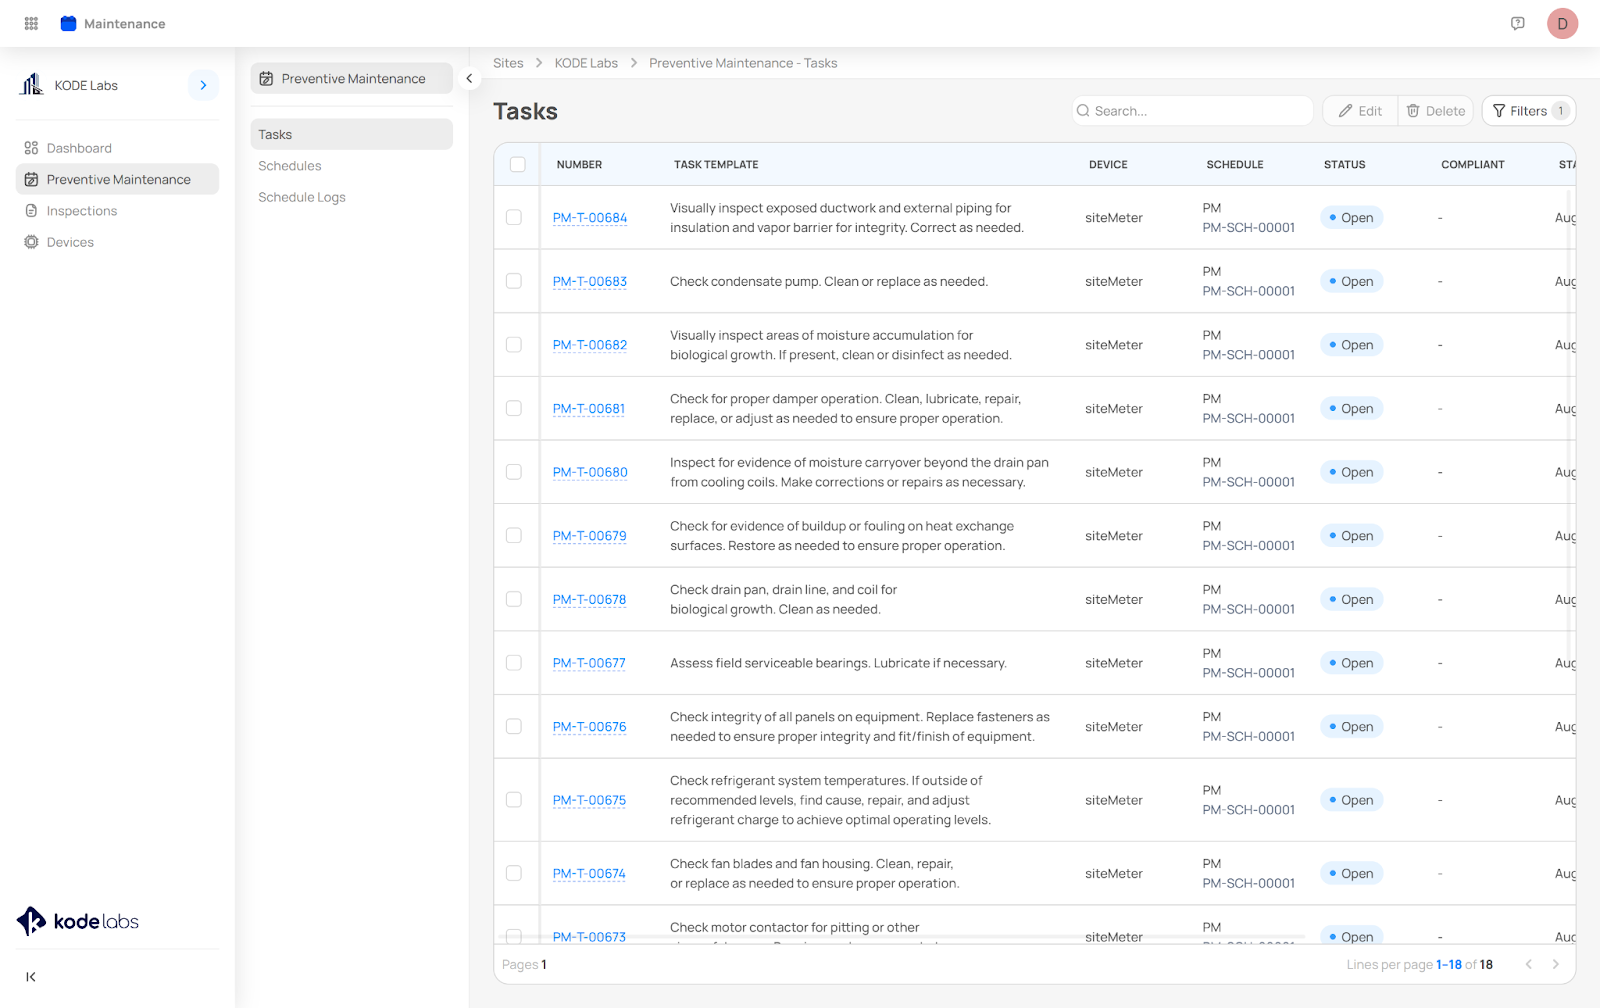
In the Tasks section, you'll find a comprehensive list of all pre-created maintenance tasks. You can browse through the tasks or use the search function to find specific tasks.
At the top right of the page, you'll find 3 important buttons:
Edit: Select a task and click on the Edit button to modify the due date or change the assignee.
Delete: Select a task and click on the Delete button to remove it from the list.
Filters: Use the filter options to narrow down tasks based on criteria such as start and due date, status, schedule, device, assignee, overdue tasks, and compliance status.
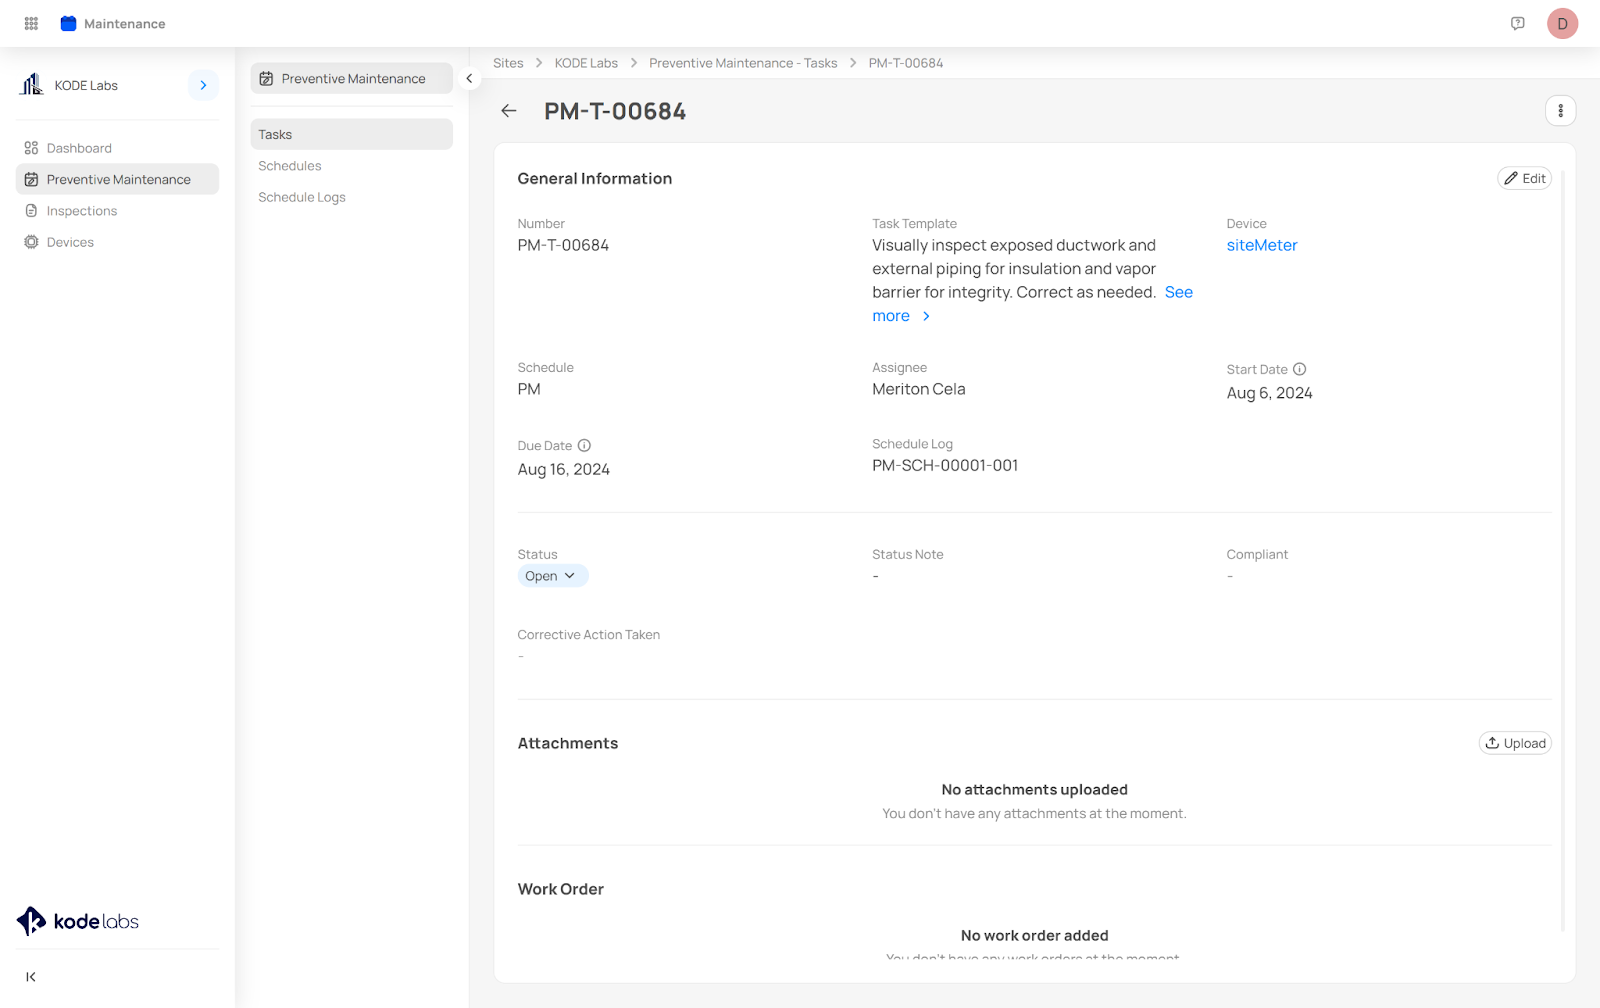
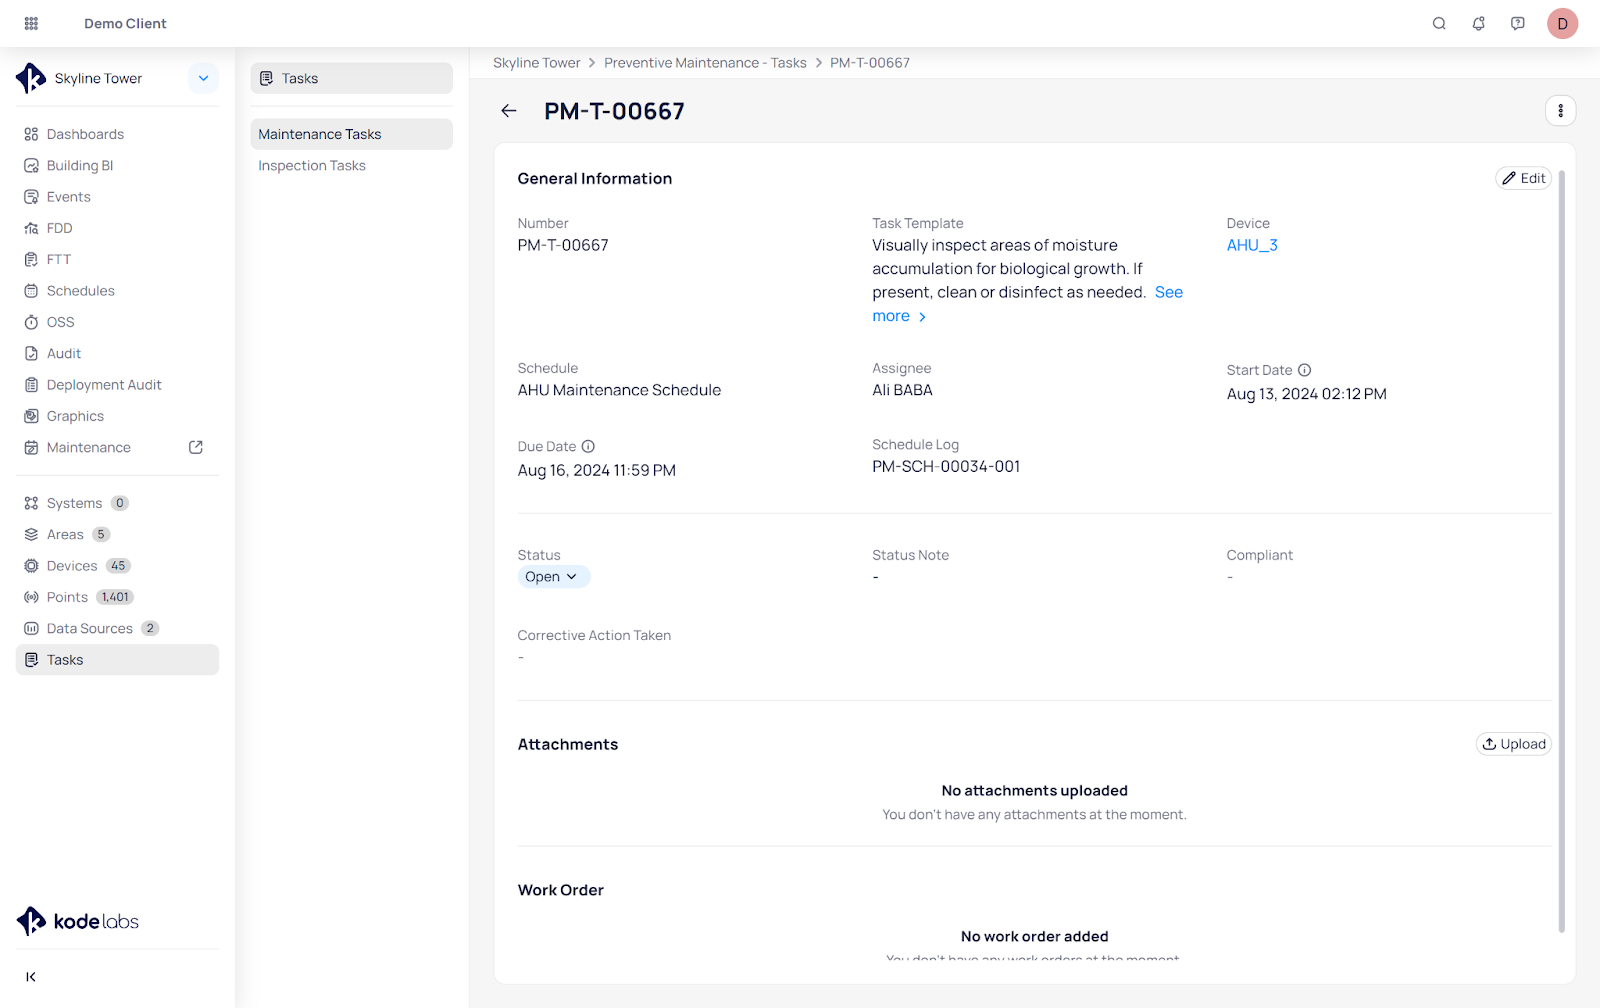
Preventive Maintenance Task Details
Once you select a task from the list you will be prompted to view its detailed information.
In the ‘General Information’ section, you'll see:
Task Number
Task Template
By clicking the ‘See More’ button, you can access detailed information about the Task Template. This view includes a comprehensive description, which may outline steps or provide relevant details for the task, as well as attachments such as manuals and videos that can assist engineers in performing maintenance.
Device Name (with a link to the device details)
Schedule
Assignee
Start and Due Date
Schedule Log
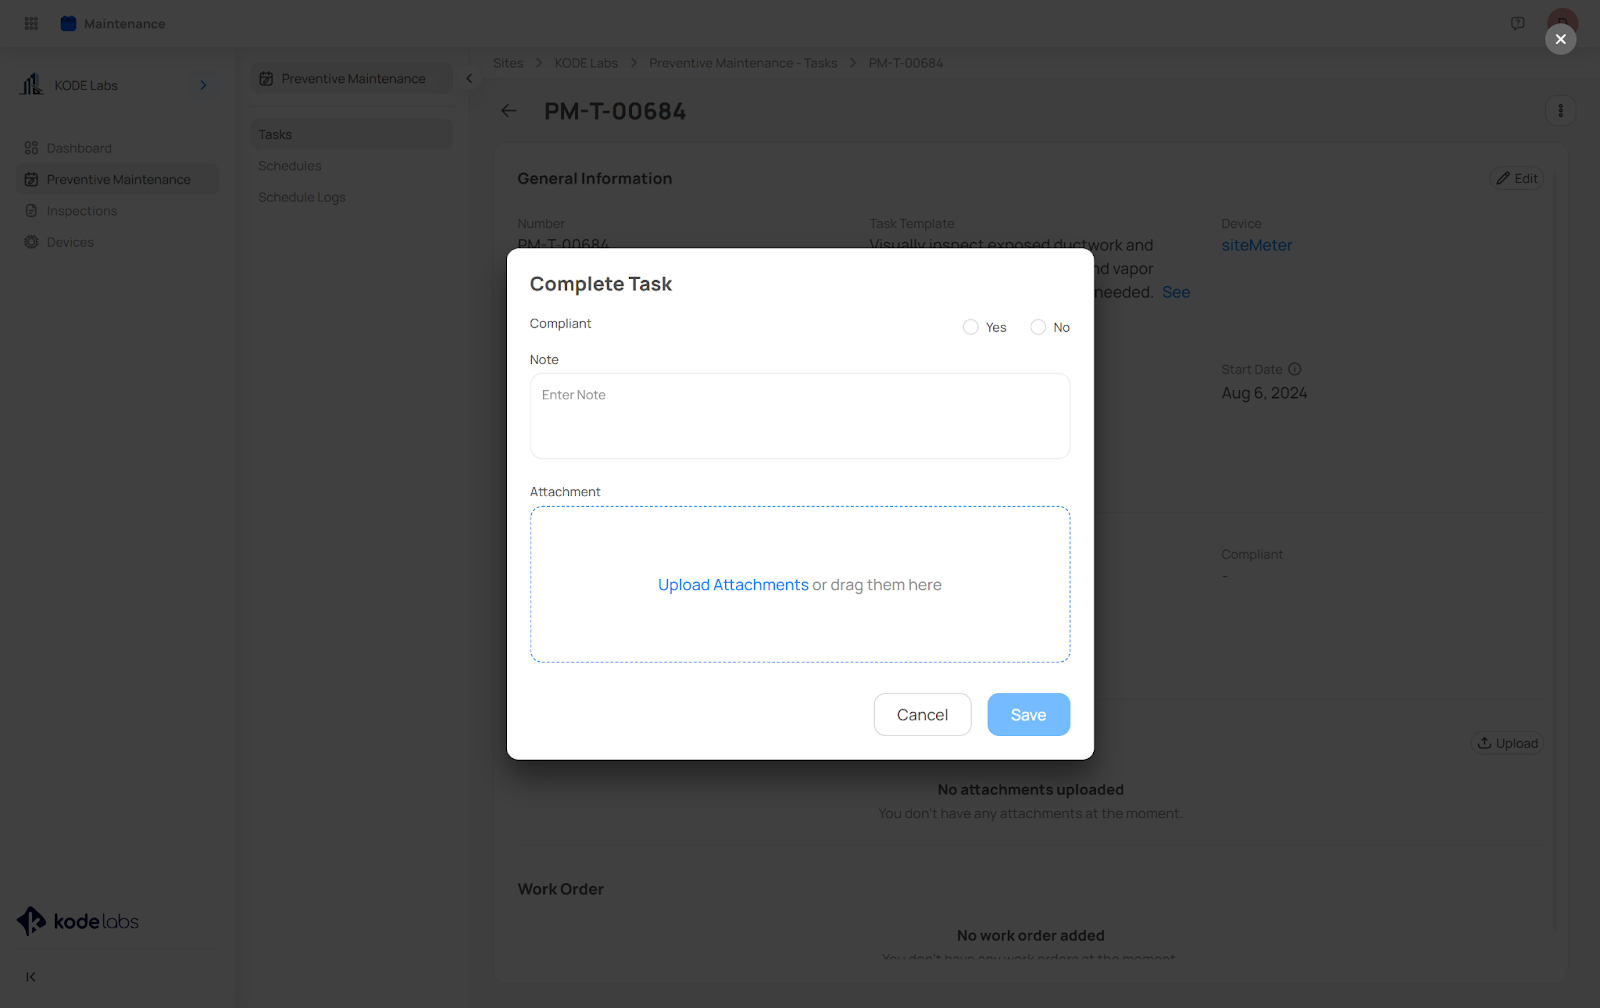
To update a task's status, click on its current status and choose from the following options:
Completed: Mark the task as compliant or non-compliant. If non-compliant, you'll be prompted to note any corrective actions taken. You can also add notes or attachments.
Cancelled: Provide reasons for canceling the task and include any relevant notes or attachments.
Not Applicable: Explain why the task is not applicable by adding a note and attach any supporting documentation o.
On Hold: Indicate why the task is being paused, with the option to add notes and attachments.
Open: This is the default status when a task is created, indicating that it's ready to be worked on.
Attachments: Upload images of devices or any other relevant documents related to the task.
Work Orders: This section displays all associated work orders that have been created for the task.
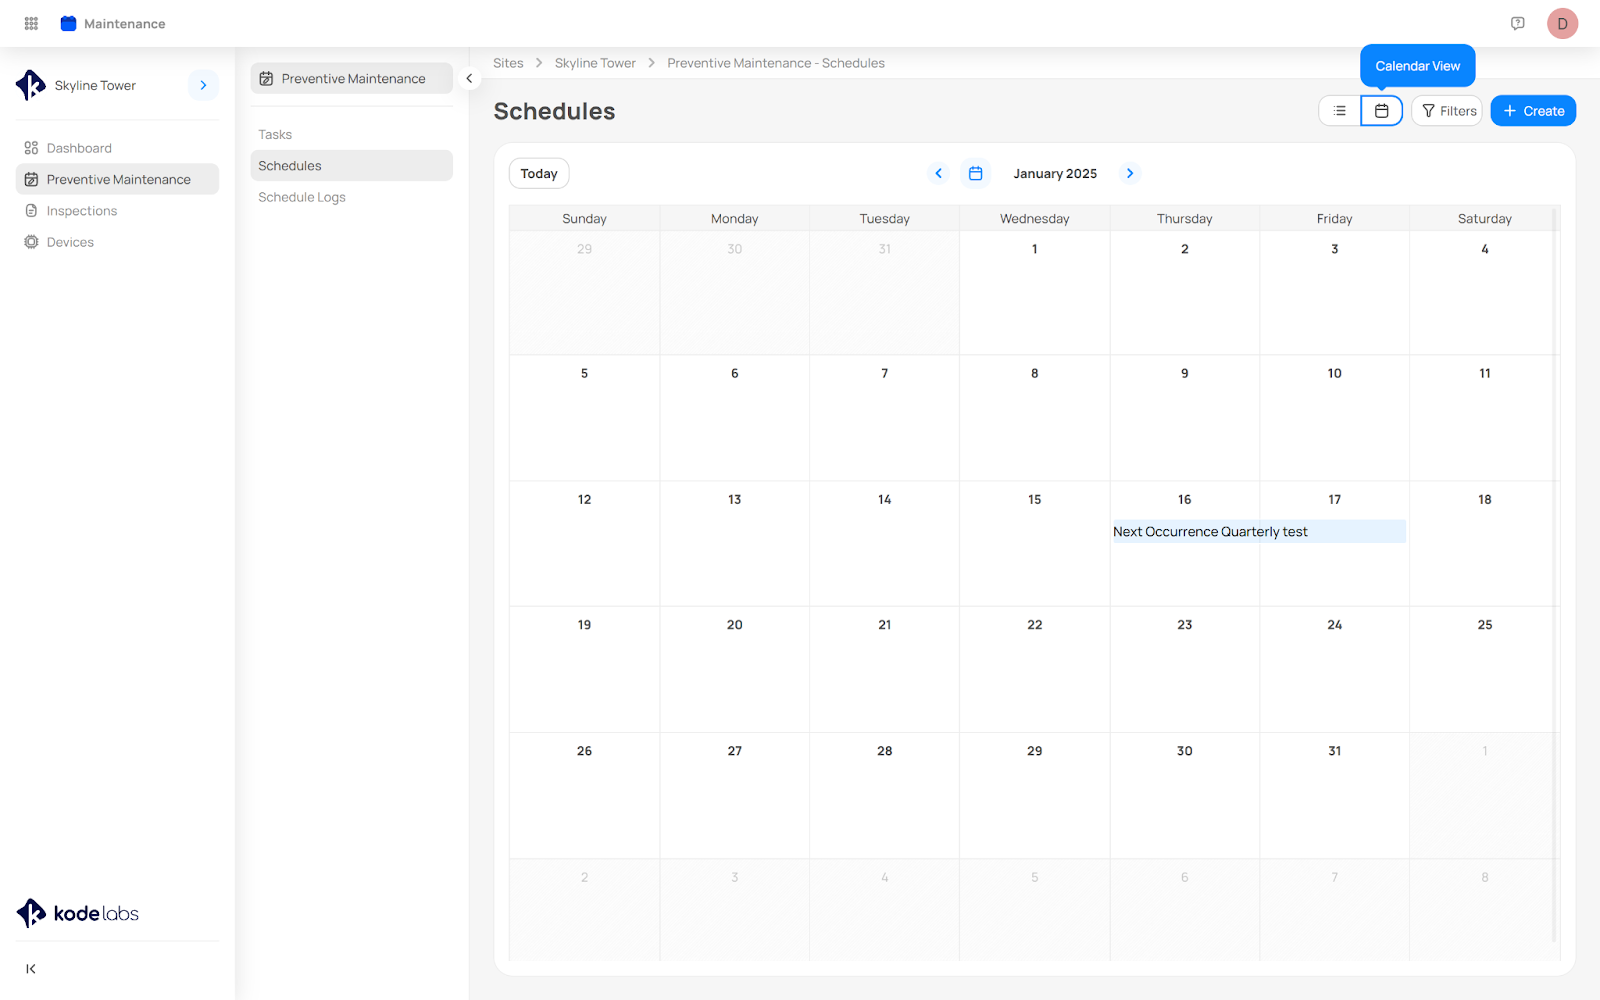
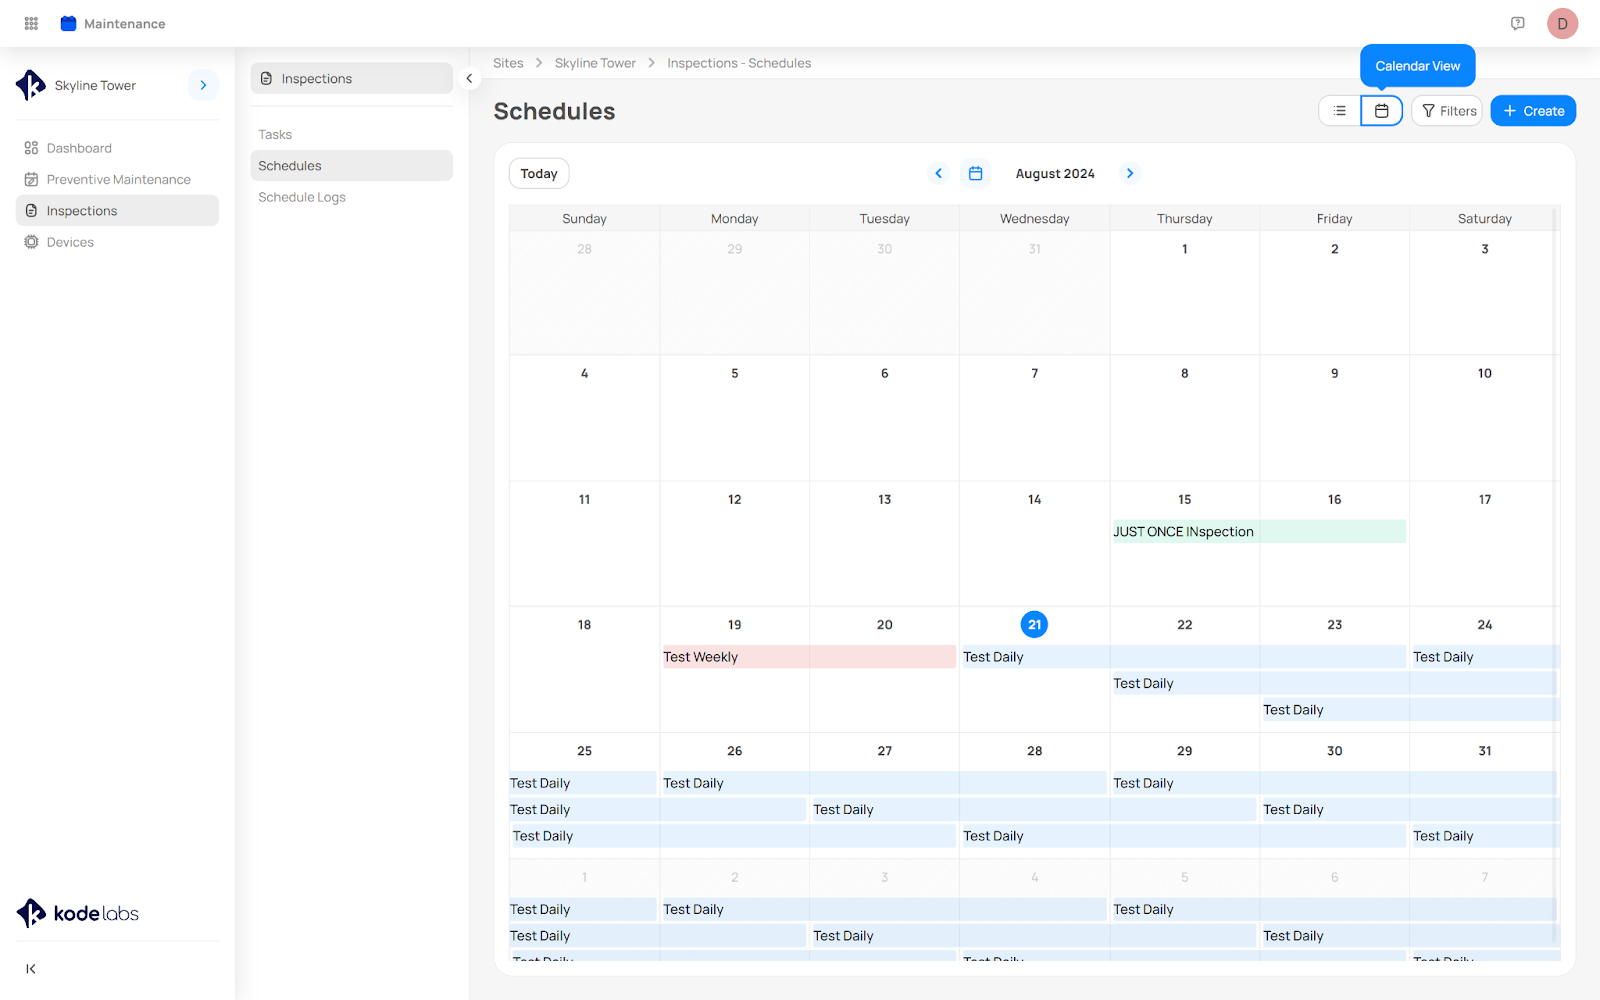
Preventive Maintenance Schedules
A preventive maintenance schedule gives you a framework to organize all the preventive maintenance needs throughout your organization.
Here you will see the list of existing preventive maintenance schedules, from where you can access 2 different views:
List View - a straightforward, detailed overview of schedules.

Calendar View - a clear, visual representation of schedules, improving planning, coordination, and time management.
Create and schedule Preventive Maintenance Schedules
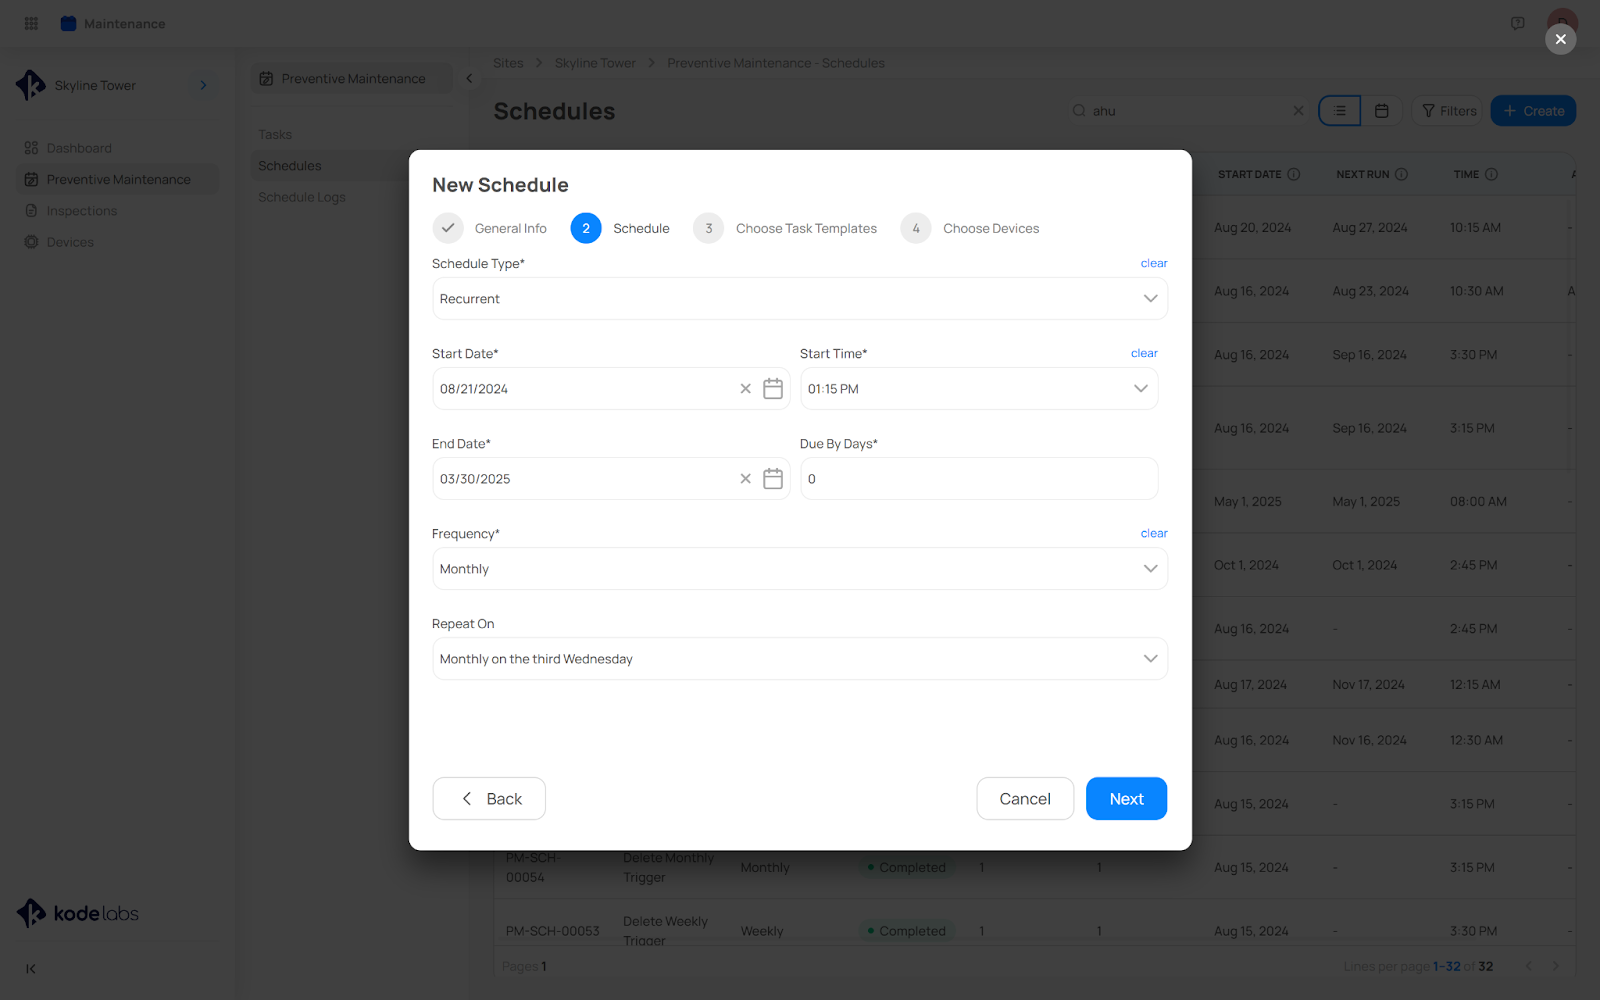
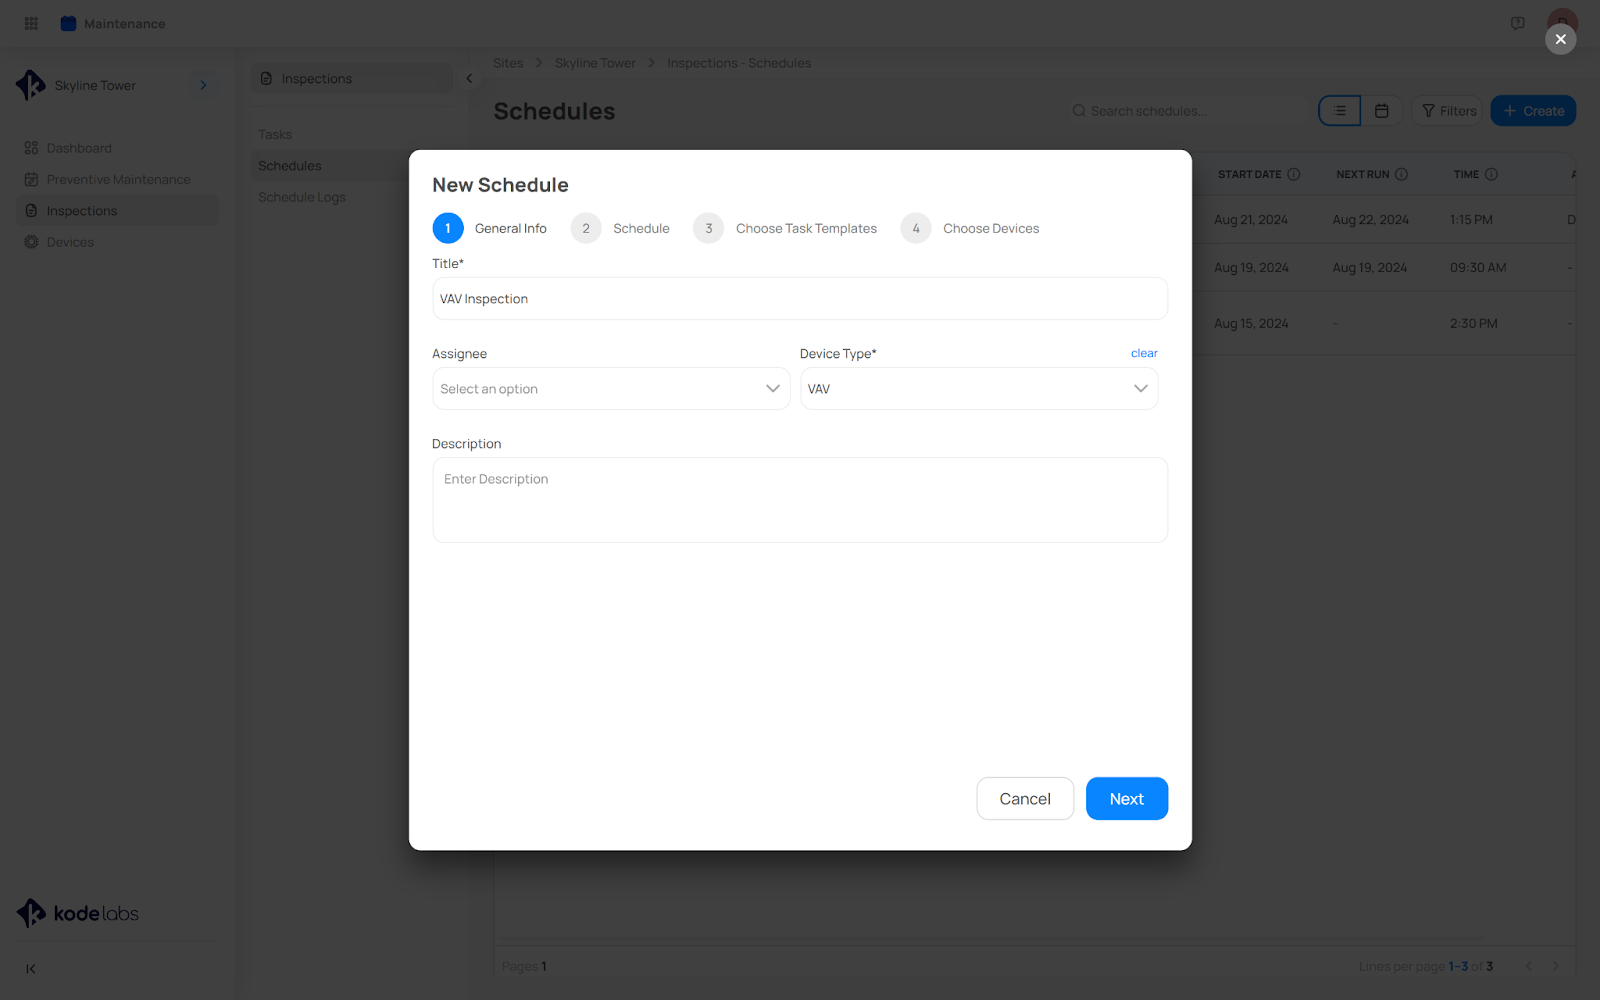
To create a Preventive Maintenance schedule follow the below steps:
Click on the “Create” button, at the top right of the page.
On the “New Schedule” page, fill in the general information such as:
Title
Assignee
Device Type
Description

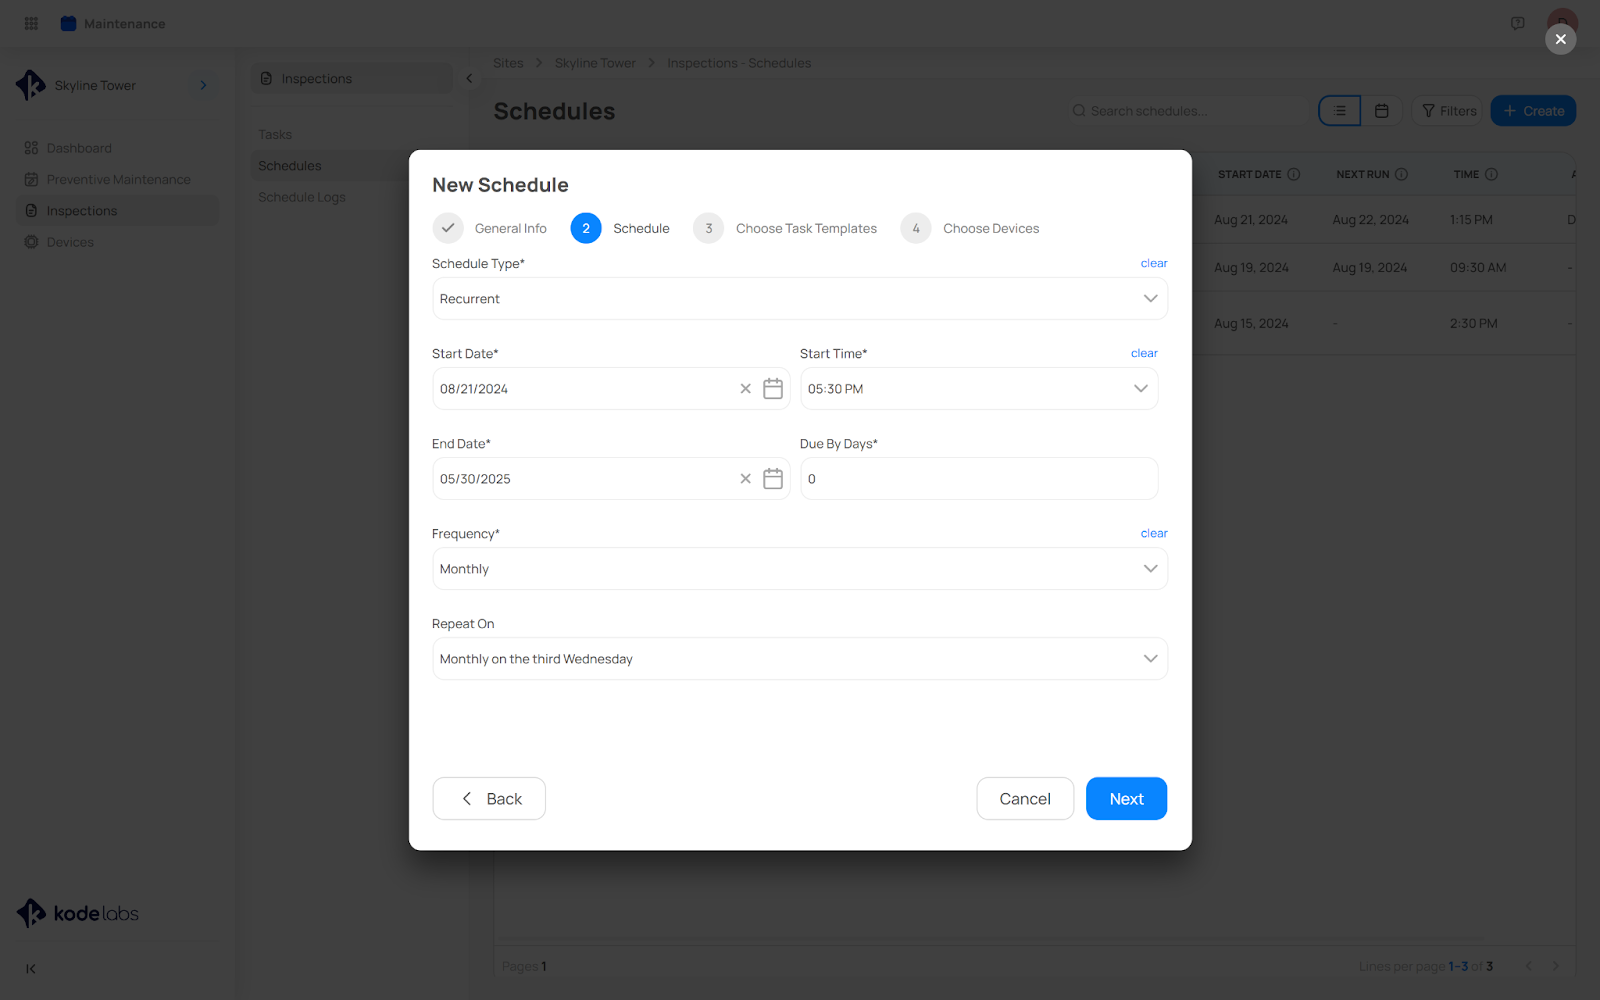
Go to the 2nd step “Schedule”, to set the time slots.
Schedule Type
Just Once or
Recurrent
Start Date and Time
End Date
Due by Days
Frequency
Daily
Weekly
Monthly
Quarterly
Annual
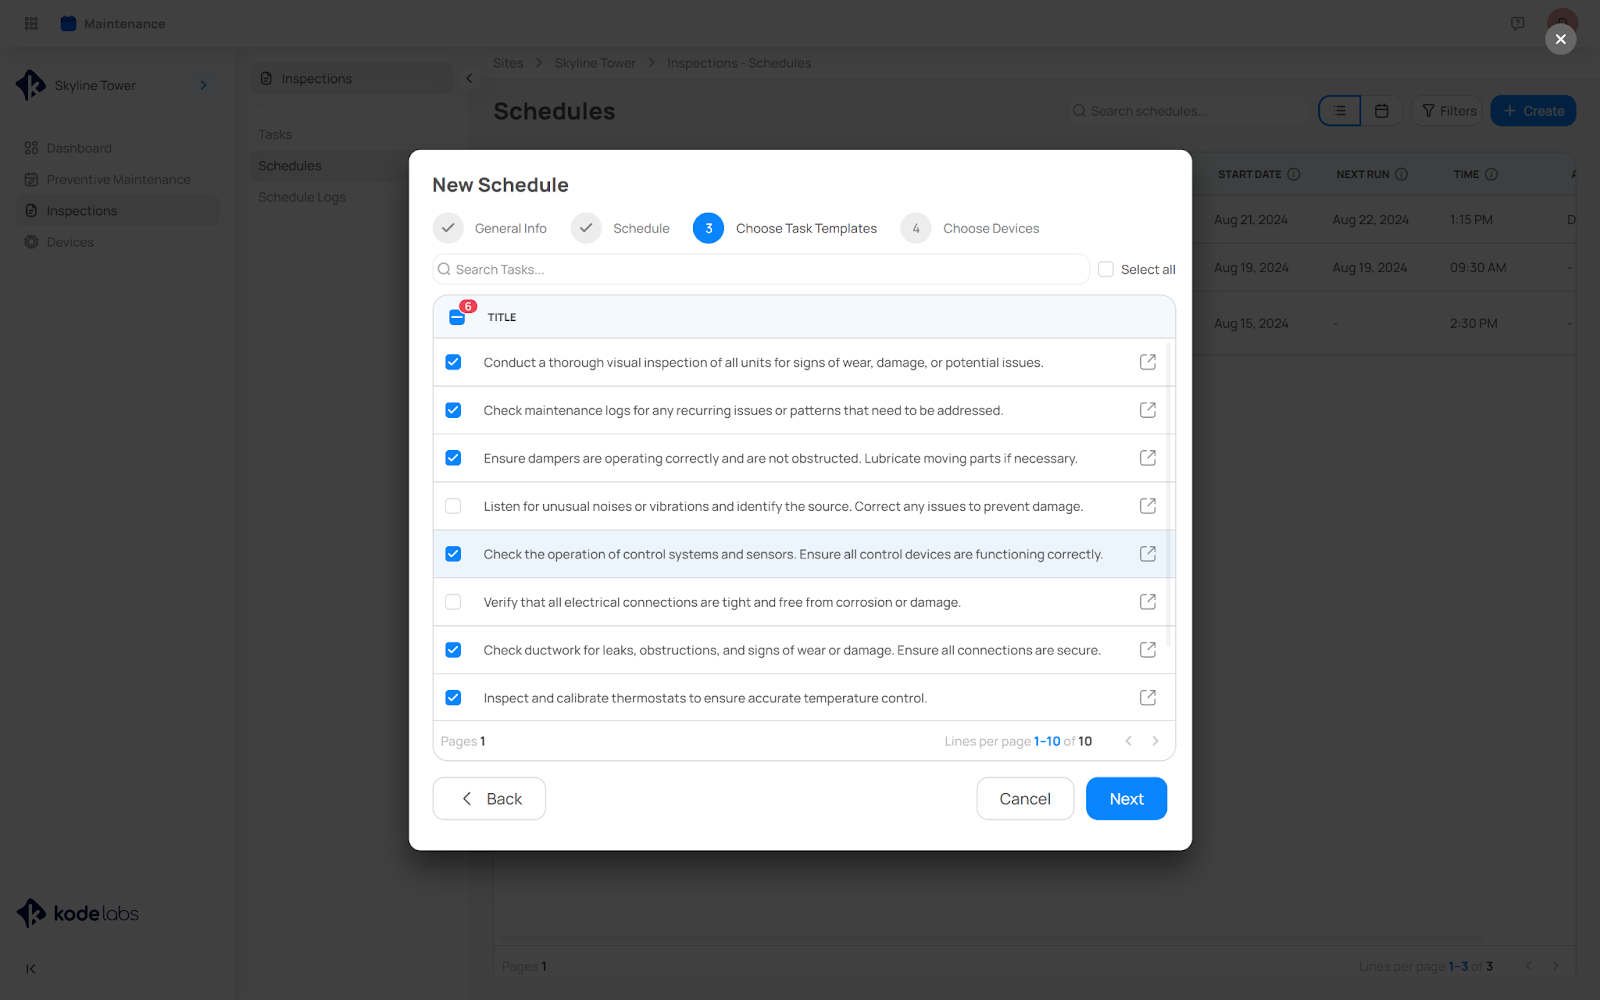
On the 3rd step ”Choose Task Templates” you have the option to select the task templates.
Select one or multiple tasks, and click on ‘Next’.

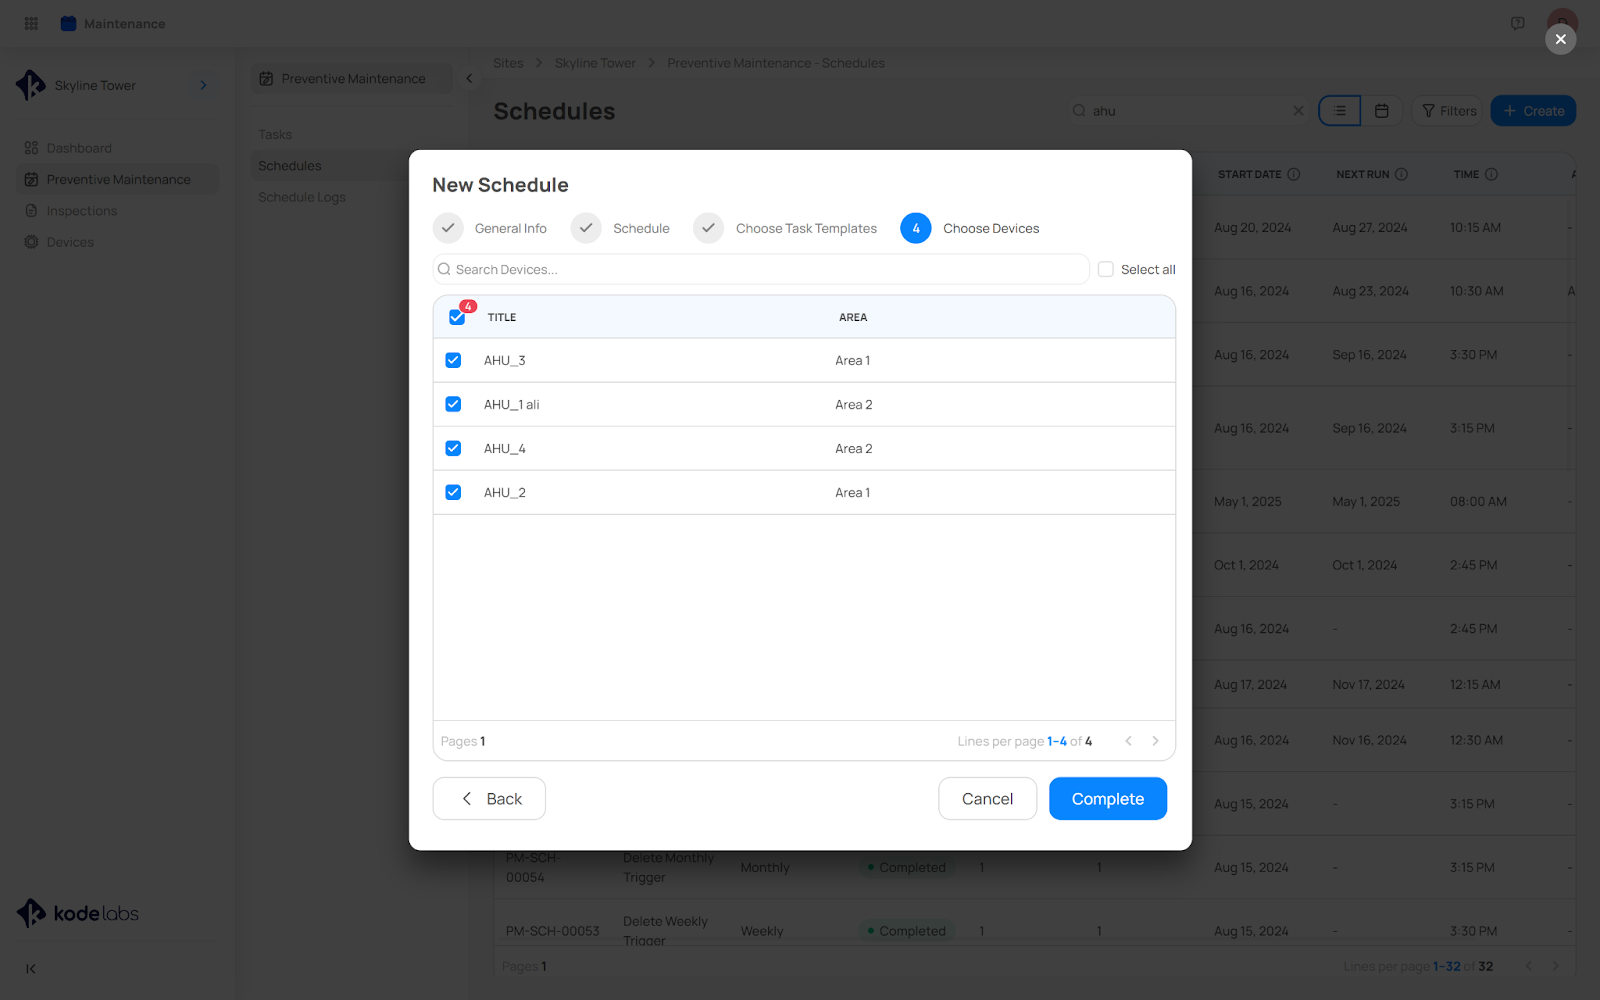
On the 4th step “Choose Devices”, you will have the option to select the devices you wish to perform maintenance to.
Click on the “ Complete” button and now you have created a new Maintenance Schedule.
Preventive Maintenance Schedule Details
After creating a preventive maintenance schedule, you'll be automatically directed to its details page. From here, you can modify the "General Information" or adjust the ‘Schedule’ time slots as needed.
By default the status of schedules is initially set to 'Active'.
If you change the status to 'Inactive,' the schedule will be paused and won’t trigger until reactivated.
Once the schedule's duration ends, its status will automatically update to ‘Completed', and it will no longer be triggered.

On the “Tasks” tab you can add or remove tasks.

On the “Devices” tab you can add or remove devices.

Preventive Maintenance Schedule Logs
The Schedule Logs module provides a comprehensive list of all your triggered schedules. From this list, you can select a specific schedule log to view the status of each task and visualize the overall progress. This will help you ensure essential items aren’t left out or forgotten, as well as to make sure maintenance procedures with multiple steps are performed accurately and completely.
Schedule Log Tasks
The Tasks tab is your central hub for managing all devices and their associated tasks.
Select one or more tasks and click on the “Edit” button at the top right of the page to edit the “Due Date” or ”Assignee”.
Select one or more tasks and click on the “Delete” button at the top right of the page to delete the tasks.

Selecting a task from the list, you will be redirected to the task details from where you can make edits, update the task status, and add attachments.
Clicking on the Device name you will be redirected to the device details in KODE OS.

Inspections
The inspection module is divided into three main sections:
Taks
Schedules
Schedule Logs
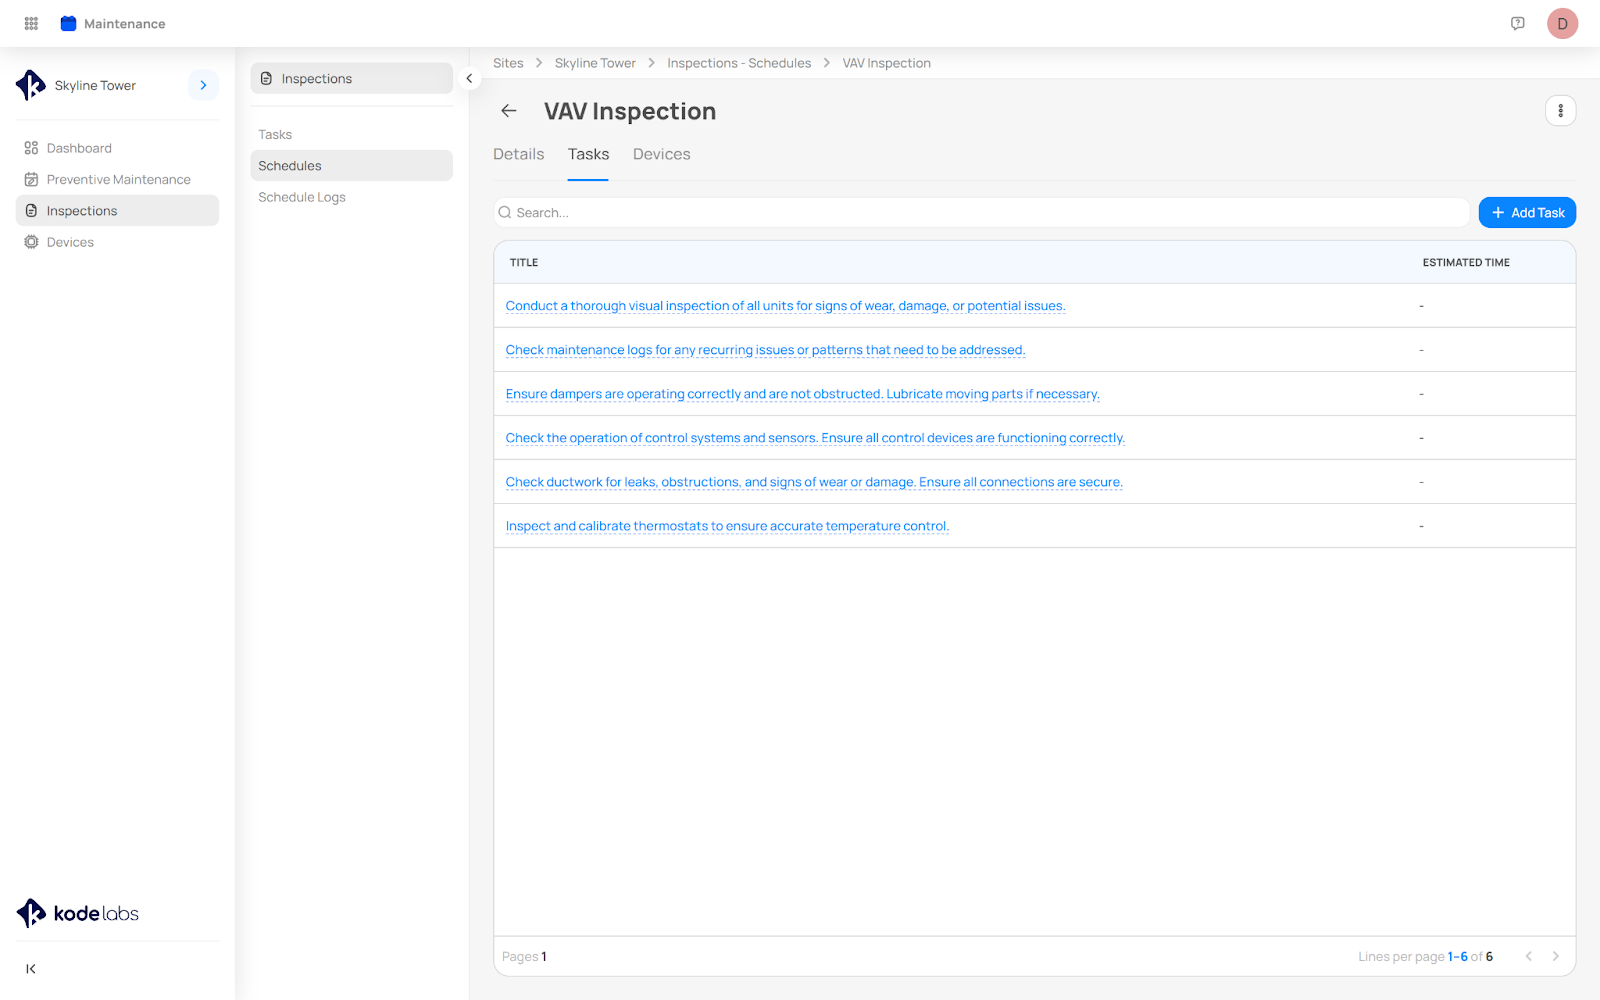
Inspection Tasks
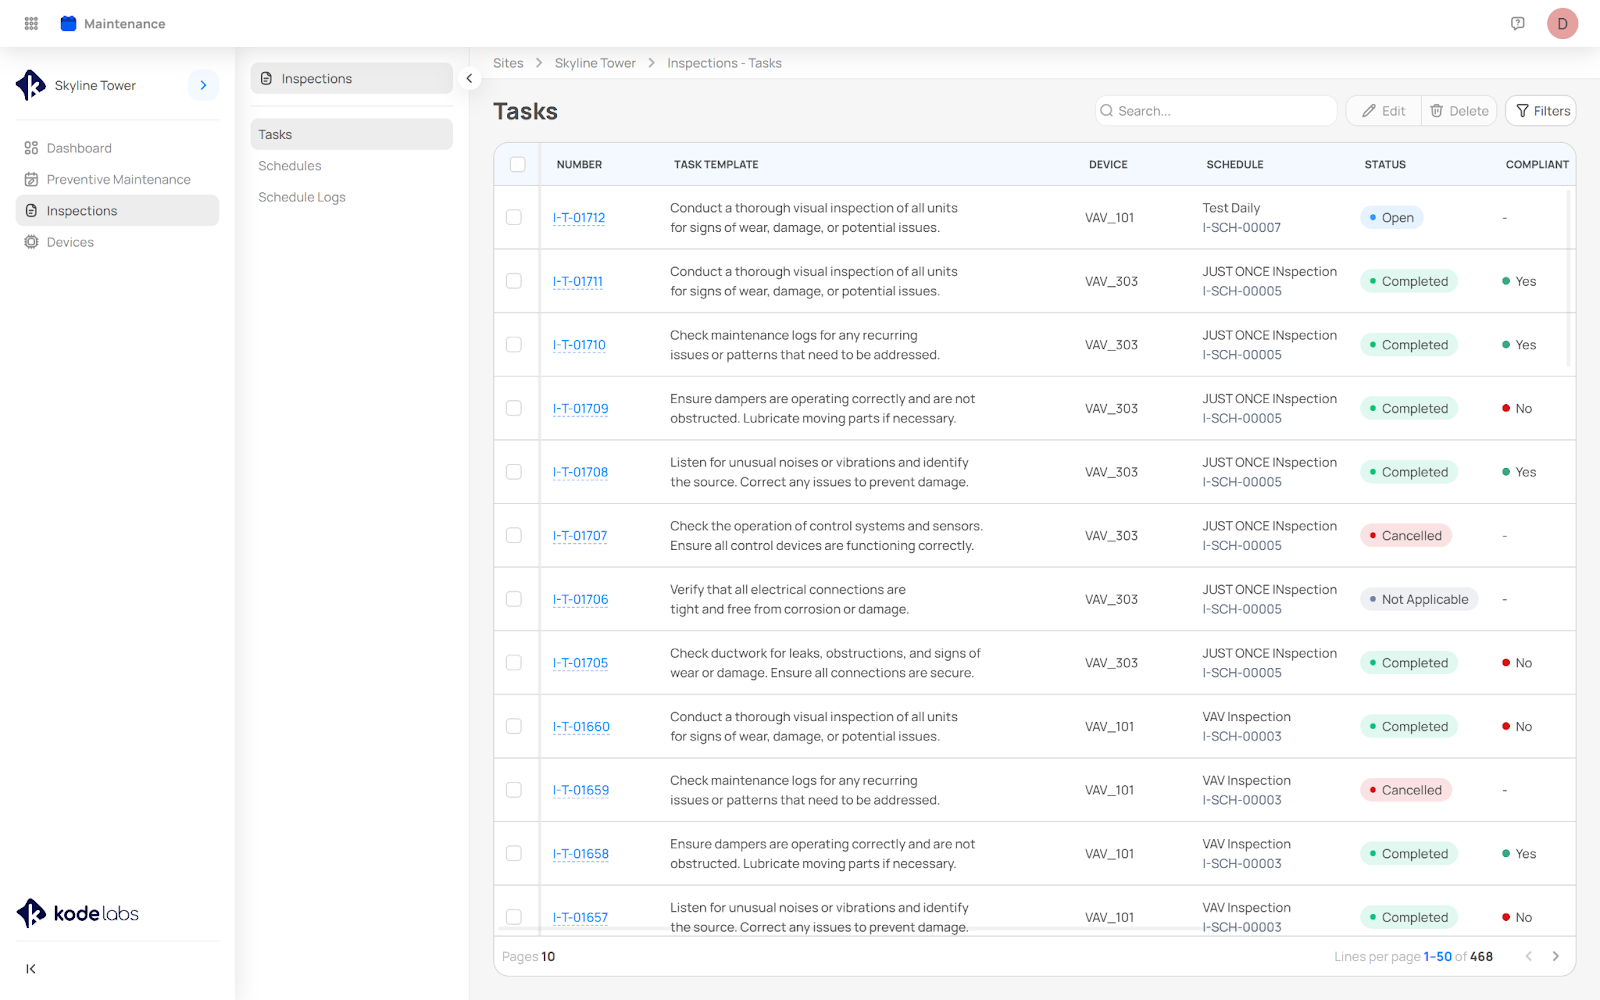
In the Tasks section, you'll find a comprehensive list of all pre-created inspection tasks. You can browse through the tasks or use the search function to find specific tasks.
At the top right of the page, you'll find 3 important buttons:
Edit: Select a task and click on the Edit button to modify the due date or change the assignee.
Delete: Select a task and click on the Delete button to remove it from the list.
Filters: Use the filter options to narrow down tasks based on criteria such as start and due date, status, schedule, device, assignee, overdue tasks, and compliance status.
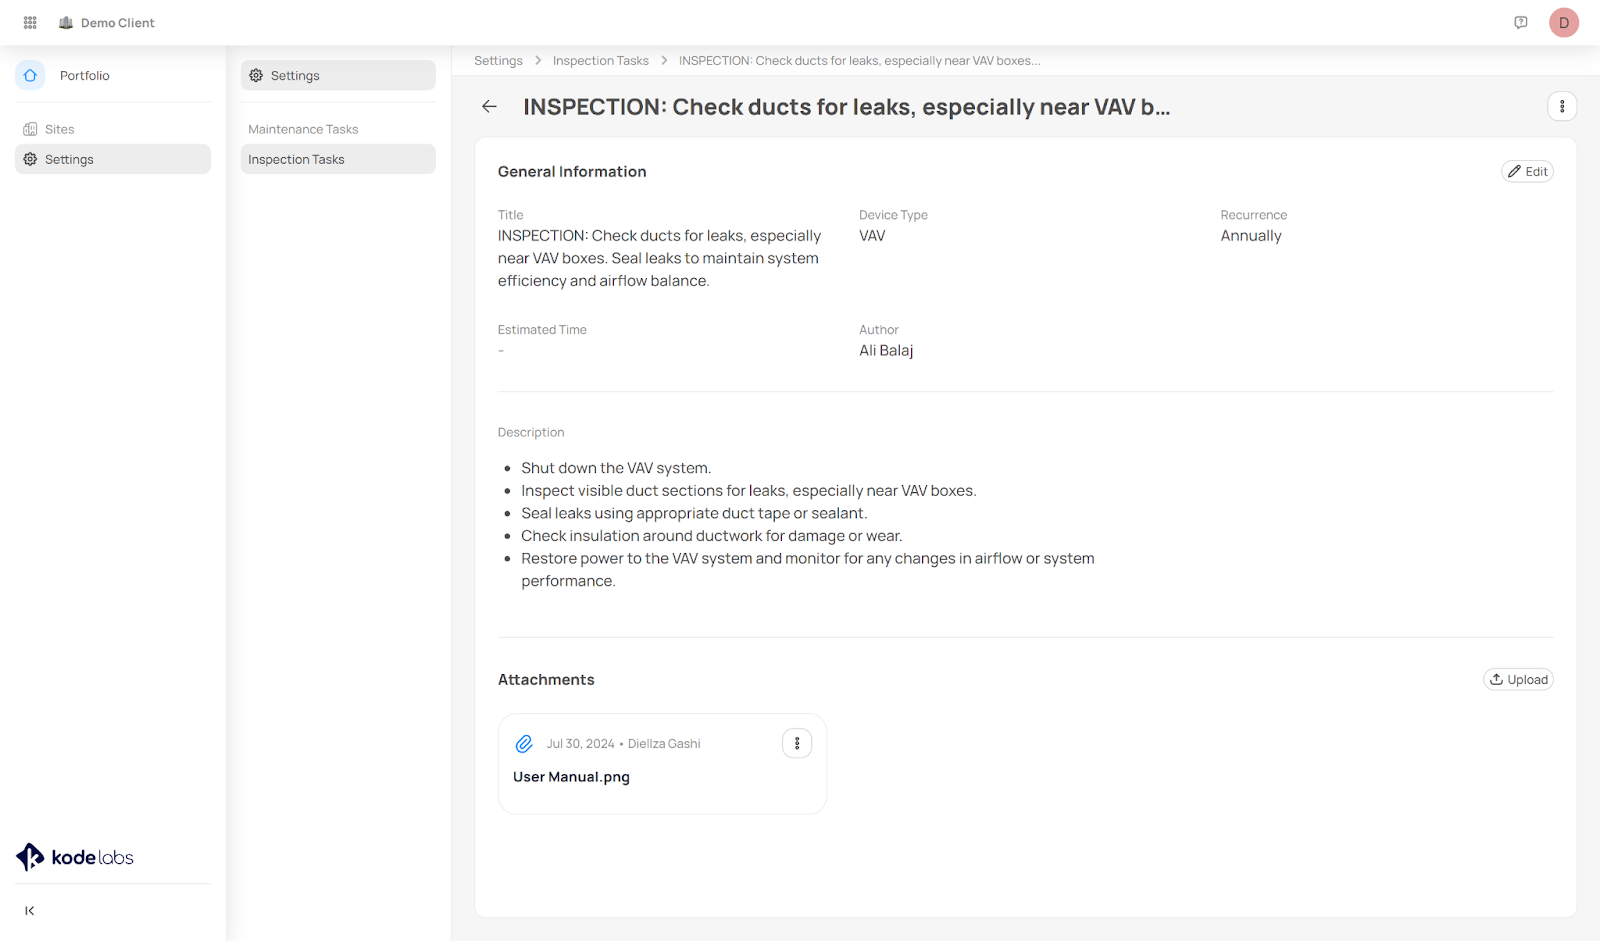
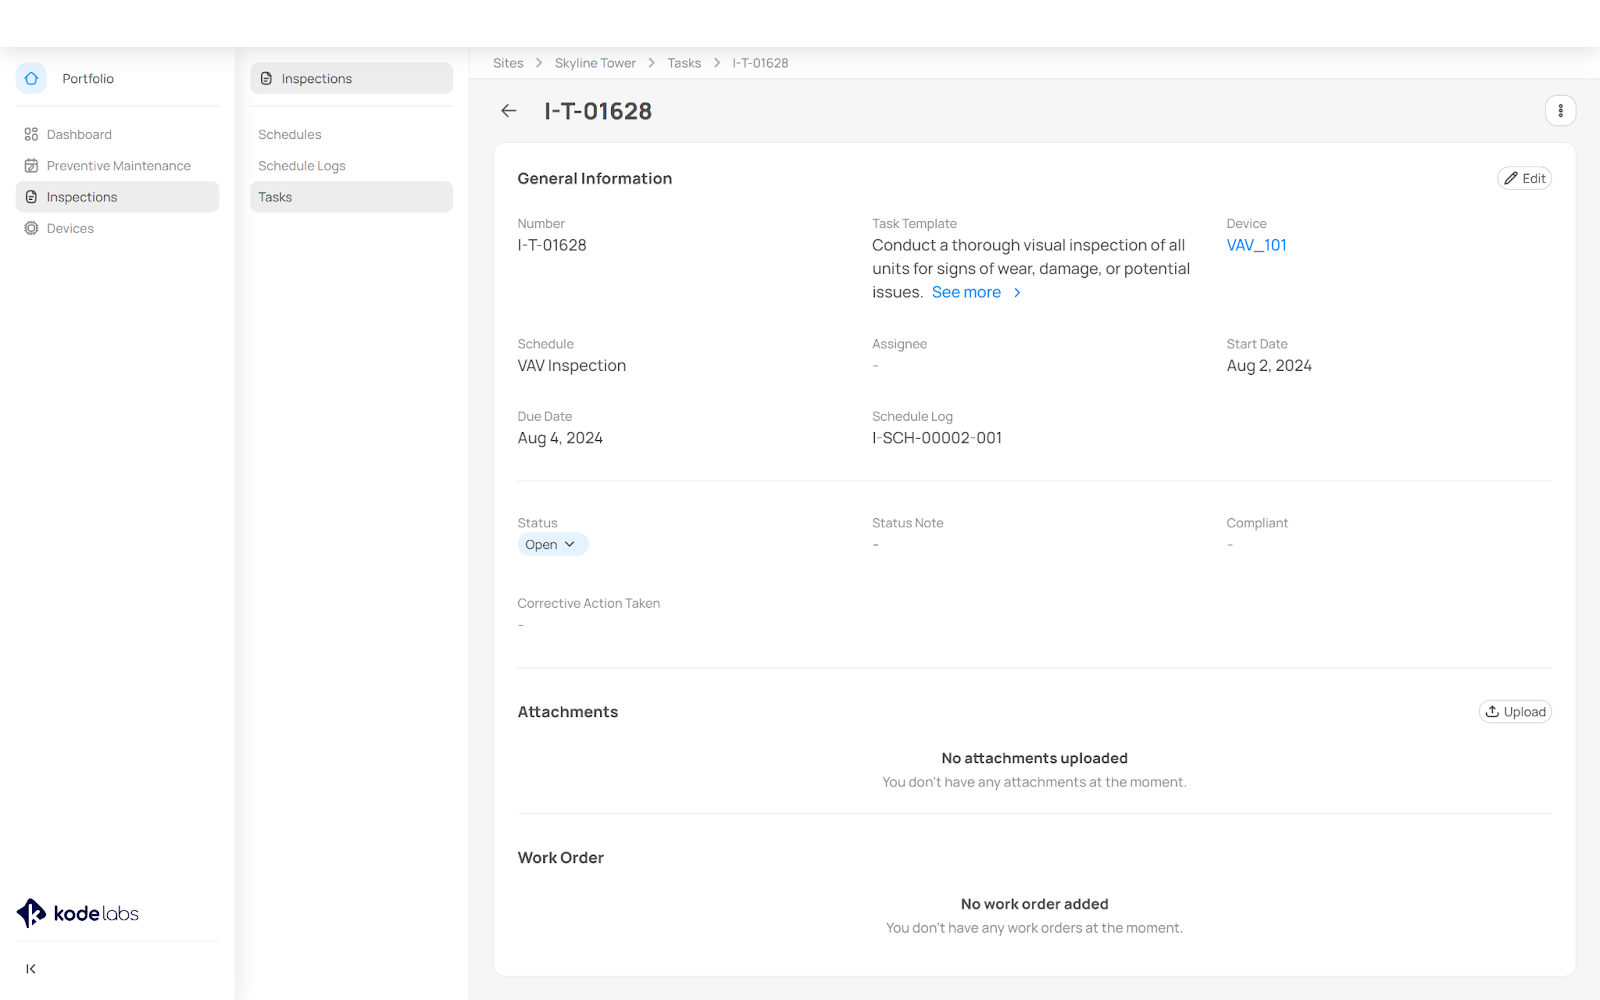
Inspections Task Details
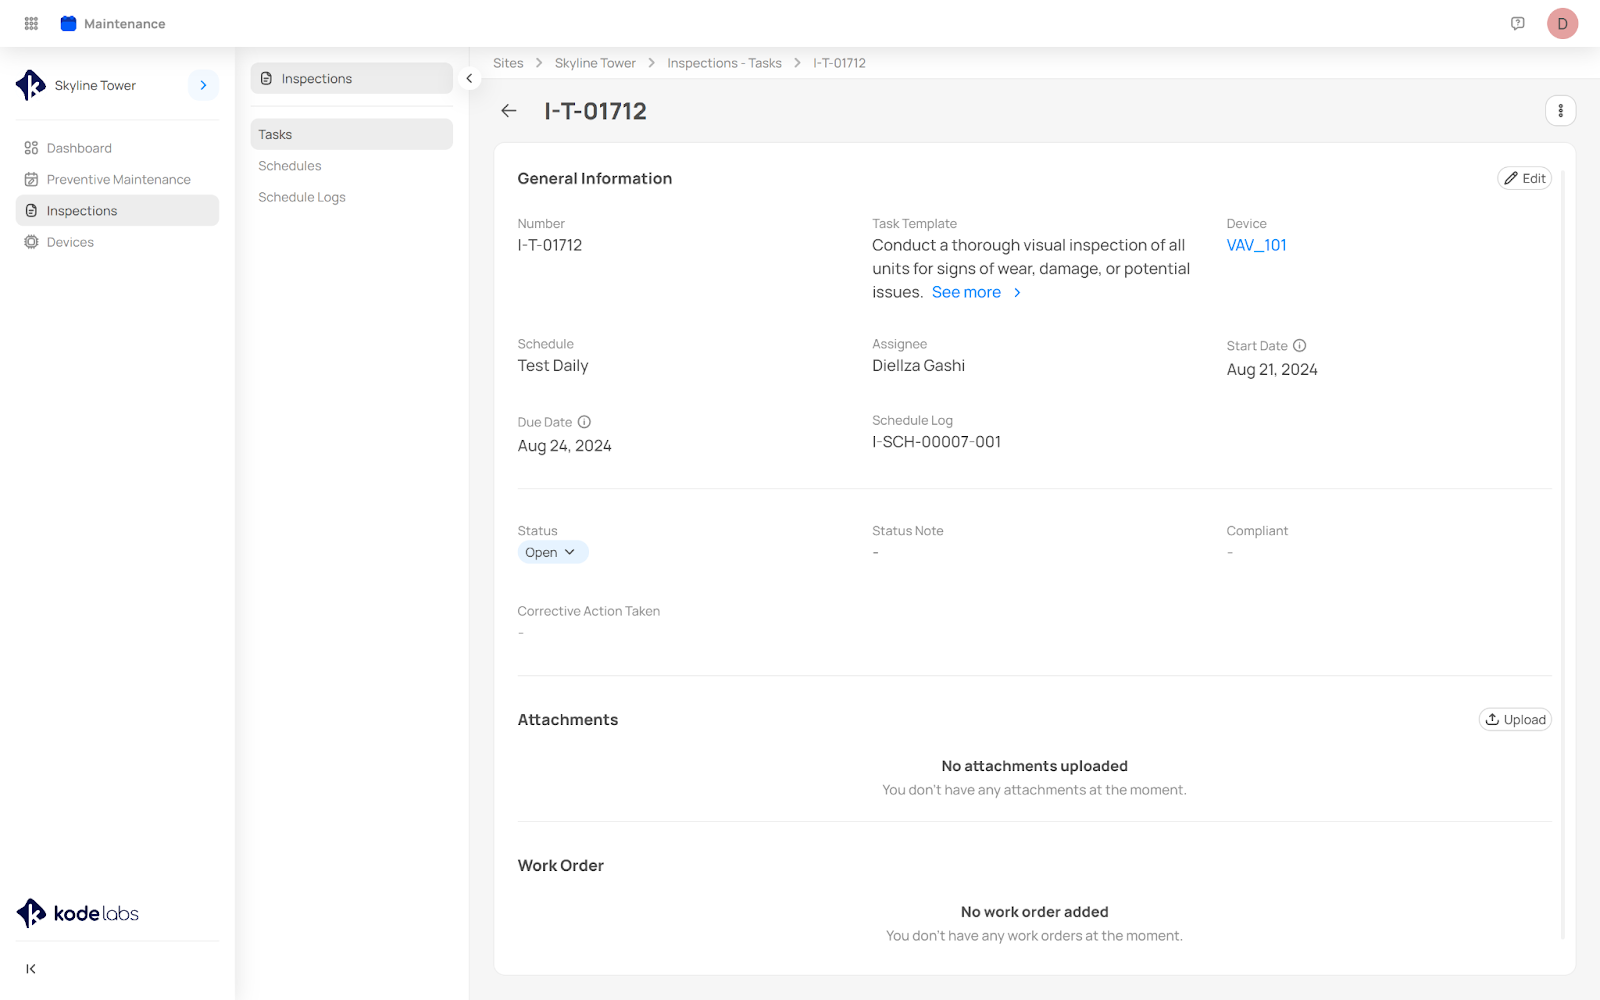
Once you select a task from the list you will be prompted to view its detailed information.
In the ‘General Information’ section, you'll see:
Task Number,
Task Template,
By clicking the ‘See More’ button, you can access detailed information about the Task Template. This view includes a comprehensive description, which may outline steps or provide relevant details for the task, as well as attachments such as manuals and videos that can assist engineers in performing inspections.
Device Name (with a link to the device details),
Schedule,
Assignee,
Start and Due Date,
Schedule Log.
To update a task's status, click on its current status and choose from the following options:
Completed: Mark the task as compliant or non-compliant. If non-compliant, you'll be prompted to note any corrective actions taken. You can also add notes or attachments.
Cancelled: Provide reasons for canceling the task and include any relevant notes or attachments.
Not Applicable: Explain why the task is not applicable by adding a note and attach any supporting documentation o.
On Hold: Indicate why the task is being paused, with the option to add notes and attachments.
Open: This is the default status when a task is created, indicating that it's ready to be worked on.
Attachments: Upload images of devices or any other relevant documents related to the task.
Work Orders: This section displays all associated work orders that have been created for the task.

Inspection Schedules
An Inspection schedule gives you a framework to organize all the inspections needed throughout your organization.
On the Inspection Schedules page you will see the list of existing schedules from where you can access 2 different views:
List View - a straightforward, detailed overview of schedules.

Calendar View - a clear, visual representation of schedules, improving planning, coordination, and time management.
Create and schedule Inspection Schedules
To create an Inspection schedule follow the below steps:
Click on the “Create” button, at the top right of the page.
On the “New Schedule” page, fill in the general information such as:
Title
Assignee
Device Type
Description
Go to the 2nd step “Schedule” to set the time slots.
Schedule Type
Just Once or
Recurrent
Start Date and Time
End Date and Due by Days
Frequency
Daily
Weekly
Monthly
Quarterly
Annual
On the 3rd step ”Choose Task Templates”, you have the option to select the task templates.
Select one or multiple tasks and click on “Next”.
On the 4th step “Choose Devices”, you will have the option to select the devices you wish to perform inspection to.
Click on the “ Complete” button, and now you have created a new Inspection Schedule.

Inspection Schedule Details
After creating an inspection schedule, you'll be automatically directed to its details page. From here, you can modify the "General Information" or adjust the ‘Schedule’ time slots as needed.
By default the status of schedules is initially set to 'Active'.
If you change the status to 'Inactive,' the schedule will be paused and won’t trigger until reactivated.
Once the schedule's duration ends, its status will automatically update to ‘Completed', and it will no longer be triggered.

On the “Tasks” tab, you can add or remove tasks.
On the “Devices” tab, you can add or remove devices.

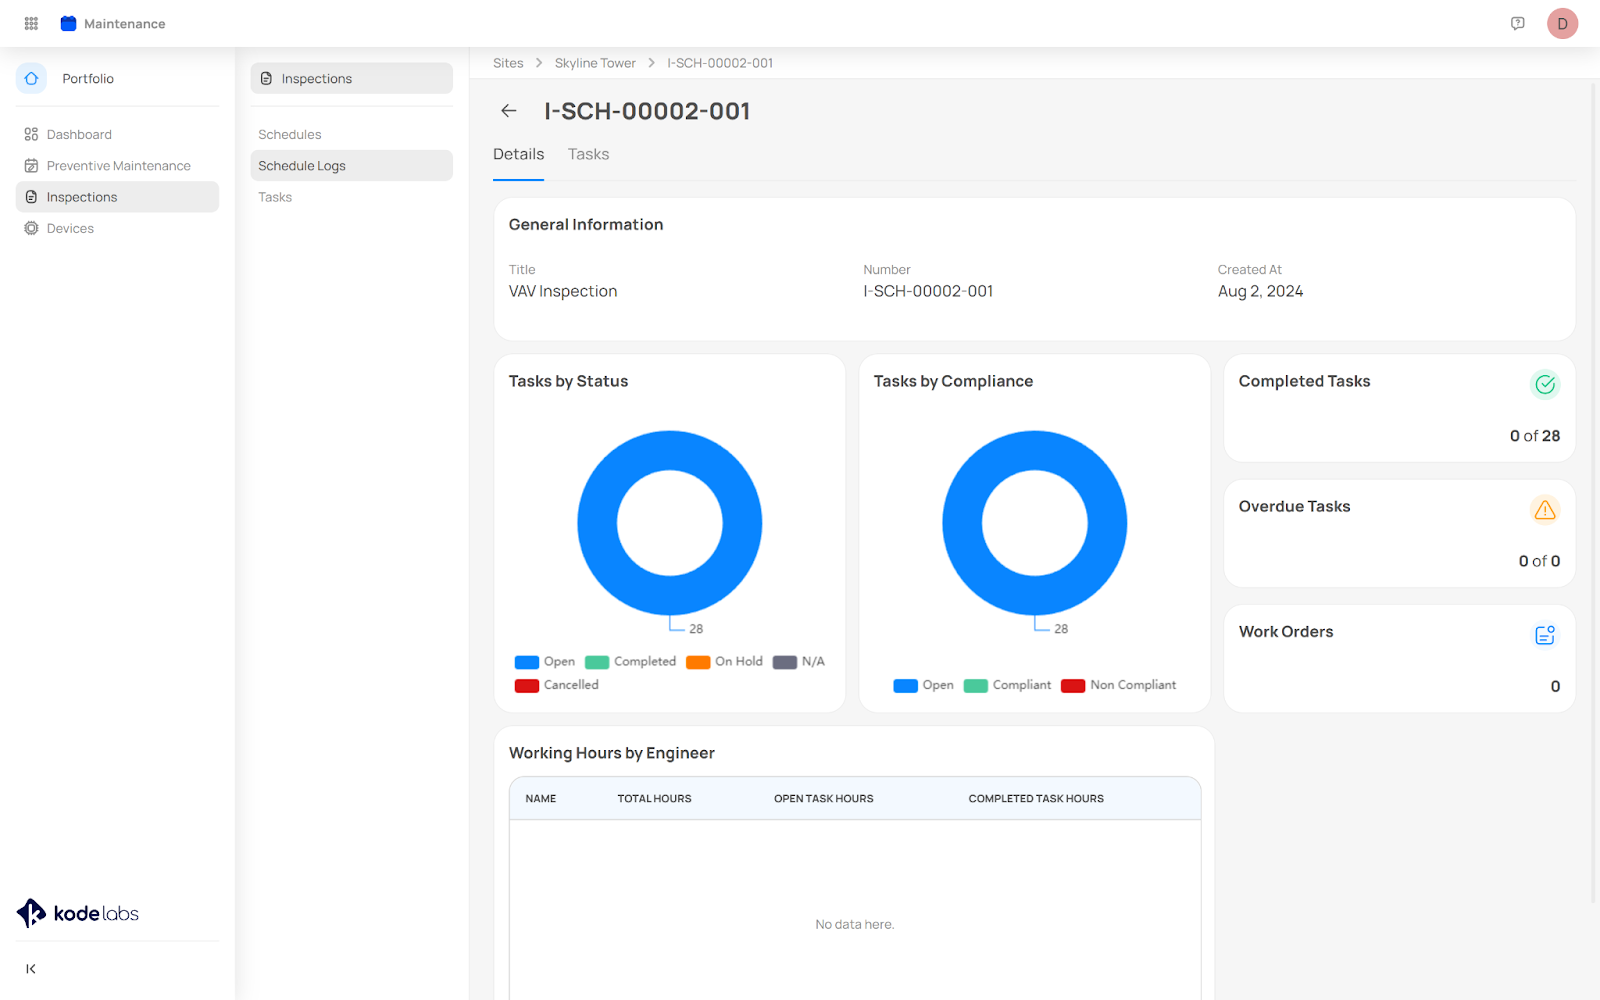
Inspections Schedule Logs
The Schedule Logs module provides a comprehensive list of all your schedules. From this list, you can select a specific schedule to view the status of each task and visualize the overall progress. This will help you ensure essential items aren’t left out or forgotten, as well as to make sure maintenance procedures with multiple steps are performed accurately and completely.
Schedule Log Tasks
The Tasks tab is your central hub for managing all devices and their associated tasks.
Select one or more devices and click on the “Edit” button at the top right of the page to edit the “Due Date” or ”Assignee”.
Select one or more devices and click on the “Delete” button at the top right of the page to delete the tasks.
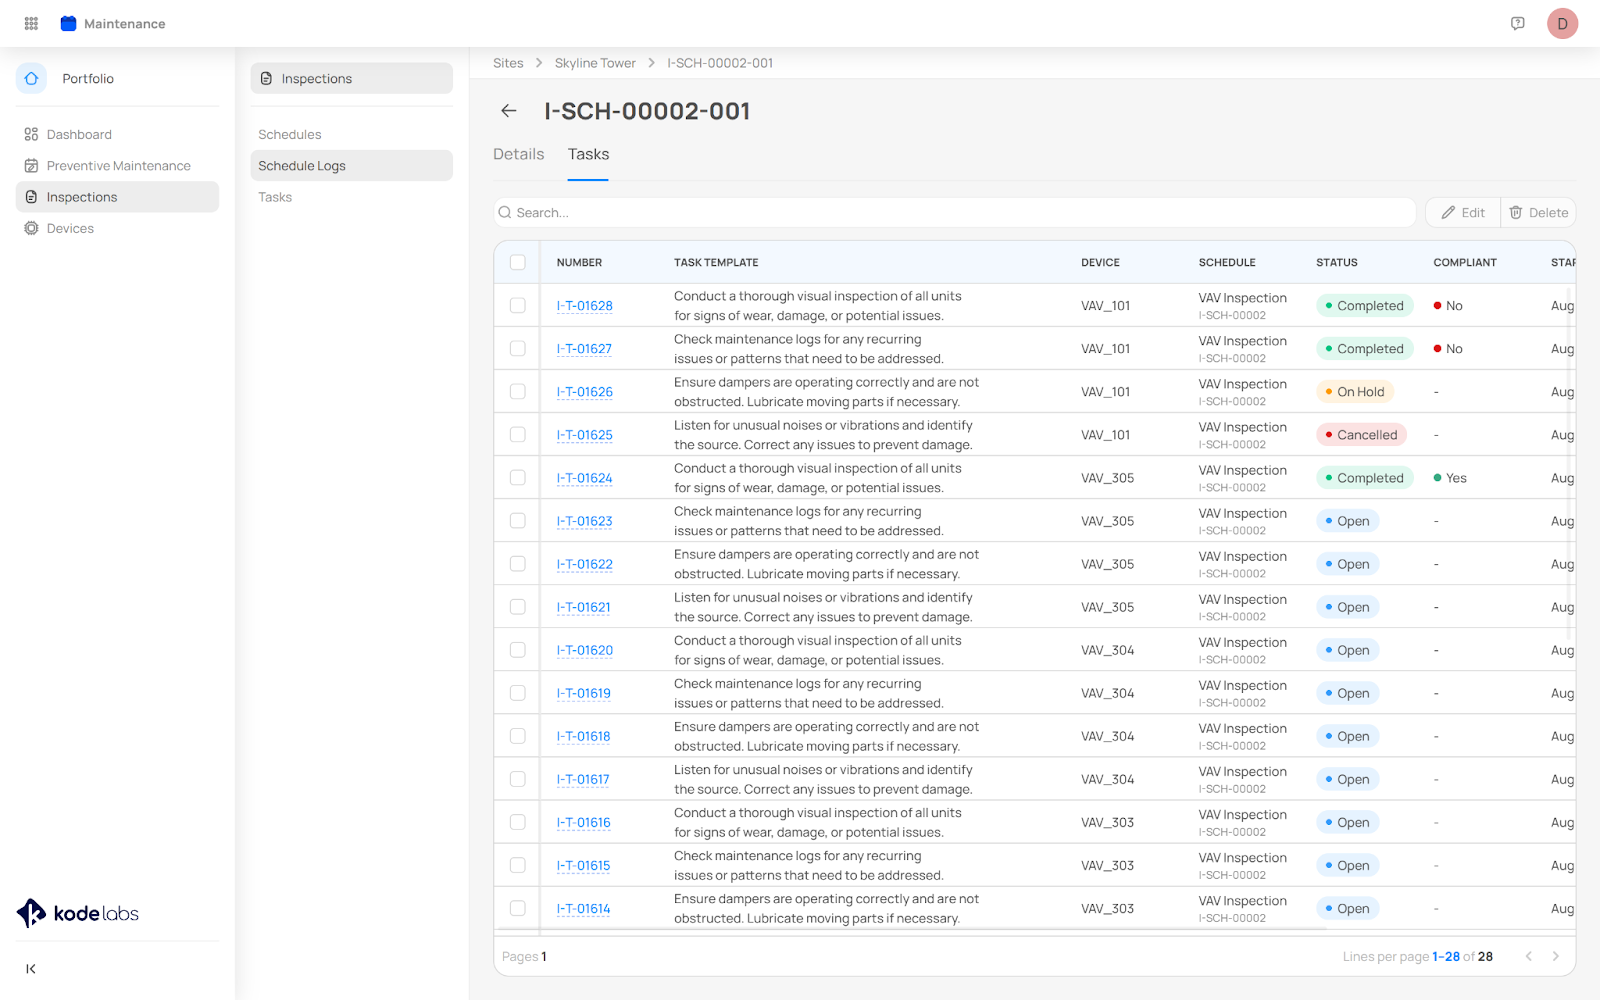
Selecting a task from the list, you will be redirected to the task details from where you can make edits, update the task status, and add attachments.
Clicking on the Device name, you will be redirected to the device details in KODE OS.
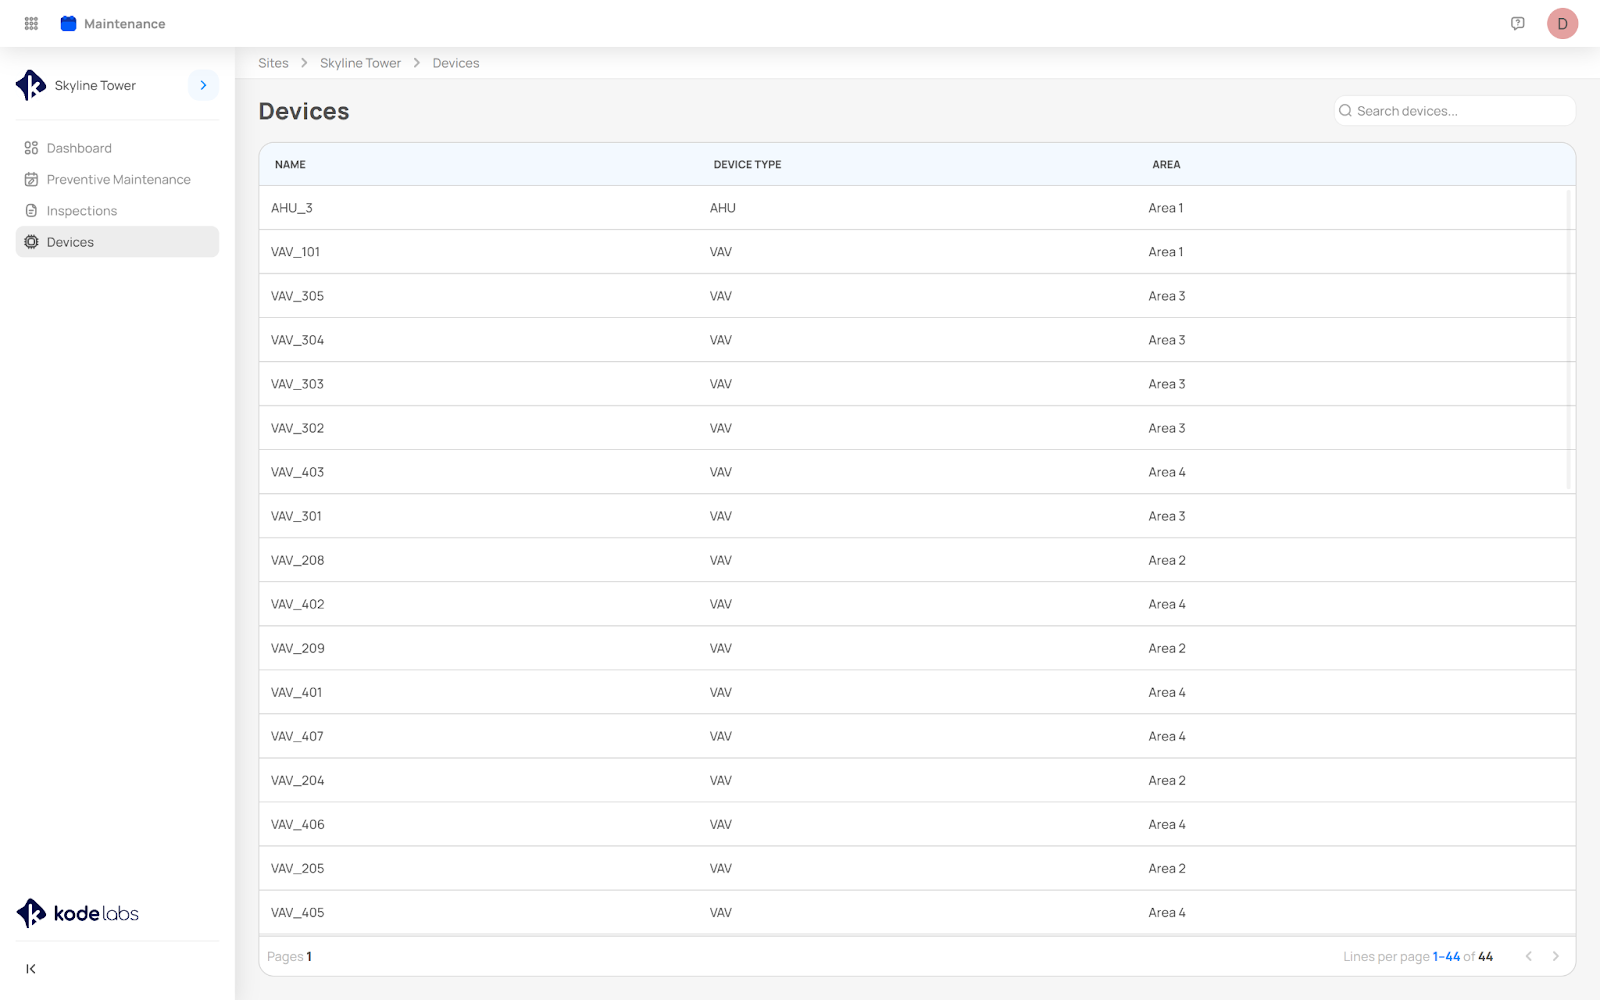
Devices
The Devices section within the Preventive Maintenance module provides an overview and detailed management of all devices requiring scheduled maintenance and tasks. To access this section, follow these steps:
From the site section, select the site.
Click on the "Devices" module to enter the Devices page.
Overview of Devices page
Upon entering the Devices page, you will see a list of all devices with assigned preventive maintenance and inspections tasks. You can either scroll through this list or use the search function to select a specific device.
Device details
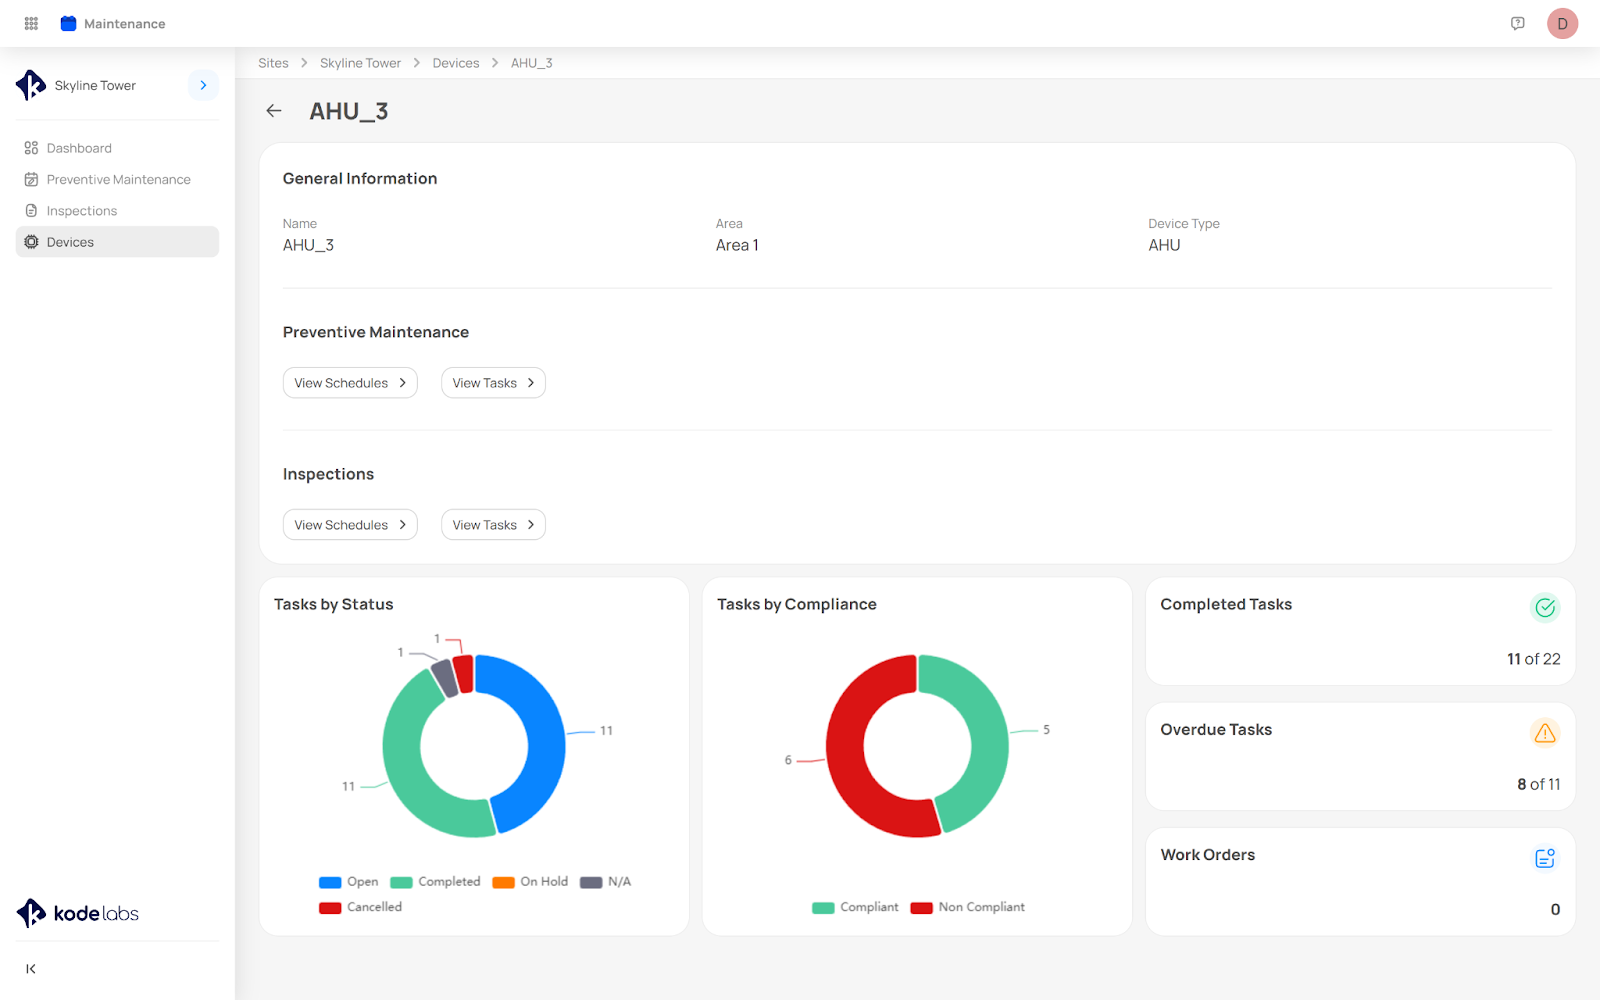
When you select a device from the list, you’ll be directed to a page that displays general information about the device, including:
Device Name: The name of the device.
Area: The specific area where the device is located.
Device Type: The category or type of the device.
Preventive Maintenance section
In the Preventive Maintenance section, you’ll find two key button links:
View Schedules: Clicking this button redirects you to the preventive maintenance schedules, specifically filtered for the selected device. This allows you to see all the tasks that have been performed on the device and what schedules the device is part of.
View Tasks: This button takes you to a detailed list of preventive maintenance tasks associated with the selected device.
Inspections section
In the Inspections section, you’ll find two key button links:
View Schedules: Clicking this button redirects you to the inspection schedules, specifically filtered for the selected device. This allows you to see all the tasks that have been performed on the device and what schedules the device is part of.
View Tasks: This button takes you to a detailed list of inspection tasks associated with the selected device.
Device metrics and charts
At the bottom of the device page, you’ll find five charts that provide important metrics related to the device:
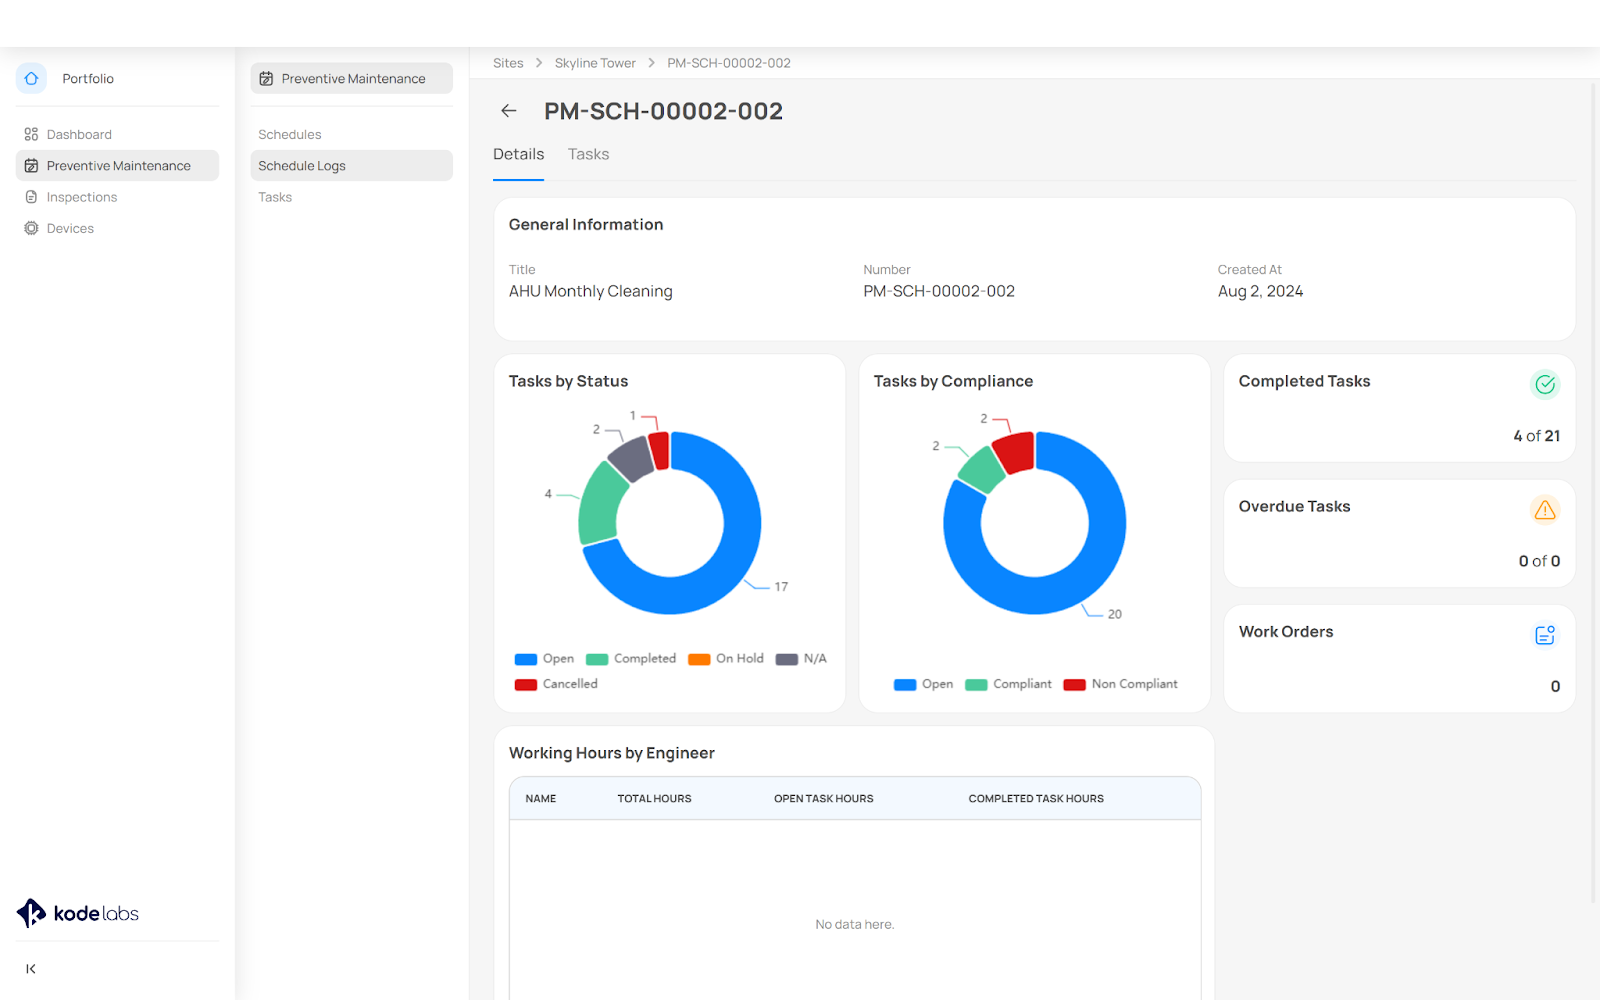
Tasks by Status: A pie chart showing the distribution of tasks by their current status, such as open, on hold, etc.
Tasks by Compliance: Another pie chart that indicates how many tasks are compliant versus non-compliant.
Completed Tasks: This metric shows the total number of completed tasks for the selected device. For example, 10 out of 23 tasks might be marked as completed.
Overdue Tasks: This chart indicates the number of tasks that are overdue. An example might be 10 out of 23 tasks being overdue.
Work Orders: This displays the number of work orders created for the selected device. For example, it might show that 3 work orders have been created.
Streamline your Maintenance Tasks with KODE OS
As a maintenance engineer, your primary responsibility is to ensure the continuous and efficient operation of machinery, equipment, and systems. With KODE OS, managing and executing your maintenance tasks becomes more straightforward and efficient, whether you're at your desk or on the go.
KODE OS offers two convenient ways to view and manage your tasks:
Device Details page
Tasks module within KODE OS
How to access Tasks from the Device Details page?
Log in to KODE OS and select the desired site.
Navigate to the main left navigation bar and click on ‘Devices’.
From the device list, select the specific device you want to manage.
Click on the Tasks icon located on the right sidebar of the device details page.
Once you've accessed the Device Details page, you'll see a list of tasks associated with the selected device. Each task includes the following information:
Task Description
Due Date
Status
Compliance Status
Corrective Action Taken
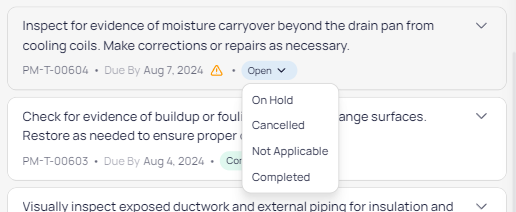
If a task is overdue, it will be highlighted with a yellow triangle, drawing your attention to its urgency.

Updating Task Status
To update a task's status, simply click on the current status and choose from the following options:
Completed: Mark the task as compliant or non-compliant. If non-compliant, you'll be prompted to note any corrective actions taken. You can also add notes or attachments.
Cancelled: Provide reasons for canceling the task and include any relevant notes or attachments.
Not Applicable: Explain why the task is not applicable by adding a note and attach any supporting documentation o.
On Hold: Indicate why the task is being paused, with the option to add notes and attachments.
Open: This is the default status when a task is created, indicating that it's ready to be worked on.

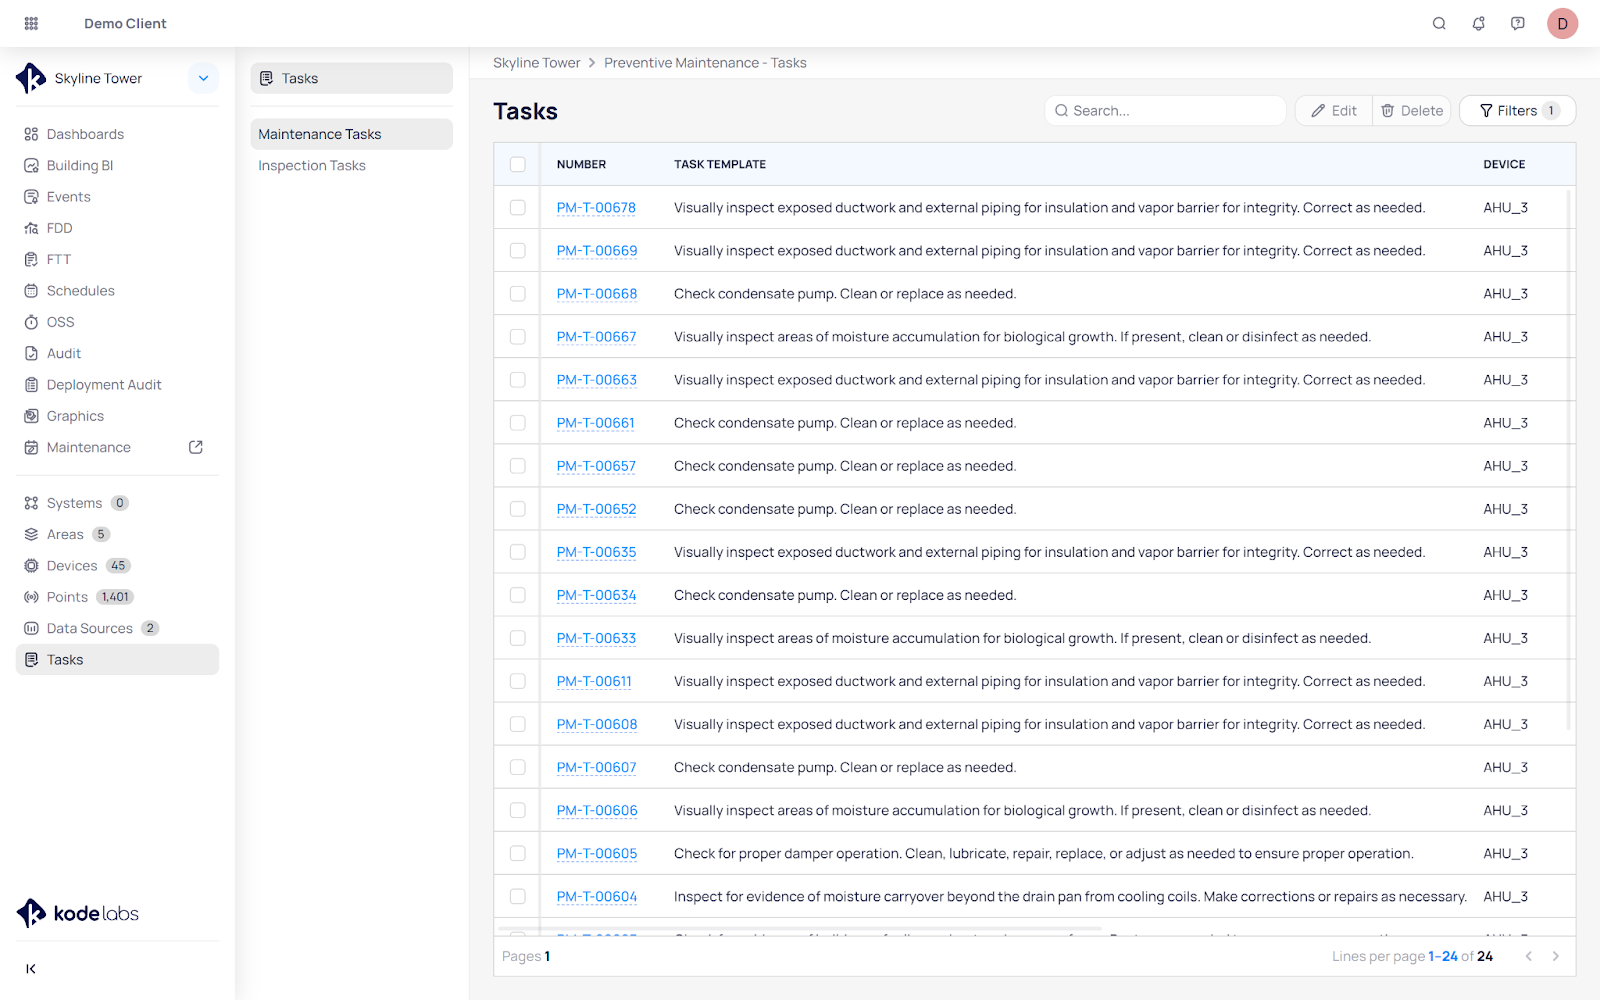
Accessing Tasks module within KDOE OS
Log in to KODE OS and select the desired site.
Navigate to the main left navigation bar and click on ‘Tasks’.
In the Tasks module, select either the Maintenance or Inspection tab to view tasks related to your chosen category.
You'll be presented with a comprehensive list of tasks. You can browse through the tasks or use the search function to find specific tasks.
At the top right of the page, you'll find 3 important buttons:
Edit: Select a task and click on the Edit button to modify the due date or change the assignee.
Delete: Select a task and click on the Delete button to remove it from the list.
Filters: Use the filter options to narrow down tasks based on criteria such as start and due date, status, schedule, device, assignee, overdue tasks, and compliance status.
Task Details
Once you select a task from the list you will be prompted to view its detailed information.
In the General Information section, you'll see:
Task Number
Task Template
Device Name (with a link to the device details)
Schedule
Assignee
Start and Due Date
Schedule Log
To update a task's status, click on its current status and choose from the following options:
Completed: Mark the task as compliant or non-compliant. If non-compliant, you'll be prompted to note any corrective actions taken. You can also add notes or attachments.
Cancelled: Provide reasons for canceling the task and include any relevant notes or attachments.
Not Applicable: Explain why the task is not applicable by adding a note and attach any supporting documentation o.
On Hold: Indicate why the task is being paused, with the option to add notes and attachments.
Open: This is the default status when a task is created, indicating that it's ready to be worked on.
Attachments: Upload images of devices or any other relevant documents related to the task.
Work Orders: This section displays all associated work orders that have been created for the task.
How to perform tasks as a maintenance engineer through the Mobile app?
Maintenance engineers play a crucial role in ensuring the smooth operation of machinery, equipment, and systems. As an engineer from the field you will have access to use KODE OS mobile app for easy access as you are on the go.
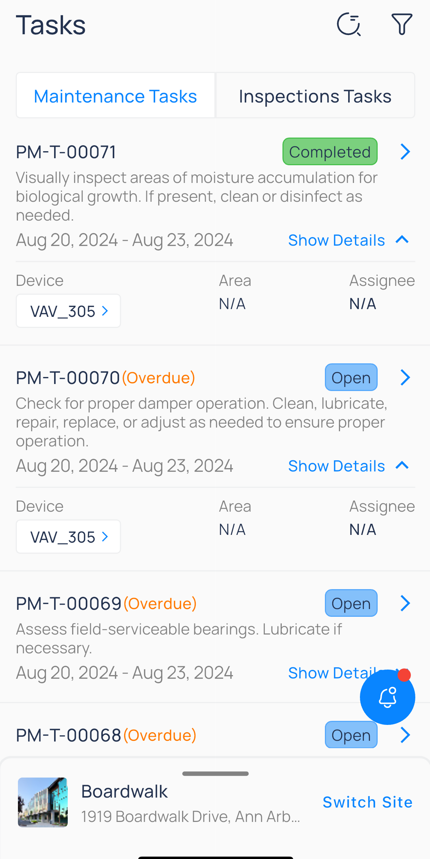
To access Preventive Maintenance from the mobile app:
Open the KODE OS app on your mobile phone.
Select a site from the Sites list.
Swipe upwards to see the site modules and select ‘Tasks’.
Here you will see the list of all tasks, with all details, device name and their status.
Switch to Inspection Tasks to view the list of Inspection Tasks.
Select “Show Details” to see the exact area and location of the device.

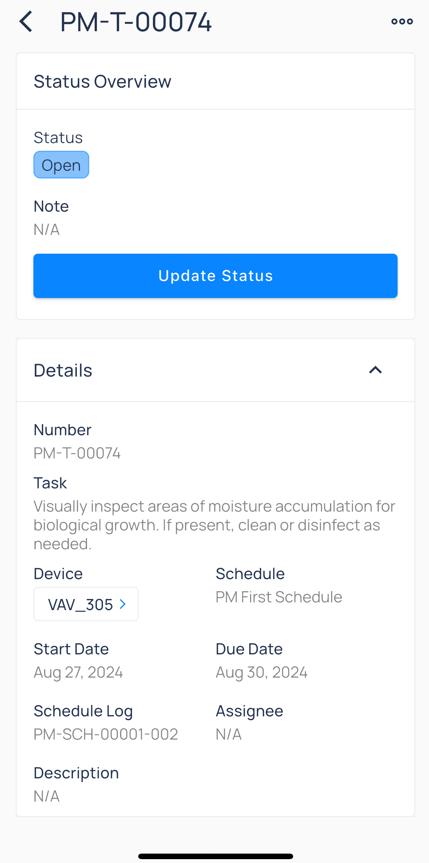
Task Details
To view the task details and instructions on how to perform the task you can rely on “Task Details” by selecting a task from the list.
Status Overview section: Update the status of the task by clicking on the “Update Status” button. To update a task's status, click on its current status and choose from the following options:
Completed: Mark the task as compliant or non-compliant. If non-compliant, you'll be prompted to note any corrective actions taken. You can also add notes or attachments.
Cancelled: Provide reasons for canceling the task and include any relevant notes or attachments.
Not Applicable: Explain why the task is not applicable by adding a note and attach any supporting documentation o.
On Hold: Indicate why the task is being paused, with the option to add notes and attachments.
Open: This is the default status when a task is created, indicating that it's ready to be worked on.
Details: In the Details section you can find relevant information about the task like:
Task Template
Device (with a link that directs you to device details)
Schedule
Start and Due Date
Schedule Log
Assignee
Description
Attachments: Upload images of devices or any other relevant documents related to the task.
Work Orders: This section displays all associated work orders that have been created for the task.
Manuals: Uploaded manuals and videos that can assist engineers in performing maintenance.
How to access Tasks from the Device Details page?
Log in to KODE OS from the mobile app and select the desired site.
Swipe upwards and select ‘Devices’.
From the device list, select the specific device you want to manage.
Click on the 3 dots icon at the top right of the screen and select ‘Tasks’.
Here you'll see a list of tasks associated with the selected device. Each task includes the following information:
Task Description
Due Date
Status
If a task is overdue, it will be highlighted with an orange message, drawing your attention to its urgency.
Updating Task Status
To update a task's status, click on the task to go to its details page, click on “Update Status” button and choose from the following options:
Completed: Mark the task as compliant or non-compliant. If non-compliant, you'll be prompted to note any corrective actions taken. You can also add notes or attachments.
Cancelled: Provide reasons for canceling the task and include any relevant notes or attachments.
Not Applicable: Explain why the task is not applicable by adding a note and attach any supporting documentation o.
On Hold: Indicate why the task is being paused, with the option to add notes and attachments.
Open: This is the default status when a task is created, indicating that it's ready to be worked on.
Roles and Permissions
The Preventive Maintenance module offers dynamic role-based access control, allowing you to tailor user permissions based on their responsibilities and needs. Below are the functionalities managed through Roles:
Functionalities Managed by Roles:
Access to Maintenance App or Task List in CloudBMS:
Users must have the "Get Maintenance" permission checked under the General settings to access the Maintenance app or the Task List in CloudBMS.
Read Ability for Dashboard and Schedule Log:
This permission allows users to view dashboards and schedule logs without making changes.
Schedules List Permissions:
Read-Only: Users can only view the schedules.
Add/Update/Delete: Users can create, modify, or delete schedules.
Task Templates Permissions:
View-Only: Users can view task templates without making changes.
Add/Update/Delete: Users can create, modify, or delete task templates.
Tasks Permissions:
Read-Only: Users can only view tasks.
Add/Update/Delete: Users can create, modify, or delete tasks.
Task Visibility Constraint: This setting restricts users to see only the tasks they are assigned to or allows them to view all tasks.
Recommended Role Setup:
Main Preventive User:
Access: Full access across all modules and visibility of all tasks.
Responsibilities: This user has control over Task Templates, ensuring consistency and preventing duplication. They are also responsible for keeping the task list up to date and adding relevant documentation.
Facility Manager:
Access: Full access to everything, with view-only permission for Task Templates.
Responsibilities: Typically assigned to manage one building, occasionally multiple buildings. The Facility Manager creates and manages schedules for their assigned buildings and only sees those buildings.
Engineer:
Access: No access to the Maintenance App; access is limited to the Tasks module in CloudBMS.
Responsibilities: Can only see tasks assigned to them, ensuring focused task management.
Related Articles
Running a Functional Test
Functional Testing is a digital commissioning tool to validate equipment operation. KODE Labs supports a variety of tests on a variety of equipment, but it is most commonly used on zone controllers such as Fan Coils, VAVs, and Heat Pumps. Running a ...KODE OS Connectivity
KODE Labs is responsible for maintaining our end of the VPN tunnel and ensuring the uptime of our software. This includes the ability to log in and access our platform without any issues. The connectivity stack for KODE OS involves a series of ...What is FDD?
Understanding Fault Detection & Diagnostics What is a Fault? A fault is a period of time in which a specified condition is true on a specific device. For example, this is a fault: @8:00am AHU-1 Could not maintain discharge temperature within setpoint ...Mass Write Points
Introducing Mass Write Points The new "Mass Write Points" feature enhances building management by allowing users to write multiple points simultaneously across a building or an entire portfolio. This capability is particularly useful for various ...Functional Testing Tool Creators Guide
Creators Guide Table of Contents Introduction 3 What is Functional Testing? 3 Overview 3 Workflow Example 3 Common Use Cases 4 Workflow Architecture 4 What is a workflow? 4 Components of a workflow 5 Sequence Architecture 7 Building A Workflow 10 ...