Mass Write Schedules
Introducing Mass Write Schedules
The new "Mass Write Schedules" feature allows users to batch edit multiple schedules at once. This feature is particularly useful for making widespread adjustments, such as changing the start or end times across several schedules due to seasonal shifts or changes in tenant contracts. Additionally, it enables the addition of special events for holidays to multiple schedules simultaneously.
Use Cases
Seasonal Time Adjustments:
Change the start or end times of multiple schedules to accommodate longer or shorter daylight hours during different seasons.
Contract Changes:
Update schedules based on new agreements with tenants, such as adjusting operational hours for different lease terms.
Holiday Management:
Add special events to multiple schedules to turn off devices during holidays when buildings are not occupied.
Building-Wide or Portfolio-Wide Changes:
Implement changes to all schedules within a building or across an entire portfolio, ensuring consistency and saving time.
Emergency Adjustments:
Quickly modify schedules in response to unexpected events or emergencies, such as a building-wide shutdown.
Comparison to Single Schedule Control
Without the Mass Write Schedules feature, each schedule must be individually edited, which can be highly time-consuming and prone to errors, especially in large buildings or portfolios with many schedules.
Benefits of Mass Write Schedules
Efficiency:
Significantly reduce the time required to make changes by editing multiple schedules at once.
Consistency:
Ensure uniform changes across all schedules, reducing the risk of discrepancies and manual errors.
Scalability:
Easily manage and update schedules across large buildings or entire portfolios without the need for repetitive, individual adjustments.
Flexibility:
Quickly respond to changes in occupancy patterns, tenant needs, or unexpected events with minimal effort.
By using the Mass Write Schedules feature, building operators can streamline their schedule management process, ensuring that all devices operate efficiently and in accordance with the latest requirements and conditions.
Detailed Instructions
How to enable access
Mass Write Schedules will be disabled by default for every role in an organization(e.g zenestate.kodelabs.com), to enable it:
Go to Launchpad -> Apps -> KODE OS -> Roles -> Pick your role or any role that you want to enable it to -> Edit
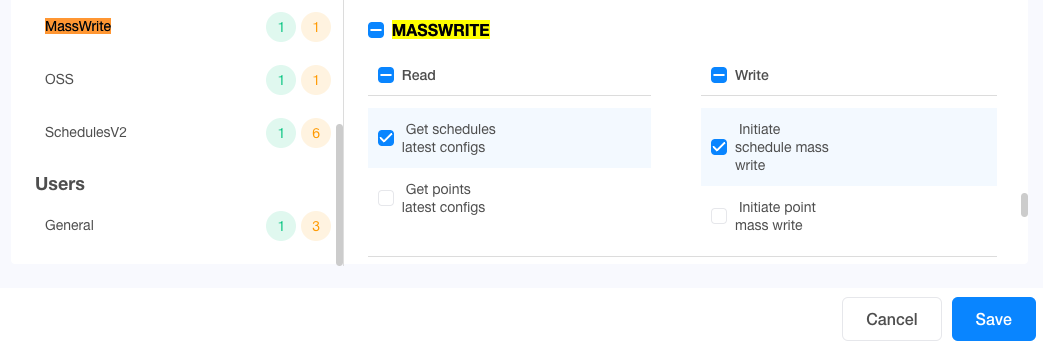
-> Check these two permissions shown on the screenshot above
Get schedules latest configs (this will enable the module)
Initiate schedules mass write (this will allow the users to initiate a mass schedule write)
-> Click Save
The Mass Write Module will show up in the Portfolio view for that organization to the users that have that role.
Accessing Mass Write Schedules
The Mass Write Schedules feature is accessible from the portfolio level view of the KODE OS app.
Navigating to Mass Write Schedules
On the portfolio view page, you will see Jobs split into Schedules and Points (Points is another mass write feature which is explained in another document)
Navigate to the Schedules tab
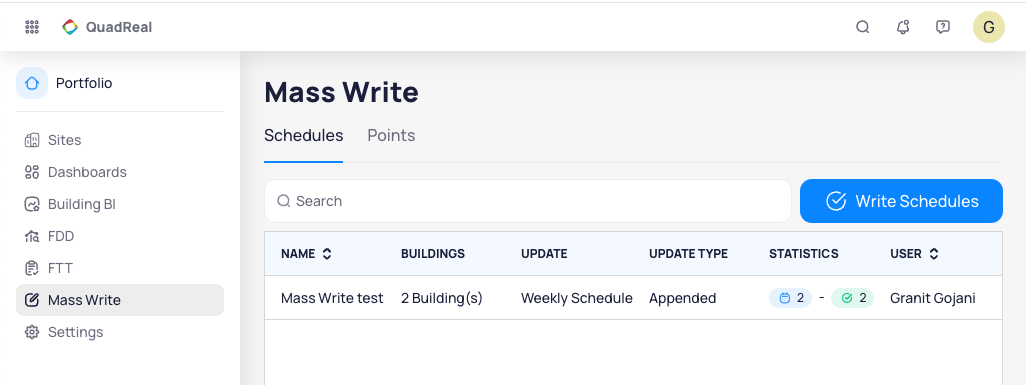
Viewing Previous Mass Write Actions
When you visit this module for the first time, there will be nothing shown on the list. Once you start using this feature you will see the previous mass write actions (Jobs) listed here.
This will be covered later in the document.
Using Mass Write Schedules
To start the process of writing multiple schedules, -> click on the “Write Schedules” button and you will be navigated to this page:
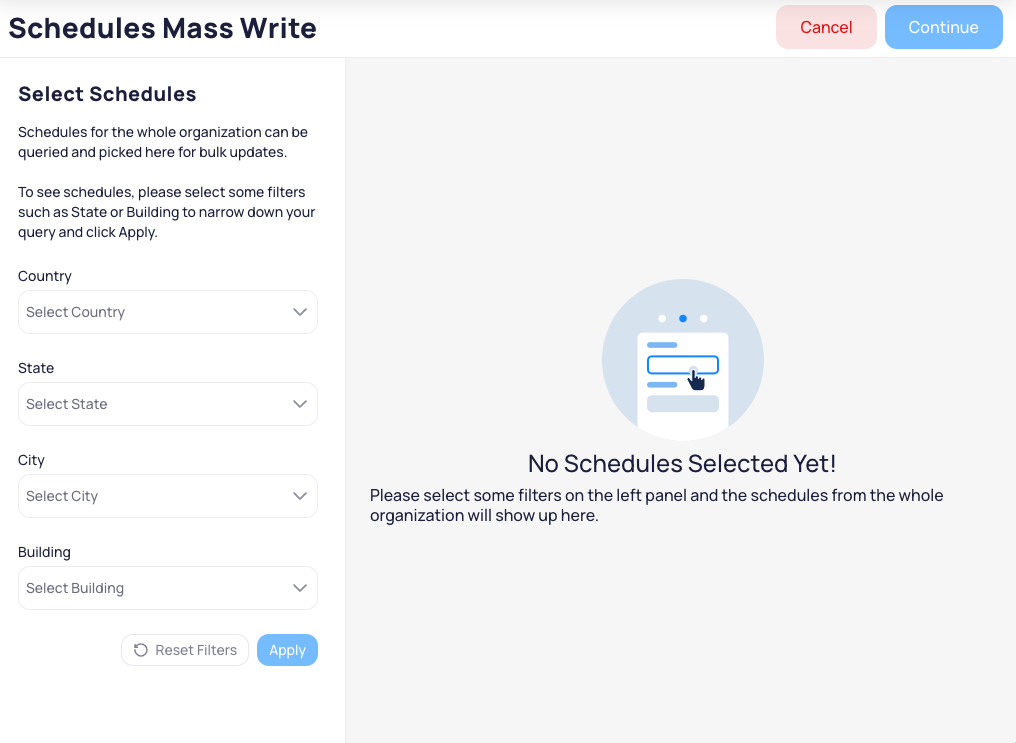
Selecting sites (buildings)
To see the schedules, you should use the filters on the left panel first to pick a site or multiple sites:
You can filter sites by:
Country
State
City
Building
Once you pick the site(s) click Apply
There is no limit to how many sites you can pick.

Selecting schedules
Every Weekly Schedule (excluding Calendar schedules) is shown on the list according to the filters.
Use the Filters button at the top right to filter schedules based on:
Data source type
Schedule type
Selecting schedules
Filtered schedules appear in a table where you can select/deselect them.
All schedules are selected by default. Deselect schedules you don’t want to write.
Deselect all works only for the schedules shown on the current page (100 schedules by default).
You can select multiple point types and kinds simultaneously.
Once you confirm that the desired schedules are selected, -> click Continue to Set Values
Please note that the schedules can’t be removed from the list on later steps of the process. Ensure that only desired schedules are selected.
Creating the Temporary Schedule
Configuring the Job
Provide a Job name
This information is needed because here we will create a “Job” for tracking progress and reviewing it later.
Update Type
The Schedule Type input allows you to pick what do you want to update:
Weekly
In case you want to update only the Weekly schedule to the selected schedules
Special Events
In case you only want to add special events to them
Both
If you pick Both, make sure to add both weekly time-slots and special events, otherwise you can’t continue further

If you pick Weekly, the special events won’t be touched, the same applies to Weekly if you only pick Special Events.
The next option to pick is very important, Update Type:
Append
Adds the update (weekly or special events) to the current state of the selected schedules
So if a special event already exists in the schedules, it doesn’t delete them and will simply add the new ones you will add here
The time slots on the weekly schedules will simply be added on top of those that exist
Replace
This will replace the Weekly or Special Events or both(depending on what you pick for Update Type) on all the selected schedules with the changes you do here
Use this only if you want to reset everything with the schedule you apply here
Please use the Replace option with caution, the changes or the selected schedules are not revertible after you complete the update.
If you are adding special events, there will be another input field Priority, which lets you pick between Top and Bottom. If the schedules you are updating already have special events, this will either add the new ones at the top of the list (higher priority) or at the bottom of the list (lower priority). The priority only applies if two special events have the same date.
Temporary Schedule
After you choose the options above, the schedule screen will show up:
If you have picked Weekly, you will only see that calendar view
If you have picked Special Events, only the view to create special events will show up
If Both, then calendar view and special events will show up spit into 2 tabs
Setting Time-slots for Weekly
Here you will create a “temporary schedule” which will be applied to the selected schedules that you picked to update.
In this step, you will only add the time slots (e.g 8:00 to 16:00), the values for those times (e.g Occupied/Unoccupied) will be added on the next step.
If the update type is Append, these values will be simply added to the schedules on top of the time-slots they already have
If the update type is Replace, all the time-slots of the selected schedules will be replaced with these ones that you set here
Days left blank here will be deleted from the schedules

Adding Special Events
Adding special events here is the same flow as adding them on specific schedules within KODE, you should:
Create the special events by picking different options that exists for special events
Add the time-slot for those special events (e.g 00:00 to 24:00)
Values for the special events will be added on the next step.

-> Once you are done with setting time-slots, click Continue to Set Values
Adding Values
On this screen, you will see the same temporary schedule on the right side.
-> To add values:
Click on a timeslot within the weekly schedule, or
Click on a special event, and then click on the timeslot
The schedules will show as grouped on the left hand side, we have grouped the schedules based on:
Schedule type - Boolean, Enum, Numeric, String
Schedule facets
Facets are possible schedule values that are set for each schedule
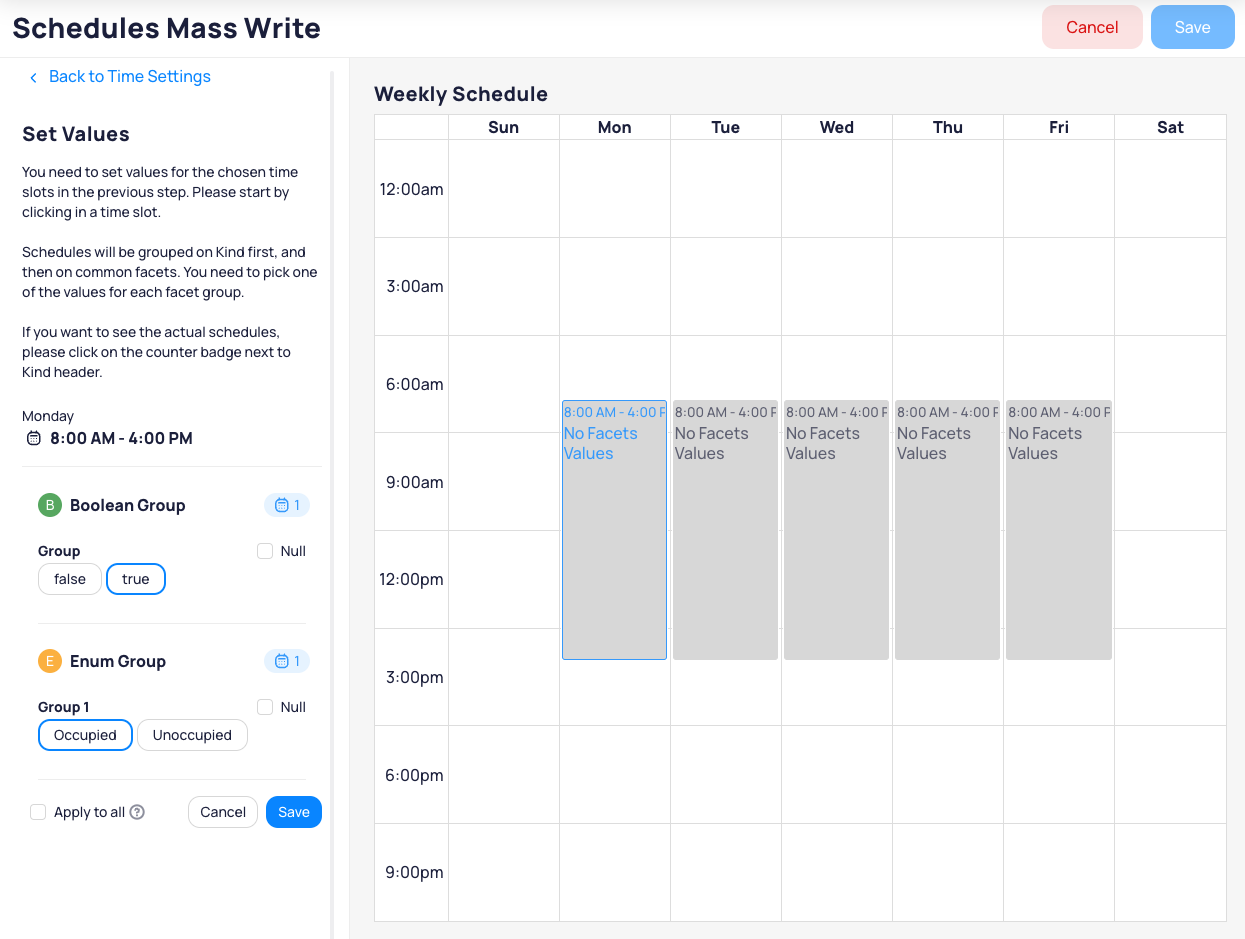
When you pick a time-slot, you will see schedule values on the right side grouped based on similarity and schedule type.
Pick the values for each group you want to set to the schedules for that time-slot:
You should pick one value for each group
This is applicable only for the selected time-slot, you should repeat the process for each, or
-> Click Apply to all, this will apply the same values to all time-slots of the weekly schedule
The same process of picking the time-slot and setting values should be done for the Special Events if there are any.
-> Click Save button at the bottom of left panel
To see which schedules are part of that group, please click the counter next to each group name.
The Save button at the top right will be disabled until you add values for all the time-slots on Weekly and Special Events.
Applying the Updates
To finish the mass update on schedules, please:
-> Click on the Save button at the top right
Please make sure that only the desired schedules are selected to be updated, you can’t revert the changes after you press Save.
After clicking Save, we will start the process of updating all those schedules.
You will be navigated to the “Job” details page where you can see the progress.
Job Details Page
On this page you will see the progress of the mass write process.
Job details shown on the left panel include:
Creator and creation time
Number of schedules processed
Success and failure counts
The right section shows you the same groups and their success and failure rates.
Click on the blue counts to see the actual schedules of the groups.
View schedule groups and click on the count to see details of successes and failures.
Jobs are listed on the main Mass Write page for future reference.
This “Job” will be part of the main list of the Mass Write page for you to see it later if needed.
Please contact [email protected] for further details or information.
Thank you!
Related Articles
Mass Write Points
Introducing Mass Write Points The new "Mass Write Points" feature enhances building management by allowing users to write multiple points simultaneously across a building or an entire portfolio. This capability is particularly useful for various ...Schedules Calendar view
The Schedules Calendar View provides a visual representation of schedules across various timeframes, enhancing visibility and planning. This dynamic view allows users to: Visualize Schedules: Switch between daily, weekly, and monthly views to manage ...Write Blocks
Write Blocks Write Blocks are how you can write (override) a point's value. A write action must be triggered by another block.Schedules Discovery
Schedules Discovery allows you to explore data sources and select which schedules to import into KODE OS. Navigating and using Schedules discovery There are two main ways to access Schedules Discovery: "Discover Schedules" button: Located in the ...Schedules Options and Features
The schedules feature allows you to manage and modify functioning schedules of various devices that are connected in a building. View, modify, delete numeric, boolean, string or enum schedules as required. Create Special Events. Using a calendar ...