Mass Write Points
Introducing Mass Write Points
The new "Mass Write Points" feature enhances building management by allowing users to write multiple points simultaneously across a building or an entire portfolio. This capability is particularly useful for various tasks, such as:
Peak Demand management i.e decreasing temperatures by 0.5 degree
Release the overrides so the devices will follow the schedule and turn off during the night to save energy.
Adjusting temperature setpoints seasonally to maintain optimal climate control.
Conducting scheduled maintenance by temporarily disabling specific devices or systems.
Responding quickly to emergency situations by simultaneously altering the operational state of multiple devices.
Optimizing building performance by making bulk adjustments based on occupancy patterns and usage data.
Comparison to Single Point Control
Without the Mass Write Points feature, users would have to individually select and adjust each point, which can be extremely time-consuming and inefficient, especially in large buildings with numerous devices. This manual process increases the risk of errors and inconsistencies, and operational delays. The Mass Write Points feature simplifies this process by allowing bulk modifications, which:
Reduces the time required to implement changes.
Minimizes the risk of manual errors.
Ensures consistent application of settings across multiple points.
Improves operational efficiency and response times.
Detailed Instructions
How to enable access
Mass Write Points will be disabled by default for every role in an organization(e.g zenestate.kodelabs.com), to enable it:
Go to Launchpad -> Apps -> KODE OS -> Roles -> Pick your role or any role that you want to enable it to -> Edit

-> Check these two permissions shown on the screenshot above
Get points latest configs (this will enable the module)
Initiate points mass write (this will allow the users to initiate a mass points write)
-> Click Save
The Mass Write Module will show up in the Portfolio view for that organization to the users that have that role.
Accessing Mass Write Points
The Mass Write Points feature is accessible from the portfolio level view of the KODE OS app.
Navigating to Mass Write Points
On the portfolio view page, you will see Jobs split into Schedules and Points (Schedules is another mass write feature which is explained in another document)
Navigate to the Points tab
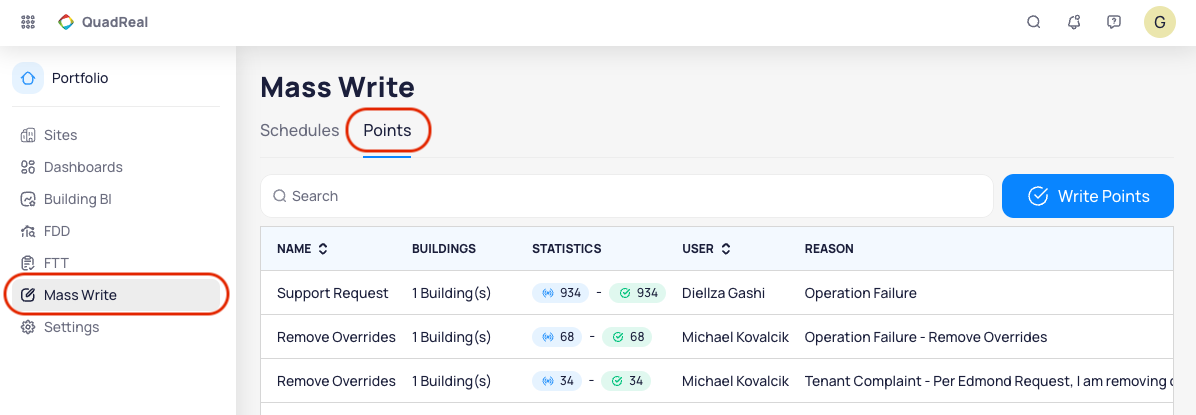
Viewing Previous Mass Write Actions
When you visit this module for the first time, there will be nothing shown on the list. Once you start using this feature you will see the previous mass write actions (Jobs) listed here.
This will be covered later in the document.
Using Mass Write Points
To start the process of writing multiple points, -> click on the “Write Points” button and you will be navigated to this page:
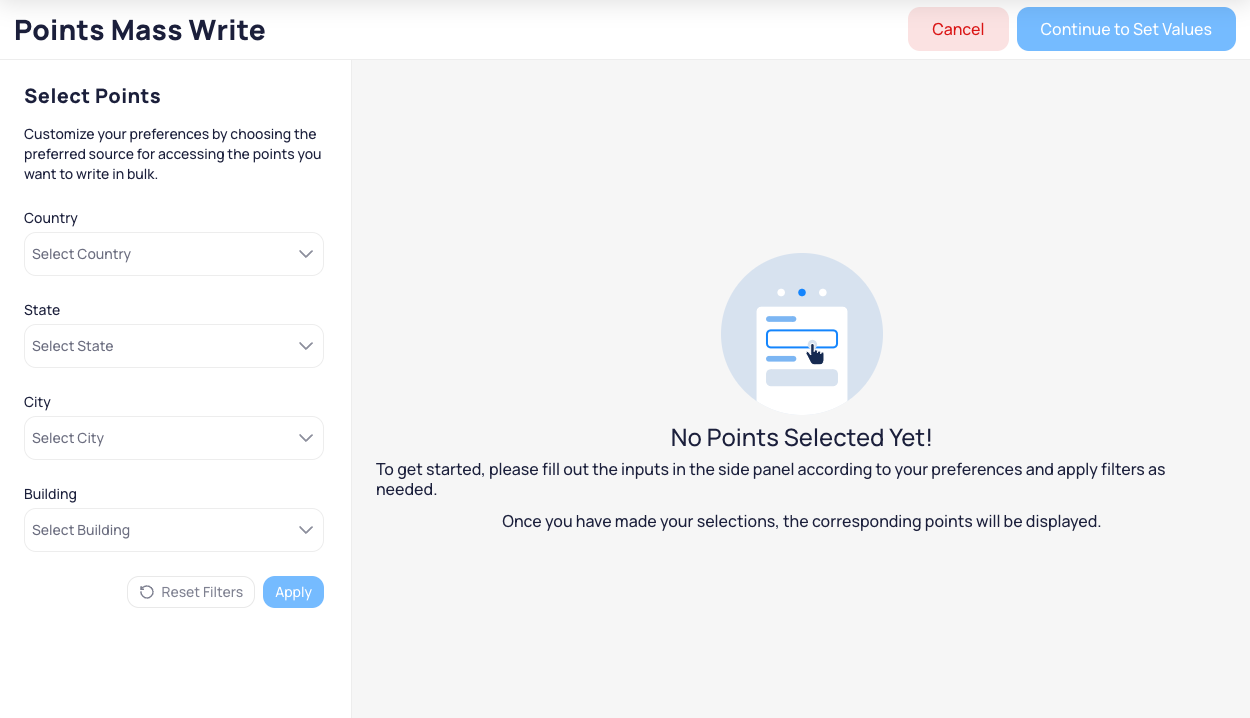
Selecting sites (buildings)
To see the points, you should use the filters on the left panel first to pick a site or multiple sites:
You can filter sites by:
Country
State
City
Building
Once you pick the site(s) click Apply
There is no limit to how many sites you can pick.

Selecting points
Only writable points (setpoints and commands) are shown on the list.
Use the Filters button at the top right to filter points based on:
Point type
Canonical Type (Device Ontology type)
Area
Point Ontology field
Data source type
Selecting points
Filtered points appear in a table where you can select/deselect them.
All points are selected by default. Deselect points you don’t want to write.
Deselect all works only for the points shown on the current page (100 points by default).
You can select multiple point types and kinds simultaneously.
Once you confirm that the desired points are selected, -> click Continue to Set Values
Please note that the points can’t be removed from the list on later steps of the process. Ensure that only desired points are selected.
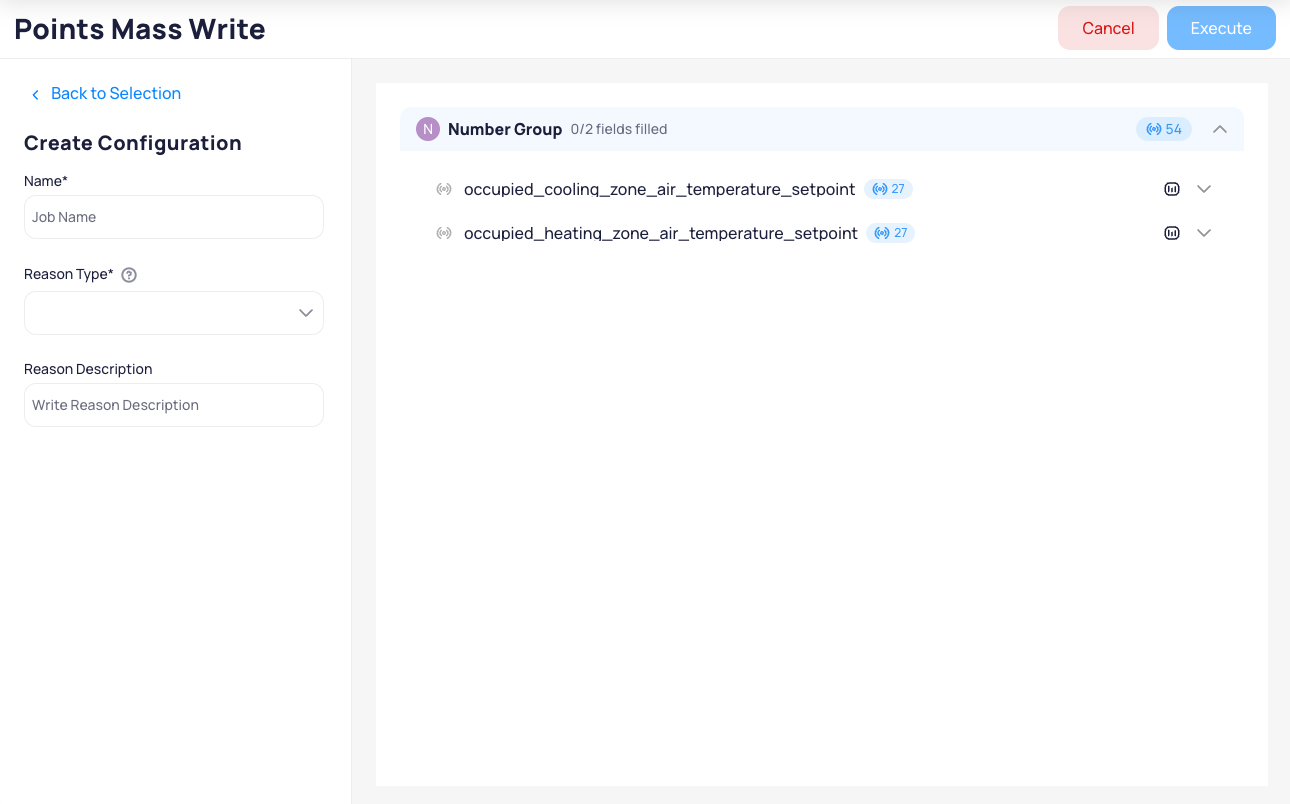
Setting Values
Configuring the Job
Provide a Job name, reason, and description.
This information is needed because here we will create a “Job” for tracking progress and reviewing it later.
Grouped Points
To allow a faster workflow, we will show points as grouped based on: the ontology field, unit, and the values or facets they accept. We will either show one group or multiple depending on the list of points you have selected. You will set values for the group not for individual points.
Click the blue counts to see individual points within a group.
Setting Values
Click on the group name or expand icon to set the values for the group
Set the following for each point group:
Priority: Override, Auto, Set, Release
Value
Duration
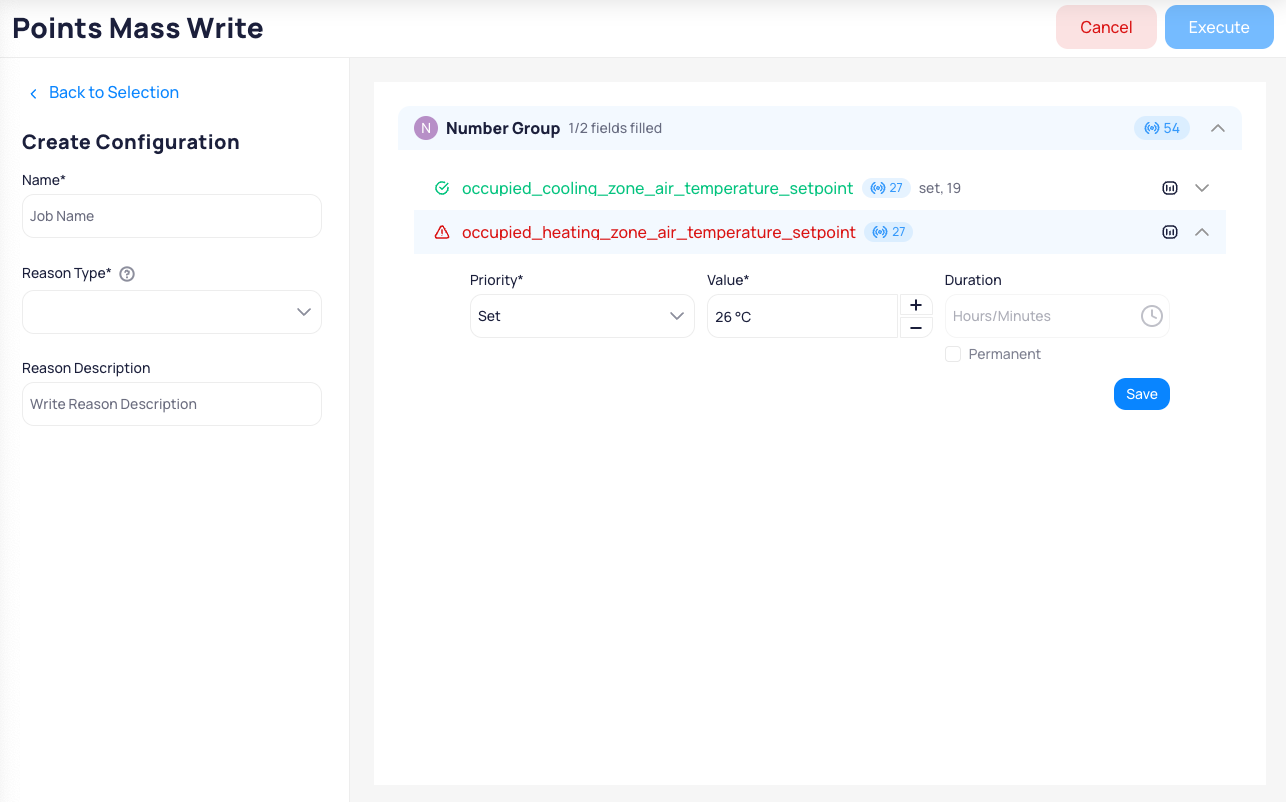
Saving and Executing
The Save button is required for each group before execution.
Color highlights indicate any missing information.
After saving all groups, click "Execute" to start writing the points.
After clicking Execute, we will start the process of writing all those points.
You will be navigated to the “Job” details page where you can see the progress.
Job Tracking and Details

Job Details Page
On this page you will see the progress of the mass write process.
Job details shown on the left panel include:
Creator and creation time
Number of points processed
Success and failure counts
The right section shows you the same groups and their success and failure rates.
Click on the blue counts to see the actual points part of the groups.
View point groups and click on the count to see details of successes and failures.
Jobs are listed on the main Mass Write page for future reference.
This “Job” will be part of the main list of the Mass Write page for you to see it later if needed.
Please contact [email protected] for further details or information.
Thank you!
Related Articles
Mass Write Schedules
Introducing Mass Write Schedules The new "Mass Write Schedules" feature allows users to batch edit multiple schedules at once. This feature is particularly useful for making widespread adjustments, such as changing the start or end times across ...Schedules Calendar view
The Schedules Calendar View provides a visual representation of schedules across various timeframes, enhancing visibility and planning. This dynamic view allows users to: Visualize Schedules: Switch between daily, weekly, and monthly views to manage ...Commanding and Controlling Equipment
Command and Control actions allow users to adjust setpoints and variables on equipment to influence their operations. These actions can only be performed on writable points. Users can access command and control functionality by clicking on a point ...Schedules Discovery
Schedules Discovery allows you to explore data sources and select which schedules to import into KODE OS. Navigating and using Schedules discovery There are two main ways to access Schedules Discovery: "Discover Schedules" button: Located in the ...Navigating through Points
To access the Points section, you need to follow the below steps: Choose a site of your choice Go to the “Points” section on your left side A long detailed list of points in that specific site will show up There are two methods to find points of ...