Mass Write
Introducing Mass Write Points
The "Mass Write Points" feature enhances building management by allowing users to write multiple points simultaneously across a building or an entire portfolio.

Peak demand management, such as reducing temperatures by 0.5 degrees
Releasing overrides so devices return to schedule and shut down during nighttime to save energy
Seasonal temperature adjustments to maintain optimal climate control
Scheduled maintenance, including temporarily disabling specific devices or systems
Emergency response, where multiple devices need to be adjusted simultaneously
Building performance optimization, through bulk changes based on occupancy patterns and usage data
Comparison to Single Point Control
Without the Mass Write Points feature, users would need to select and adjust each point individually. This can be time-consuming and inefficient, especially in large buildings with many devices. It also increases the risk of errors, inconsistencies, and operational delays.
The Mass Write Points feature streamlines this process by enabling bulk modifications, which:
Reduces the time required to apply changes
Minimizes the risk of manual errors
Ensures consistent settings across multiple points
Improves overall operational efficiency and response times
How to enable access
Mass Write Points should be activated on KODE OS roles in order for a users to view this.
1. Go to Launchpad -> Apps -> KODE OS -> Roles -> Pick your role or any role that you want to enable it to -> Edit
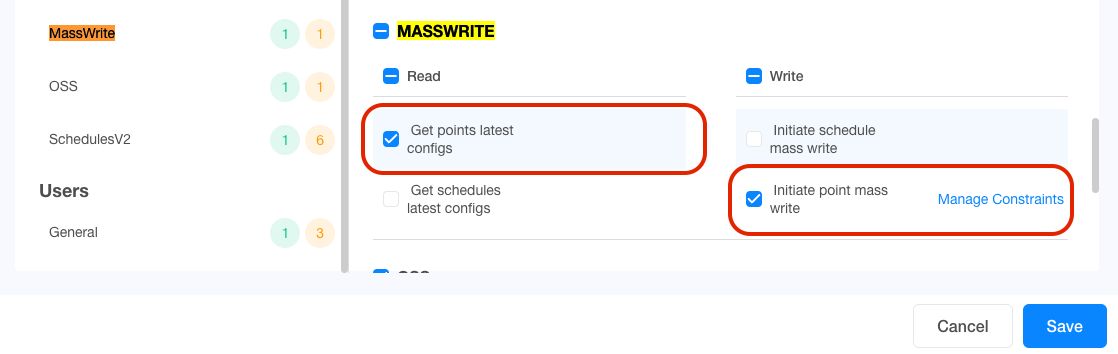
2. Check these two permissions shown on the screenshot above
Get points latest configs (this will enable the module)
Initiate points mass write (this will allow the users to initiate a mass points write)
3. Click Save.
The Mass Write Module will show up in the Portfolio view for that organization to the users that have that role.

Warning: Only Launchpad administrators can update role permissions. If you do not have admin access, submit a support ticket to request the change.
Accessing Mass Write
The Mass Write feature is accessible from the portfolio level view of the KODE OS app:
Mass Write Points navigation and using
On the portfolio view page, you will see Mass Write divided into Schedules and Points
Navigate to the Points tab
On the portfolio view page, you will see Mass Write divided into Schedules and Points
Navigate to the Points tab
Using Mass Write Points
To start the process of writing multiple points, -> click on the “Write Points” button and you will be navigated to this page:
Selecting Sites (buildings) and Points
Navigate to the Points tab under Mass Write.
Click Write Points.
Use the filters on the left panel to pick a site or multiple sites (Country, State, City, Building). Click Apply.
There is no limit to how many sites you can pick.
Filter points based on Point type, Canonical Type, Area, Point Ontology field, or Data source type.
Select or deselect the desired points. Deselect all works only for the points shown on the current page (100 points by default).
You can toggle between "List" and "Grouped" view using the buttons in the upper right.
Click Continue to Set Values. Ensure only desired points are selected, as they cannot be removed in later steps.
Note that the points can’t be removed from the list on later steps of the process, so please ensure that only desired points are selected.
Setting Values
Configuring the Job
Provide a Job name, reason, and description for tracking purposes.
Grouped Points
To allow a faster workflow, we will show points as grouped based on: the ontology field, unit, and the values or facets they accept.
We will either show one group or multiple depending on the list of points you have selected.
You will set values for the group not for individual points.
Click the blue counts to see individual points within a group:
Setting Values and understanding Priority Levels
Click on the group name or expand icon to set the values for the group
Set the following for each point group:
Priority: Override, Auto, Set, Release
Value
Duration
Click on the group name or expand icon to set the values for the group
Set the following for each point group:
Priority: Override, Auto, Set, Release
Value
Duration
Note: Priority levels range from 1–16, where 1 is the highest priority and is reserved for manual life safety commands.
Saving and Executing
After saving all groups, click "Execute" to start writing the points. You will be navigated to the “Job” details page where you can see the progress.
Job Tracking and Details
Job Details Page
On this page you will see the progress of the mass write process.
Job details are now shown in a horizontal banner at the top, which includes:
Status (Overall progress along with total success and failure counts)
Time (Execution date and time)
Reason (The justification provided during setup)
User (Creator of the job)
Below the job details banner is the full-width Point Groups table. This table displays the configured Priority, Value, Duration, and individual Status (success/failure rates) for each group.
Click on the blue counts next to the group name, or click "View All Points" at the top right of the table, to see the actual points part of the groups. View point groups and click on the count to see details of successes and failures.
Managing Existing Jobs
All completed and in-progress jobs remain available on the main Mass Write page for future reference.
Export Job Results
Use the Export button on the Job Details page to download the job results. You can:
Specify a custom file name
Choose which columns to include in the export
Job Actions
Click the three-dot menu in the top-right corner of the Job Details page to access additional actions:
Edit Details – Update the job name or description.
Re-run Job – Create a new job using the same point selection as the original job.
Retry Failed Points – Create a new job using only the points that failed during the original execution.
Re-running or Retrying a Job
Edit Details – Update the job name or description.
Re-run Job – Create a new job using the same point selection as the original job.
Retry Failed Points – Create a new job using only the points that failed during the original execution.
When you select Re-run Job or Retry Failed Points:
You will be redirected to the Select Points page.
A blue banner in the filter panel will indicate the active process (for example, Re-running job: "Override DAT").
The original points or point groups will be pre-selected automatically.
You can modify the selection if needed by adding or removing points or groups.
Click Continue to Set Values to configure the command types and values for the new job.
Review your configuration and execute the job as normal.
Mass Write Schedules
Introducing Mass Write Schedules
The new "Mass Write Schedules" feature allows users to batch edit multiple schedules at once. This feature is particularly useful for making widespread adjustments, such as changing the start or end times across several schedules due to seasonal shifts or changes in tenant contracts.
Use Cases
Seasonal Time Adjustments:
Change the start or end times of multiple schedules to accommodate longer or shorter daylight hours during different seasons.
Contract Changes:
Update schedules based on new agreements with tenants, such as adjusting operational hours for different lease terms.
Holiday Management:
Add special events to multiple schedules to turn off devices during holidays when buildings are not occupied.
Building-Wide or Portfolio-Wide Changes:
Implement changes to all schedules within a building or across an entire portfolio, ensuring consistency and saving time.
Emergency Adjustments:
Quickly modify schedules in response to unexpected events or emergencies, such as a building-wide shutdown.
Comparison to Single Schedule Control
Without the Mass Write Schedules feature, each schedule must be individually edited, which can be highly time-consuming and prone to errors, especially in large buildings or portfolios with many schedules.
Benefits of Mass Write Schedules
Efficiency:
Significantly reduce the time required to make changes by editing multiple schedules at once.
Consistency:
Ensure uniform changes across all schedules, reducing the risk of discrepancies and manual errors.
Scalability:
Easily manage and update schedules across large buildings or entire portfolios without the need for repetitive, individual adjustments.
Flexibility:
Quickly respond to changes in occupancy patterns, tenant needs, or unexpected events with minimal effort.
By using the Mass Write Schedules feature, building operators can streamline their schedule management process,
ensuring that all devices operate efficiently and in accordance with the latest requirements and conditions.
Accessing Mass Write Schedules and using
The Mass Write Schedules feature is accessible from the portfolio level view of the KODE OS app.
Navigating to Mass Write Schedules and Using Mass Write
To access this feature, open the portfolio view page and navigate to the Mass Write module. From there, the Schedules tab will be the landing page.
To start the process of writing multiple schedules, click on the “Write Schedules” button and you will be navigated to this page:
Selecting sites (buildings)
To view schedules, use the filters in the left panel to select one or more sites. You can refine your selection by country, state, city, building, and other identifiers. There is no limit to how many sites you can choose.
Once selected, click Apply.
You can also switch between Grouped and List views using the tabs in the top-right corner of the list.
Selecting schedules
All Weekly Schedules are displayed based on your selected filters. You can further refine the list using the Filters right above the list, where schedules can be narrowed down by data source type, schedule type, and current status.
Once your selection is confirmed, click Continue to Set Values.
Please note that schedules cannot be removed in later steps, so make sure only the required schedules are selected before proceeding.
Creating the Temporary Schedule
Configuring the Job
To create a temporary schedule, configure the job on the Set Values screen:
1. Enter a name for the job.
2. Schedule Type: Select what to update:
Weekly – Only weekly schedule
Special Events – Only special events
Both – Updates both (enables both tabs)
If you pick Both, make sure to add both weekly time-slots and special events, otherwise you can’t continue further.
3. Update Type: Choose how changes are applied:
Append – Adds the new updates (weekly schedule or special events) to the existing configuration. Nothing is removed.
Existing special events remain unchanged and new ones are added alongside them
Weekly time slots are added on top of existing ones without deleting current entries
Replace – Fully replaces the selected part of the schedule (Weekly, Special Events, or both, depending on your selection).
All existing data in the selected category is overwritten
Use this option only if you want to completely reset and replace the current schedule with the new configuration
4. Priority: Select a priority level (required to run the job).
Configuring the Weekly Schedule Type
In this step, you define the temporary schedule that will be applied to the selected schedules.
Here, you will need to add time slots (e.g. 08:00–16:00) and assign values for those periods (e.g. True/False).
The behavior depends on the selected Update Type:
Append – New time slots are added on top of the existing schedule without removing any current entries.
Replace – All existing time slots in the selected schedules are removed and replaced with the ones defined in this step.
Any days left blank will be removed from the schedule.
To add an event, click on the desired day in the schedule. An action menu will appear where you can select Create Event, then define the required time slot.
Once you have configured the weekly time slots and facets, click Save to store your changes. After saving, click Execute to run the job and apply the temporary schedule to the selected points.
Configuring the Special Events Schedule Type
Adding special events during a mass update follows the same general flow as configuring individual schedules within KODE.
To begin, create a special event by clicking the + New Event button or by selecting an empty area in the time slot grid and choosing Create Event / All Day Event from the dropdown.
In the Add Event modal, define the event duration by setting a Start Time and End Time (e.g. 08:00–16:00), or enable All Day Event if applicable. Click Save to create the event.
Once created, the new time slot will appear in blue on the grid with the label “No Facet Values”, indicating that values still need to be assigned.
Once you assign the facet Value, if needed, you can enable Apply to all at the bottom of the left panel to apply the same value across all time slots.
Click Save - the time slot will turn green and display the assigned value, and the event status will update to Ready.
Click Execute to complete the mass update. The system will process the updates and redirect you to the Job Details page, where you can monitor progress and confirm when the job status changes to Completed.
NOTE: If both Weekly and Special Events schedules are selected, the Execute button will remain disabled until all time slots for both Weekly and Special Events have assigned values.Before finalizing, ensure only the intended schedules are selected, as changes cannot be reverted after execution.
Job Details Page
On the Job Details page, you can monitor the progress and review the results of your mass write process.
The interface provides a clear breakdown of the job execution:
The Top Summary Bar displays the overall job status, including counts of successful and failed schedules, the execution time, the schedule type, and the update type.
The Groups Table lists all schedule groups and shows the success or failure status for each group.
You can click the blue schedule count link (e.g. “1 Schedules”) next to a group name to view the schedules contained within that group.
Exporting Job Data
To export the results of a mass write job, click the Export button in the top-right corner.
From the export menu, you can:
Enter a custom file name
Select specific columns to include in the export, or export all available data (e.g. Building ID, Building Name, Data Source Name, Type, and day-specific values)
Additional Job Actions
Next to the Export button, the three-dot menu (⋮) provides additional actions:
Edit Details – Update the job name.
Re-run Job – Run the job again using the original schedules, with the option to adjust configuration before execution.
Edit Details – Update the job name.
Re-run Job – Run the job again using the original schedules, with the option to adjust configuration before execution.
Retry Failed Schedules – Re-run the job only for schedules that failed during the initial execution, with editable settings available before running.
All executed jobs are saved and available on the main Mass Write page for future reference.
Retry Failed Schedules – Re-run the job only for schedules that failed during the initial execution, with editable settings available before running.
Related Articles
Mass Write Schedules with Sheet: Update Schedules in Bulk
Overview The Mass Write Schedules with Sheet feature allows users to update schedules in bulk through a spreadsheet upload. Unlike the standard Mass Write, where a single schedule is applied to all selected schedules, this functionality enables: ...Points Module
To access the Points Module, go to your site and then select the "Points" module from the left menu. Within this module, you’ll find three options: Point Statuses Point List Batch Update Points Point Statuses Section The Points Status section ...Schedules
Schedules Options and Features The schedules feature allows you to manage and modify functioning schedules of various devices that are connected in a building. View, modify, delete numeric, Boolean, string or Enum schedules as required. Create ...Schedules
Introduction Schedules are the programming logic that commands major mechanical equipment to enter an occupied or unoccupied mode. The Schedules feature allows you to manage and modify the functioning schedules of various devices that are connected ...Duplicating (Copying) Points Between Devices
This article explains how to duplicate (copy) points between devices. Duplicating points allows the same point (for example, a setpoint or sensor) to be shared across multiple devices. Common use cases include shared sensors, shared setpoints, or ...