Enable Single Sign-On
KODE Labs platforms utilize industry standard procedures for active SSO integration. This allows corporations to integrate their existing authentication platforms in their KODE Labs organization in order to have SSO functionality.
If your KODE Labs workspace has SSO enabled, users will be able to log-in to the organization through your corporate identity provider credentials, instead of using KODE Labs account credentials. This will eliminate the need to login through normal process and enable secure access to your apps.
Available Sign-in Method Integration Functionalities
KODE Labs allows IdP integration via the following methods:
OpenID Connect Authentication (OIDC)
Security Assertion Markup Language (SAML)
Steps to enable SSO
In order to enable SSO for your organization, you would need the following:
Access to your identity provider’s configuration settings
Admin Role in your KODE Labs workspace
Set up SSO in Launchpad
To set up SSO for your organization with any IdP, follow these steps:
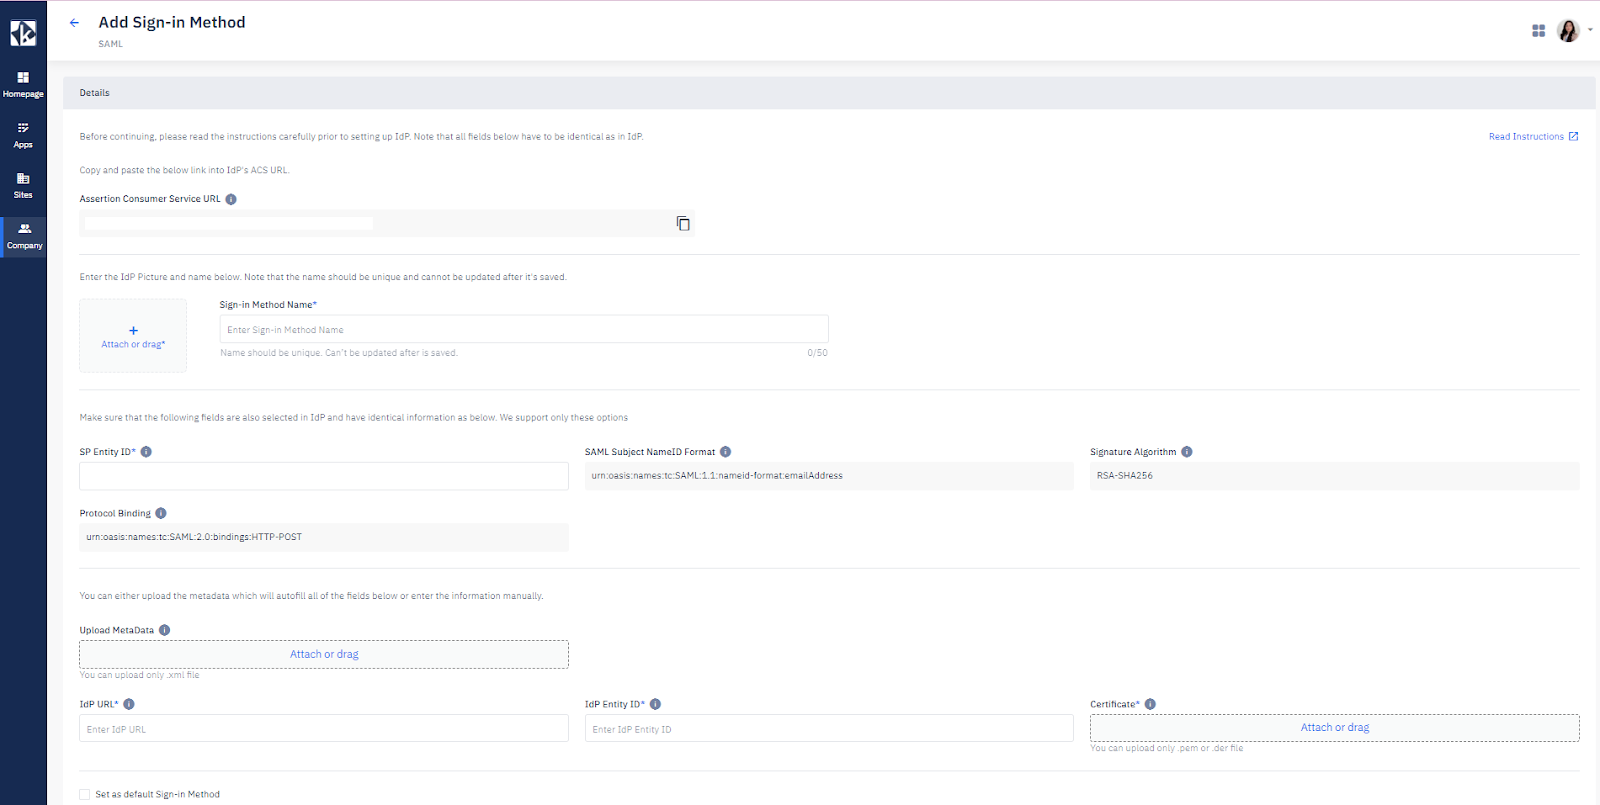
Login to KODE Launchpad > go to the Sign-in Methods under Company section, click + Add Sign-in Method > select an existing Sign-in Method or add a custom one (OIDC or SAML).

Based on the IdP you choose to add there are different required fields.
In the Sign-in Method Name field Enter an SSO name of your choice.
Note: Name should be unique. Can’t be updated after it is saved.
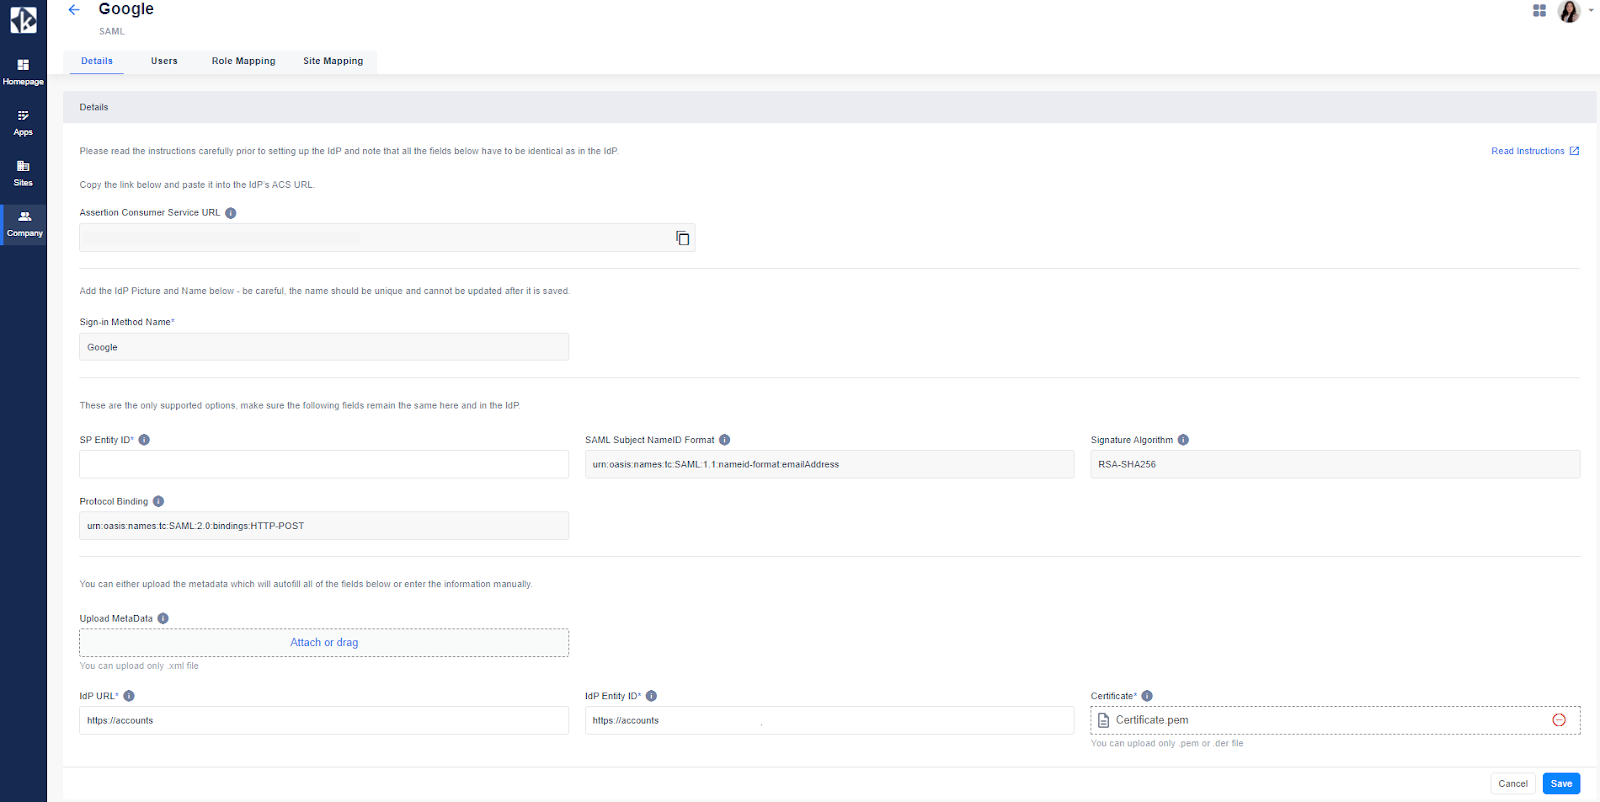
On the “Add Sign-in Method” page you will see the Assertion Consumer Service URL generated and other information such as SP Entity ID, Subject NameID Format, Protocol Binding, Signature Algorithm and Attributes Configuration.

Setup KODE Labs app in your IdP
Login to your IdP account.
Create a new application (or connector in some IdPs).
In your IdP account settings, you need to provide the SSO Configuration details that you received from the Sign-in method in Launchpad (Set up SSO in Launchpad - above section).
In your IdP, provide the following details:
In the Single Sign-on URL field, provide the Assertion Consumer Service URL that was generated for your organization in KODE Launchpad.
Use the Entity ID (generated in Launchpad) in your IdP in Audience URI, SP Entity ID, SAML Issuer ID, or fields similar to these.
In the NameID Format, select or enter EmailAddress. This defines the parameter that your IdP should use to identify KODE Labs users.
In the Signature Algorithm field select RSA-SHA256.
For Protocol Binding field select HTTP-POST.
Under Attribute Mapping add the following attributes. If you want to map IdP groups/roles to KODE Labs roles, you need to add a new attribute called “roles” under Attribute Mapping, and return your IdP users’ roles or groups to KODE Labs - Launchpad.
For SAML IdP:
firstName attribute
lastName attribute
For OIDC IdP:
firstName claim
lastName claim
Return the below information to KODE Labs:
roles claim for OIDC IdP
roles attribute for SAML IdP
Once you enter all the details and save your settings in IdP, you should receive IdP Single Sign-On URL and x509Certificate or MetaData file.

Configure IdP Details in KODE Launchpad
Go back to “Add Sign-in Method” page in Launchpad.
At Upload MetaData field upload the MetaData file or:
In the IdP URL field, paste the IdP Single Sign-On URL that you received from IdP (Step 6 - Setup KODE Labs app in your IdP).
In the Certificate field, upload the x509Certificate that you received from your IdP.
Fill in the Attributes Configuration.
Click Save to save IdP configuration.
Security Assertion Markup Language (SAML)
OpenID Connect Authentication (OIDC)
KODE OS User Role Mapping
With active directory integration, while client user authentication will occur on the active directory platform, KODE Labs also allows client user permissions to automatically be passed through as part of the integration. To achieve the above, some configurations are to be made as part of the integration, parameters for which can be found in table below:
Configuring Role Mapping
Before you add new role mappings, you must add the “roles” attributes in the “Attribute Mappings” section in your IdP, and then return the information in KODE Labs.

You can manage your role mappings by adding the ability to Create, Update and Assign users to buildings on login.
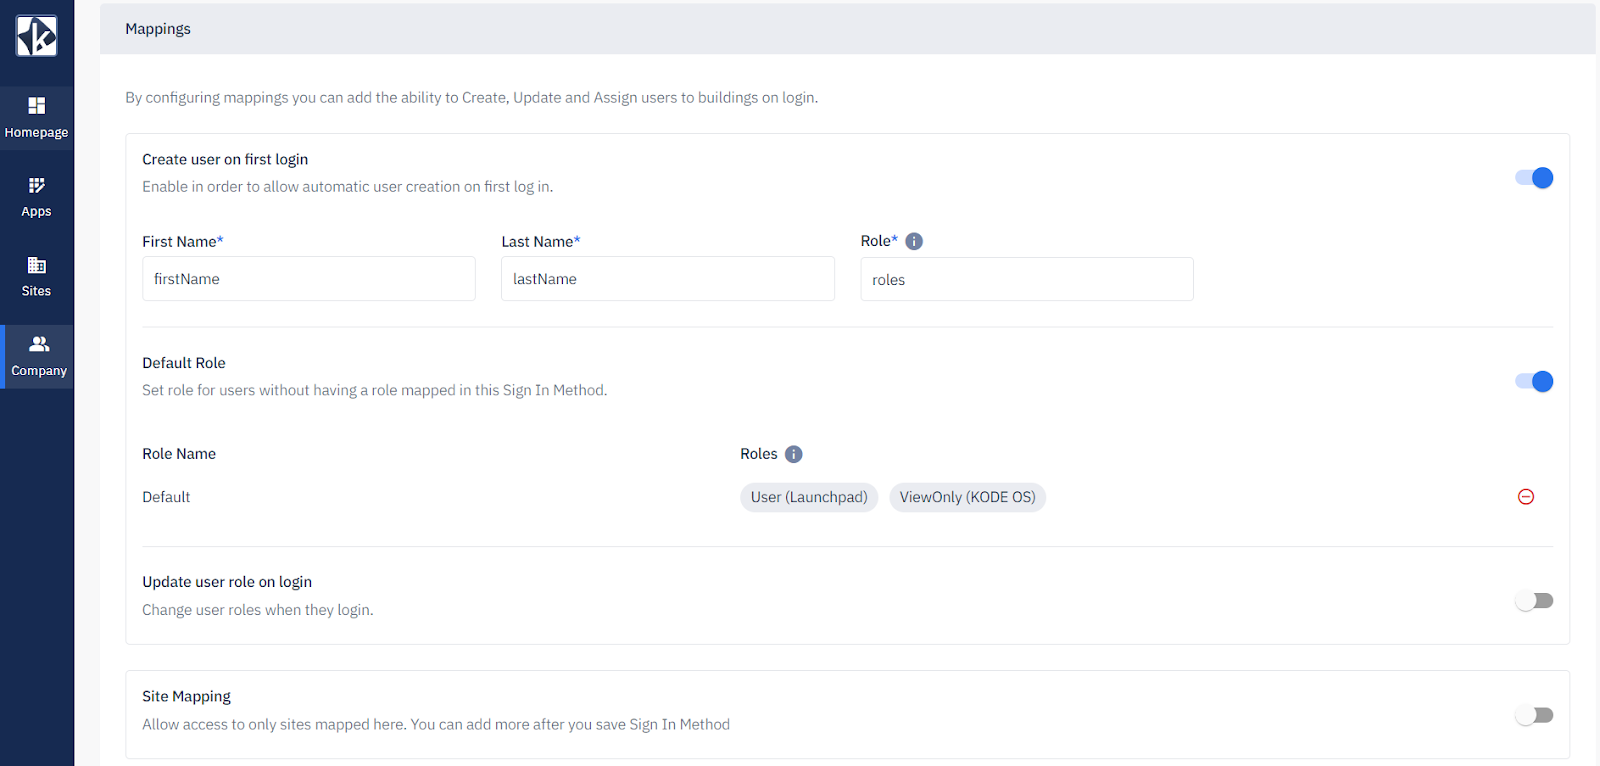
Create user on first login
To allow automatic user creation on first login enable the toggle button
Fill in the First Name attribute, Last Name attribute and Roles attribute
Default Role
Enable the toggle button to set the role for users without having a role mapped in this Sign in Method. Other roles can be added after you save the Sign In Method
Click on + Assign Role(s) button
Choose the Launchpad Role (required)
Choose myMSI and KODE OS role (optional)
Click on Assign Role(s)

Update user role on login
Enable the toggle button to change user roles when they login
This means that the existing roles assigned to the users will be overridden by the roles assigned to IdP groups
Site Mapping
Enable the toggle button to allow access to the site's map. You can add more after you save the Sign In Method
Technical Support & Experience
KODE Labs works with the client to configure the active directory integration as is needed for a seamless integration and experience for end users. KODE Labs has already integrated with the following commonly found active directory / identity management platforms:
CyberArk
Azure Active Directory (Azure AD)
Okta
Auth0
JumpCloud
To edit SSO configuration:
Login to KODE Launchpad
Go to the Sign-in Methods under Company section
Select the SSO application that you want to modify from the list of applications listed
The Sign-in Method page appears.
Click the edit icon at the top right of the SSO details secion.
The Edit Single Sign-On page appears.
Update the configuration as needed.
Edit the attribute fields (for example SP Enity ID, IdP URL or IdP Entity ID)
Update and Upload
the metadata which will autofill all of the required fields or enter the information manually.
the signing certificate that is used to encrypt the SAML assertion
Click Save to save the changes. If you want to discard your changes, click Cancel instead.
Related Articles
Add a new IAM method
KODE OS allows you to add a number of Identity and Access Management (IAM) sign-in methods. To add these methods follow the below steps: Click on the “Company” icon in the left hand navigation bar in Launchpad. This will open up your company’s ...Set up Two-Factor Authentication - SMS Method
The purpose of any Two-Factor Authentication functionality is to increase the security of one or more user accounts by enabling a second method of authentication, in addition to the password. To enable your Two-Factor Authentication functionality, ...Log in through Single Sign-On (SSO)
KODE Labs supports all implementation of identity and access management (IAM) tools, in order to make it easier for you to login into your workspace and start exploring the platform. Whether your organization uses Microsoft Azure AD, Google IAM, ...Set up Two-Factor Authentication - App Method
The purpose of any Two-Factor Authentication functionality is to increase the security of one or more user accounts by enabling a second method of authentication, in addition to the password. To enable your Two-Factor Authentication functionality via ...Product enablement for buildings
Introducing Product Enablement by Site This feature empowers Channel Partners with control, flexibility, and visibility over product access. With this feature, managing product deployments becomes more efficient and scalable. Instead of applying ...